Being the most popular gaming platform of PC, the “Access is denied” message is surely annoying. Whether you have bought yourself a new AAA title or something out of your favorites, this error message can frustrate you the same. So, we have taken this opportunity to discuss all the resolutions to troubleshoot this issue in the Steam client on Windows 11, 10, or any other version of Windows.
Fix 1 – Restart the Steam client as an administrator
Launching the Steam application with administrative rights should help you fix the problem.
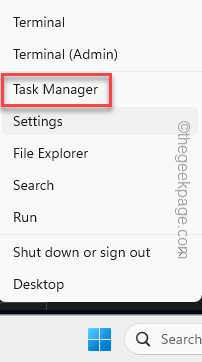
Step 1 – At first, just right-tap the Windows button in the taskbar.
Step 2 – Next, tap “Task Manager“.
Step 3 – Find the “Steam” application in there.
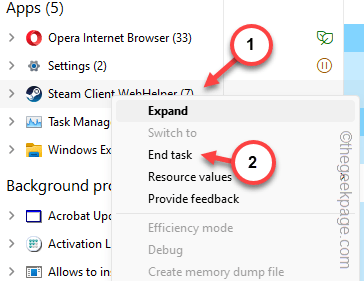
Step 4 – Once you have found that, right-click the “Steam” or “Steam Client Web Helper” application and tap “End task“.
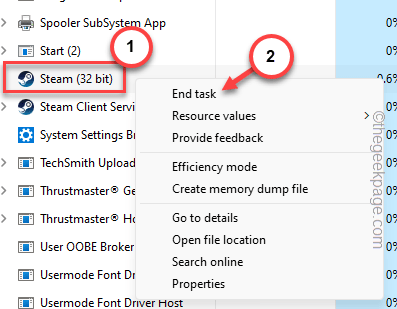
Step 5 – Now, if you go down through the same page, you will find several Steam application threads running.
Step 6 – Terminate all the Steam applications one by one.
Step 7 – After this, initiate a search for “Steam” from the search box.
Step 8 – Right-click the “Steam” app and tap “Open file location“.
Step 9 – Later, right-tap the “Steam” shortcut file and tap “Open file location” one more to open the Steam root folder.
Step 10 – You will see the “Steam” application, highlighted already.
Step 11 – Right-click that file and click “Properties“.
Step 12 – Switch to the “Compatibility” tab, on the Steam Properties page.
Step 13 – Just tick this “Run as administrator” check box.
Step 14 – After this, tap the “Apply” and the “OK” buttons after this.
After this, run the Steam application once more. This time, you will be able to access the Steam client without anymore issues.
Fix 2 – Log out of your Steam account and re-login
Log out of the Steam account and log in again.
Step 1 – Open the Steam client on your system.
Step 2 – Next, click the account icon there and tap “Sign out of account” to sign out of the Steam account.
Step 3 – A confirmation prompt should appear in the Steam account. Tap “Confirm” to sign out from the Steam account.
Step 4 – It automatically loads up the default Steam client version. Tap “Log in” to start the login process.
Step 5 – Use your Steam credentials and complete the login process.
If your Steam account has 2-FA security or Steam Guard, use the code received on the Steam app on your phone to complete the login process.
After this, check whether you can access your Steam library or not.
Fix 3 – Clear the browser cache
If you are having trouble logging in Steam website, clearing the browser cache may help.
[NOTE – The steps are for the Google Chrome users.]
Step 1 – To do this, go to the browser webpage.
Step 2 – Next, paste this and hit Enter.
Step 3 – Simply paste this address. Later, use the Enter key.
chrome://settings/clearBrowserData
Step 4 – Tick all those boxes there.
Step 5 – After this, tap “Clear data“.
After emptying the browser data, go to the Steam website and use the login IDs to log into your Steam account. This time, there won’t be any more issues.
Fix 4 – Is the Steam service down?
Steam, just like other services, does have downtime as well. So, test the Steam service status and proceed accordingly.
Step 1 – If you are a US resident, you can fetch the current Steam status from (It is unofficial).
Step 2 – If you are not, you can use the Downdetector in Steam.
If you see any signs of downtime for Steam, you have to wait for the Steam services to go live once more.
Fix 5 – Change the DNS cache
The DNS cache, contained locally on your device can cause this debacle as well.
Step 1 – You have to use a terminal to do this. So, just input “cmd” in the box.
Step 2 – Under the Best match, right-tap the “Command Prompt” item in the elevated result.
Step 3 – Use these commands to flush the DNS cache on your system.
ipconfig /flushdns
ipconfig /registerdns
ipconfig /release
ipconfig /renew
netsh winsock reset
After running these four commands successfully, quit the terminal.
Just a system restart and all the DNS cache gets flushed completely. The next time you launch the Steam, your access won’t get denied.
Fix 6 – Run an integrity test on the affected game
Is that your access getting denied while launching a particular game on your system?
Step 1 – Instead of launching the game directly, go ahead and open the Steam client.
Step 2 – Next, go straight to the “Library” page.
Step 3 – Identify the game on the left ribbon.
Step 4 – Next, right-tap the game there and click “Properties“.
Step 5 – Inside the game properties, go to the “Installed Files” tab.
Step 6 – On the next tab, tap the “Verify integrity of game files” option.
This option will initiate a verification process on your system that shall scan all the installed game files.
Depending upon the size of the game files, it should be over quickly.
Try to launch the game once more and test it.


