Proxy servers are very useful providing functionality, security, and privacy to the users. But sometimes it can make your life harder slowing internet connectivity, sometimes disconnecting the internet connection. If you are facing any kind of proxy server errors on your computer, follow these fixes and the problem will be solved in no time.
Fix-1 Disable Proxy servers
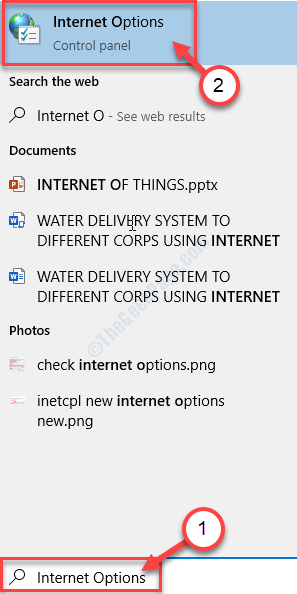
1. Search for the “Internet Options” from the search box.
2. Then, click on the “Internet Options“.

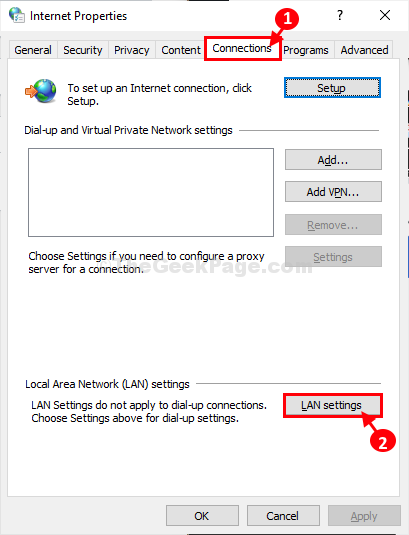
The Internet Properties window will be opened.
3. You have to go to the “Connections” tab.
4. After that, click on the lower portion, click on “LAN settings“.

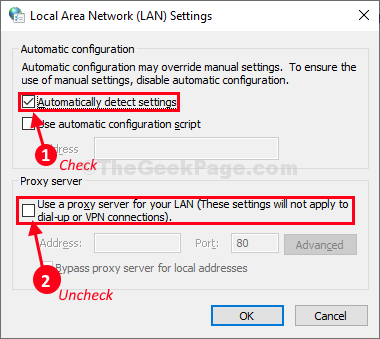
5. In the Local Area Network (LAN) Settings window, check the option “Automatically detect settings“.
6. You need to make sure the option “Use a proxy server for your LAN” is unchecked.

7. Click on “OK” to save the changes on your computer.

Close Internet Properties window. Check if it solves your issue or not.
Fix-2 Reset your internet settings-
If nothing is working out for you, resetting your internet connection settings will surely work out for you.
1. Press Windows key+R to launch Run window.
2. Type below-mentioned command and then click on “OK“.
inetcpl.cpl

The Internet Properties window will be opened.
3. When the Internet Properties window opens, you need to go to the “Advanced” tab
4. After that, what you have to do is click on “Reset” to reset all existing connection settings.

5. In Reset Explorer Settings window, make sure the “Delete personal settings” option is unchecked.
6. Now, click on the “Reset” option will initialize the resetting process.

6. After the completion of the at process, click on “OK” to save the changes.

Try to connect to the internet. Your issue with the proxy server will be fixed.
Fix – Flush the dns via cmd
1 – Type cmd in the Taskbar search box and right click and run as admin.
2 – Now, Run the commands given below one by one and keep hitting enter key
ipconfig /flushdns
netsh int ip reset
netsh winsock reset
Close the window and try again.
Fix-3 Enable auto-detect for Proxy servers
You can set proxy servers to detect the internet settings automatically.
1. At first, Press Windows key+I.
2. Then, click on “Network & Internet” settings.

3. Now, on the left-hand side, click on “Proxy“.
4. On the right-hand side, toggle “Automatically detect settings” to “On“.

Close the Settings window and check if it works.
Fix 4 – Edit Proxy entries in Registry
1 – Open RUN by pressing Windows and R key
2 – Type regedit in it and click OK button
3 – Now, Go to the location shown below
HKEY_CURRENT_USER\Software\Microsoft\Windows\CurrentVersion\Internet Settings
4 – In the right side, Locate and delete ProxyEnable .
Also, if you are able to locate ProxyServer , MigrateProxy or ProxyOverride keys , delete them as well.

Fix-5 Change Network Properties
Changing network properties to obtain an IP address automatically can work out for you.
1. Press Windows Key+R, to launch Run window.
2. Now, type “ncpa.cpl” and hit Enter to access the Network Connections settings.

3. What you need to is to right-click on your network connection and click on the “Properties“.

4. After that, double click on “Internet Protocol Version 4 (TCP/IPv4)“.

5. Check the radio button beside the option “Obtain an IP address automatically“.
5. Then, click on “Obtain DNS server address automatically” to mark it.
7. Finally, click on “OK” to save the changes on your computer.

Now, check it solves the proxy servers issues.
Fix-6 Run Internet Connection Troubleshooter-
1. Type “troubleshoot network” in the Search box on your taskbar.
2. Then, you need to click on the “Troubleshoot network“.

3. Now, on the left side of the Settings window, click on “Internet Connections” to highlight it.
4. Then, click on “Run the troubleshooter“.

4. All you have to do is to follow the on-screen instructions to complete the troubleshooting process.

When the process is complete click on “Close“.
Try to find and connect to the WiFi network.