Windows 10 users are targeted by a number of errors and issues. The latest in the long list of Windows 11 or Windows 10 errors is Task Scheduler is not available. When this error appears, clicking on OK or closing it doesn’t work at all. The error shows up again, and makes the Task Scheduler freeze. If you get stuck in such situation, the best way to close it is through Task Manager. But it will still show again up after some time. Many Windows 10 users are affected by this error. If you are also one of them, there is nothing to worry about anymore. The reason behind this error could be anything from the corrupt registry to corrupted Task Scheduler tree cache. We will try to fix this issue using different methods. Simply perform them one by one, until the issue is fixed.
Fix 1 – Make Changes in Task Conditions
In this method, we will make some changes in the properties of your task. The “task” here can be any task of yours. Follow the steps to perform the method.
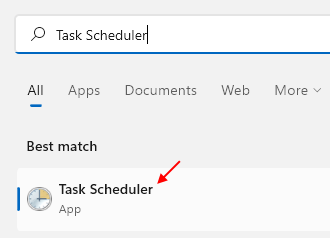
Step 1 – Search Task Scheduler in Search box of Windows PC and click on the search result to open task scheduler.

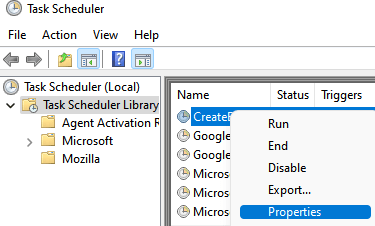
Step 2- In the Task Scheduler window, Locate your task and then simply right-click on your task and click on Properties.

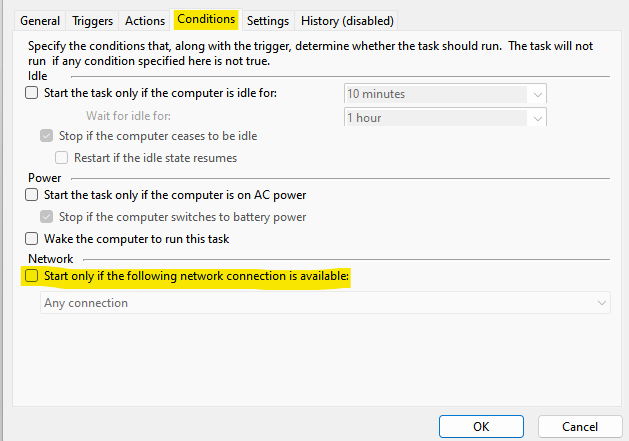
Step 3 – In the Properties window, go to Conditions tab. Here, you need to Uncheck the box beside Start only if the following network connection is available. It will be located under Network. Also, don’t forget to set it to Any connection. After that, click on OK.

Step 4 – Now you need to restart your computer. After the restart, the error will be fixed.
This should fix the error. If you are still facing the same problems using Task Scheduler, follow the next method.
Fix 2 – Editing Registry Values
1 – Search Registry editor in Windows search box.
2 – Now, click on on Registry editor to open it.

3 – Now, browse to the path given below in Registry editor.
HKEY_LOCAL_MACHINE\SYSTEM\CurrentControlSet\Services\TimeBrokerSvc
4 – Now, in the right side double click on Start.
5 – Change the value to 3 and click OK.

6 – Restart PC.
Fix 3 – Change the name of the task being imported
Many users said that, this error happened when they tried to import a tak which has the same name of an already deleted task. They said, this error got fixed when they changed the name of the task being imported. You can also try changing the name of the task being imported to a new one.
Fix 4 – Start Task Scheduler Service Manually
The best method to fix the issue is by starting the Task Scheduler service manually. A number of Windows 10 users have profited from this method. Follow the steps to perform this method.
Step 1 – Search services in windows search box and click on it.

Step 2 – The last step will open Services. In the Services window, look for Task Scheduler service and right-click on it. Select Properties from the menu that opens.

Step 3 – In the Properties window, check the Startup type and make sure it is selected as Automatic. Also, check Service Status. It should be Running. If it is not Running, then click on the Start button. After that, click on OK.

Step 4. Now restart your computer.
This should fix the issue. If you are still getting the same error, try the next method.
Fix 5 – Fix the Registry
In the second method, we will try to solve the issue by fixing the Registry. Many users have fixed the error using this method. Follow the steps to perform this method.
Step 1. Open Run. To open Run, right-click on the Start menu button and select Run.

Step 2. The last step will open the Run window. Now, we have to open Registry Editor. To do that, type regedit in Run window and click on OK. When asked for confirmation, click on Yes.

Step 3. The last step will open Registry Editor. Here, you have to follow the path mentioned below on the left side of Registry Editor.
HKEY_LOCAL_MACHINE\SYSTEM\CurrentControlSet\Services\Schedule

Step 4. After selecting Schedule on the left side, look for Start key on the right side of the Registry Editor.

Step 5. If you were unable to find Start key, simply right-click on the right side of Registry Editor, go to New and select DWORD (32-bit) Value.

Step 6. The last step will create a New Value#1 key. Now, rename the New Value#1 to Start and then open Modify by double clicking on it. Here, under Value data type 2 and click on OK.

Step 7. After the last step, close the Registry Editor. Now you just need to restart your computer.
After restarting the computer, check if this has fixed the issue or not. If the problem still persists, perform the next method.
Fix 6 – Find and Delete the Corrupted Task Scheduler Tree Cache
In this method, we will find the corrupted Task Scheduler tree cache and delete it. Follow the steps closely to perform this method.
Step 1. Open Run. To open Run, right-click on the Start menu button and select Run.

Step 2. The last step will open the Run window. Now, we have to open Registry Editor. To do that, type regedit in Run window and click on OK. When asked for confirmation, click on Yes.

Step 3. The last step will open Registry Editor. Here, you have to follow the path mentioned below on the left side of Registry Editor.
HKEY_LOCAL_MACHINE\SOFTWARE \Microsoft\Windows NT\CurrentVersion\Schedule\TaskCache\Tree

Step 4. On the left side of the Registry Editor, right-click on Tree and click on Rename. Rename it to Tree.old.

Note: -If you can not edit Tree , Read this article to get full permission
Step 5. Now, open the Task Scheduler and check if this has solved the problem. If you are no more getting the error message, this means the Tree is corrupted. Now we have to find out which task is corrupted in it.
Step 6. First, you need to rename Tree.old back to Tree. To do that, right-click on Tree.old and select Rename. Now rename it to Tree.

Step 7. Expand Tree. Here you will see a number of scheduled tasks. Now, you have to rename the first task and add “.old” at the end of its name (very much like Step 4). For example, if the first task is KMSAuto, then right-click on it and select Rename. Now rename it to KMSAuto.old.

Step 8. After performing the last step, open Task Scheduler and check if you are still getting the error. If you are still getting the error, then remove the “.old” from the task you renamed in the last step.
Step 9. Now, perform the Step 7 with the next task and then repeat Step 8. Keep doing this with every task, until the error message stops showing in the Task Scheduler.
And when you don’t get the error on Task Scheduler, this means the last task you renamed is the corrupted one. Now, simply delete the corrupted task by right-clicking on it and selecting Delete.

This should fix the problem.
We hope you were able to fix the error using our methods. If you solved the problem using some other method, or if you have any questions related to this issue, please mention them below in comments.