When you are trying to send some emails from MS Outlook, you might have come across an error that says :
Error 0x80040115 : We can’t complete this because we can’t contact the server right now
This is one of the common errors that users encounter in Outlook. This error occurs when,
- There is some issue with the Internet connection. Either there is no internet connection or the connection is really poor.
- There is Licensing issue/service glitch with the Exchange server.
- Outlook .pst or .ost file is corrupted.
- Outlook profile is corrupted.
- There s an issue with Add-ins in Outlook
In this article, let us go through the various different ways to fix this error in the system. Make sure the fixes are tried in the same order as listed below.
Fix 1: Make sure the Internet connection is up and running
First things first, make sure that the internet connection in the system is up and running. If you see some issues with your internet, then refer to this link
Connected to WiFi But No Internet Connection? Here’s How to Fix it
Once, the internet connection is working, try if the issue still persists. If it does, then try the next fix listed.
Fix 2: Flush DNS from your System
The majority of the users reported that this fix solved their issue.
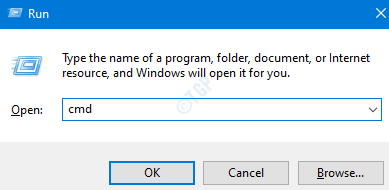
1. Open the Run Dialog. Press the shortcut key Windows+r
2. Enter the command cmd and hit Ctrl+Shift+Enter to open the command prompt with admin rights

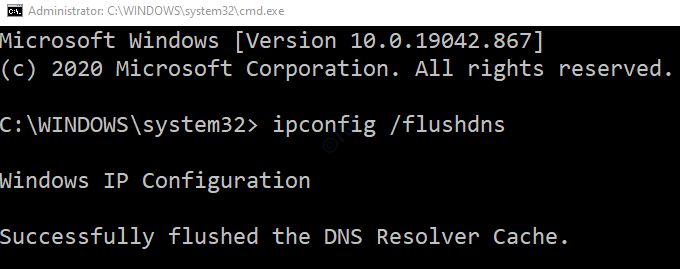
3. In the command prompt window that opens, type the below command and hit Enter
ipconfig /flushdns

Now, open Outlook and check if the error resolved. In case it did not, try the next fix.
Fix 3: Open Outlook in SafeMode
Sometimes ceratin Add-Ins might cause this issue. In order to Troubleshoot that Run Outlook without any Add-Ins
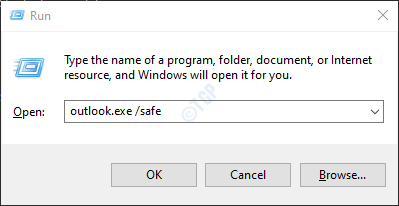
1. Open the Run Dialog pressing the keys Windows+r from the keyboard simultaneously.
2. In the Run dialog that opens, type outlook.exe /safe, and press OK

3. Now, the Outlook opens in safe mode where all the Add-Ins have been disabled.
4. If the error is not shown now, it means that this error is caused due to some Add-In. Disable the Add-Ins one after the other and check which Add-in caused the issue.
5. Open MS Outlook in your system
6. Click on the File menu option as shown below

7.In the window that shows up, from the left bottom corner, select Options

8. In the Outlook Options window, choose Add-ins from the left-hand side menu
9. All the add-ins will be displayed. Choose COM Add-ins from the drop-down located at the bottom of the window and click on the Go button

10. Untick all the plugins and click on OK

11. Now, enable one add-in at a time and check which add-in caused the issue.
12. Once, the trouble-causing add-in is identified take necessary action.
If this fix doesn’t help and the issue still persists, try the next fix.
Fix 4: Add the Exchange services to the Windows Firewall
By default, the Exchange service is allowed in windows Firewall as it is from a known application. However, there are chances that the program gets removed accidentally. To re-add it back, follow the below steps.
1. Open the Run Dialog with the keys Windows + R
2. Type control firewall.cpl, and press Enter

3. Click on Allow an app or feature through Windows Defender Firewall, from the left-hand side menu

4. In the Allowed apps window, click on Change Settings. You must be logged in as an Administrator to do this change
5. Click on Allow another app button at the bottom-right corner as shown below

6. Add an app window opens, click on Browse

7. Now, add Exchange
8. Restart the system and check if the error has resolved.
Check if this fixes the issue. If not, ty the net fix listed.
Fix 5: Encrypt data between Microsoft Outlook and Microsoft Exchange
1. Open the Run Dialog by pressing the keys Windows+r simultaneously in your system
2. In Run Dialog, type control and hit Enter

3. In the search bar located at the top right corner of the Control Panel window, type Mail. Click on the Mail option that shows up

4. In the Mail Setup window that opens, click on the Email Accounts button as shown below

5. Click on the required email account and then press Change

6. In the Change Account window click on the More Settings button at the bottom right corner.

7. In the window that opens, go to the Security tab.
8. Under the Encryption section, tick the option Encrypt data between Microsoft Outlook and Microsoft Exchange
9. Click on Apply and then click on OK

Now, restart the Outlook application and check if the error is present. If it is, then try the next fix.
Fix 6: Enable the Use Cached Exchange Mode feature
1. Open the MS Outlook Application
2. Click on File from the top menu options

3. In the appearing window, open the Info tab
4. Click on Account Settings
5. From the Pop-Up Context Menu, click on Account and Sync Settings

6. In the window, click on the More Settings button

7. In the Microsoft Exchange window that opens, Go to the Advanced tab
8. Tick on Use Cached Exchange Mode.
NOTE: If you see that this option is already ticked, Untick the option.
9. Click on Apply and then click on OK

10. Close MS Outlook application. Open the application again and check if the issue still persists. If it does, then try the next fix.
Fix 7: Add the account to a new Profile
Many users have reported that this solution solved their issue.
1. Open the Run Dialog by holding the keys Win Key+r simultaneously in your system
2. In Run Dialog, type control and hit Enter

3. In the search bar located at the top right corner of the Control Panel window, type Mail. Click on the Mail option that shows up

4. In the Mail Setup window that opens, click on the Show Profiles button as shown below

5. Click on the Add button

6. A window pops-up, give the required name, and press Enter

7. Select the newly created Profile

8. Open the MS Outlook application. Click on File Menu Option

9. From the Info tab, click on Add account as shown below

10. Enter your Email id and press on Connect. Follow the instructions shown to re-add the account.

If this fix doesn’t help, check the next fix.
Fix 8: Repair the .pst or .ost file
In the case of pop3 accounts, the .pst file and in the case of IMAP accounts, the .ost file hold all the information regarding an Outlook account on your PC. When Outlook application connects to the internet, this file is updated with fresh content. When the system is Offline, this file is responsible for showing the existing mails in MS Outlook. Now, when this file gets corrupted, many issues are encountered. In such a case, we have to repair the existing .pst or .ost file with the in-built tool called SCANPST. To do so,
Step 1: Identify the location of the .pst or .ost file. Follow the below steps,
1. Open the MS Outlook Application
2. Click on File from the top menu options

3. In the appearing window, go to the Info tab
4. Click on Account Settings
5. Then click on Account Settings again

6. In the Account Settings window that opens, Go to the Data Files tab, Note the location of the file of the required account

Step 2: Open SCANPST.EXE and run the application
The location of the application is different for different versions of Outlook.
-
Outlook 2019: C:\Program Files (x86)\Microsoft Office\root\Office16
- Outlook 2016: C:\Program Files (x86)\Microsoft Office\root\Office16
- Outlook 2013: C:\Program Files (x86)\Microsoft Office\Office15
- Outlook 2010: C:\Program Files (x86)\Microsoft Office\Office14
- Outlook 2007: C:\Program Files (x86)\Microsoft Office\Office12
Based on the Outlook version on your system, go to the appropriate location and double click on SCANPST.EXE

Step 3: When the SCANPST application opens, paste the filename in the Enter the name of the file you want to scan section. The location that we noted in Step 1, point 6
Step 4: Click on the Start button
NOTE: The OST files can also be repaired using the SCANPST application.

Step 5: Once the scan finishes, it will notify if there are any errors. Repair the file with the instructions shown.
Step 6: Restart the system and open the Outlook application and check if this fixed the issue.
If this doesn’t help, try the next fix listed below.
Fix 9: Repair the Outlook Application
1. Hold the keys Windows+r
2. In the Run Dialog, type appwiz.cpl, and hit Enter

3. In the Program and Features window that opens, locate Microsoft Office Suite or Microsoft 365. Right-click on it and choose Change

4. If the UAC pops up asking for permissions, press on Yes
5. In the appearing window, click on Quick Repair.
6. Then Click on the Repair button

7. Follow the instructions shown and repair the Office programs.
8. If the issue is encountered due to a corrupted Outlook application, this fix will resolve the issue.
9. Restart the application and check if the issue has fixed. If not, try choosing Online Repair (In point no 6 ) to repair the Office apps.
10. Restart the application and check if the error has been fixed.
If not, try the next fix.
Fix 10: Update the Outlook application
1.Open the MS Outlook Application in your system
2. Click on File from the top menu options

3. In the appearing window, Select the Office Account from the left-hand side.
4. Click on Update Options
5. From the drop-down menu choose Update Now

6. Wait for the updates to finish installing in the system
Check if the issue has resolved. If the issue is still in place, try the next fix.
That’s All
Thank you for Reading. We hope this article has been informative and helped you fix the error. Kindly comment and let us know which of the above fixes worked in your case. Also, let us know if run into any issues, we will be glad to help you.