The Internet Message Access Protocol (or, IMAP) is mainly used by Outlook to retrieve the gmail messages from mail exchange servers. So, if your Outlook client is throwing up the “IMAP Error 78754“, you may stop receiving email updates. If the IMAP is disabled in the Outlook app, this situation may arise. These are the solutions you will need to fix the issue.
Fix 1 – Enable the IMAP
Enable the IMAP protocol from the Google Account settings on your device.
Step 1 – To do this, open a browser and load the Gmail settings console.
Step 2 – Log into your account, if it is needed.
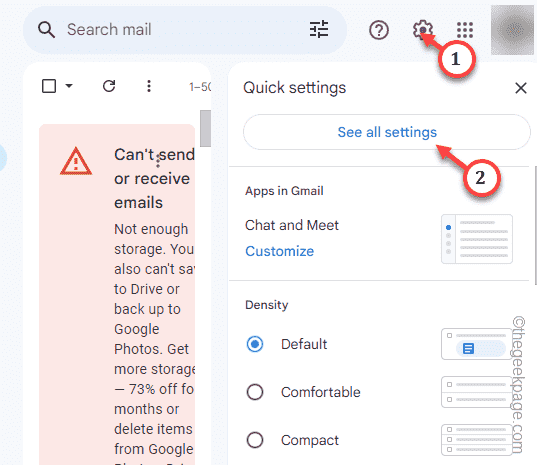
Step 3 – On the right-top corner, tap the “⚙️” to access the settings.
Step 4 – Next, tap “See all settings” to access that.
This will open up the entire Gmail settings in the browser.
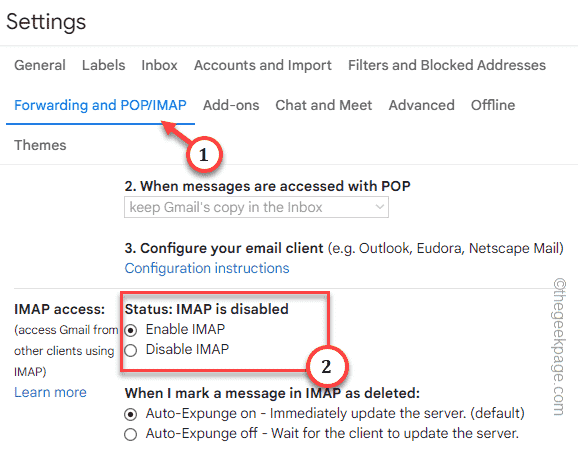
Step 5 – Go to the “Forwarding and POP/IMAP” settings tab.
Step 6 – There should be IMAP access section. Choose the “Enable IMAP” option.
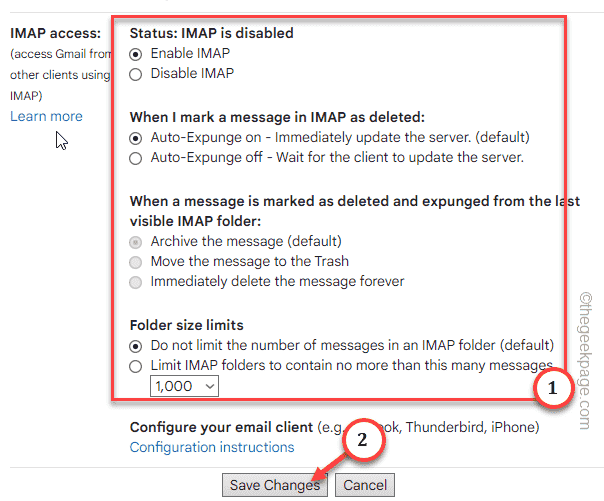
Step 7 – There should be other IMAP settings as well. Go through these settings and enable those IMAP feature as need-to-be basis.
Step 8 – Once you have tweaked it, tap “Save changes“*.
Gmail page should reload.
Close the browser and relaunch the MS Outlook. Check if you are still getting the “IMAP Error 78754” error code in Outlook.
*NOTE – This IMAP feature may not work properly if you are using 2-FA or two factor authentication to secure your account. As Google has recently cut off the support for the access of the less secure apps, there isn’t much you can do.
Fix 2 – Change the IMAP settings
Change the advanced IMAP settings in Outlook email setup and check.
Step 1 – Quickly, hit the ⊞ Win+R key combinations to get access to a Run box.
Step 2 – Next, type “control” in the Run panel. After this, hit “OK“.
Step 3 – Next, choose the “View by:” as “Small icons” to get a comprehensive list of Control Panel items.
Step 4 – Open up the “Mail (Outlook setup)(32-bit)” option.
Step 5 – Now, choose the “Email accounts” to open that up.
Step 6 – After this, double-tap the email account to open that up.
Step 7 – Finally, tap “More settings” to access it.
Step 8 – This will load the Change account panel. Get to the “Advanced” tab.
Step 9 – Quickly, set the “Use the following type of encrypted connection:” and set it to “SSL/TLS” from the list.
Step 10 – Same way, set the “Use the following type of encrypted connection:” and choose “SSL/TLS“.
Step 11 – Make sure the “Outgoing server (SMTP)” and set it to “465“.
Step 12 – Finally, tap “OK” to save the changes.
Close all the windows one-by-one.
After this, close and reboot the Microsoft Outlook and test.
Fix 3 – Set up the email account manually
You should set up the email account manually.
Step 1 – Launch the Outlook client and ignore the IMAP error message for now.
Step 2 – Next, go to the “File” menu.
Step 3 – Just go to the “Info” tab.
Step 4 – On the opposite side of the page, make sure to choose the affected email ID from the drop-down.
Step 5 – Next, tap the “Account Settings” and further click “Server settings” to edit that.
Step 6 – It should automatically load up the IMAP settings. Now, toggle the “Incoming mail” settings and make the changes this way –
Server: imap.gmail.com
Port: 993
Encryption method: SSL/TLS
Step 7 – Uncheck the “Require logon using Secure Password Authentication (SPA)” box.
Step 8 – Next, expand the “Outgoing mail” section and input the data this way –
Server: imap.gmail.com
Port: 993
Encryption method: SSL/TLS
Step 9 – Ensure to uncheck the “Require logon using Secure Password Authentication (SPA)” box.
Step 10 – Check both the “My outgoing (SMTP) server requires authentication” and the “Use same settings as my incoming mail server” options.
Step 11 – Tap “Next” to save the changes and proceed.
Go ahead and finish the account setup process following the subsequent steps. Usually, Outlook does perform a check with the servers.
After go through the entire process, your emails will start to sync according to the settings that you have set up.
Fix 4 – Re-use the password to log in
If the password dialog box is appearing in the Gmail inbox, as soon as start the Outlook, don’t ignore that. Simply, input your account password and log in to your account.
You won’t be seeing any “IMAP Error 78754” failed messages again.


