Local Group Policy settings can be used to set a common wallpaper for the users in an Active Directory Domain. But sometimes, the desktop background group policy may fail and show a black deskop on the affected user screens. If you are facing this dilemma in your domain, don’t worry. This problem has few fixes to solve the problem.
Workaround–
There is a chance that the affected user has logged in to the system before you have deployed the group policy.
Fix 1 – Rename the TranscodedWallpaper
You can fix this problem simply by removing the cache of the wallpaper on your computer.
Steps to view hidden folders
1. Click on search icon located in taskbar.
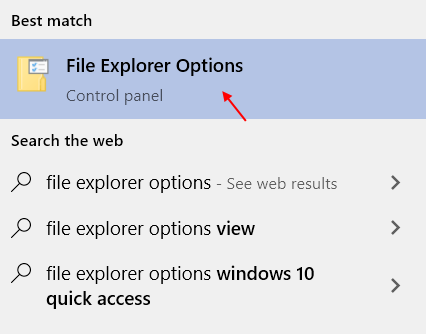
2.Search File explorer Options from the search box.
3 – Now, Click on File explorer Options from the search result.

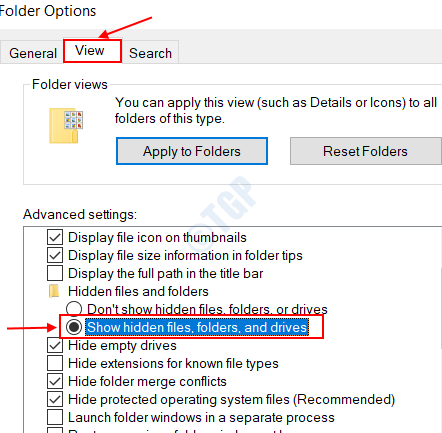
4. When the Folder Options window prevails, go to the “View” tab.
5. After that, check the option “Show hidden files, folders, and drives“.

6. Finally, click on “Apply” and then on “OK“.

Steps to release the cache
1. Press the Windows key+R keys together.
2. When the Run terminal opens up, paste this address and hit Enter.
%USERPROFILE%\AppData\Roaming\Microsoft\Windows\Themes

3. Once you have opened the Themes folder, right-click on the “TransodedWallpaper” file and click on “Rename“.

4. Now, you rename the files as “TranscodedWallpaperOld“.

Close the File Explorer screen and restart the system once. This should fix the issue on the affected computer.
Fix 2 – Modify the registry
Adjust the registry to solve the problem on the ADD.
1. What you have to do is press the Windows key and the R key together.
2. In the Run terminal, write “regedit” and click on “OK” to access the Registry Editor screen.

NOTE –
After the Registry Editor opens up, click on “File” and click on “Export” to create a new backup on your computer.

If anything goes out of hand while altering the registry, you can easily retrieve the registry back to normal.
3. Once the Registry Editor opens up, proceed to this location on the Registry Editor screen –
HKEY_CURRENT_USER\SOFTWARE\Microsoft\Windows\CurrentVersion\Policies
4. Then, check if there is any sub-key named “System” on the left-hand side.
5. After that, check if there are two keys on the right-hand side – ‘Wallpaper‘ and ‘WallpaperStyle‘.

6. Right-click on the “System” key and click on “Delete” to remove the key from the system.

Close the Registry Editor and restart your computer. Deploy the group policy settings and check if it works.
Fix 3 – Set the value of the Wallpaper key
1. Open the File Explorer.
2. Go to the folder where the wallpaper file is on your computer.
3. Right-click on the wallpaper file and click on “Properties“.

4. Copy the “Location” of the file.
The path of the file is –
Location/name of the file
Example –
If the name of the wallpaper file is ‘Kylo Ren’ and the location of the file is ‘C:\Users\Sambit\Music\New folder’.
So, the path of the file is –
C:\Users\Sambit\Music\New folder\Kylo Ren

Minimize the File Explorer window.
5. Press the Windows key+R keys together.
6. Then, type “regedit” and hit Enter.

7. In the Registry Editor screen, go here –
Computer\HKEY_CURRENT_USER\Control Panel\Desktop
8. On the right-hand side, double click on the “Wallpaper” key.

9. Set the value of the key as the path of the wallpaper file that you have noted.
(Example – As the path of the wallpaper is – C:\Users\Sambit\Music\New folder\Kylo Ren. So, this will be the value of the key. )
10. Click on “OK” to save it.

Once you have set the key, close the registry screen.
Check the effect on users on the domain.
NOTE–
You can deploy the same change using the Group Policy Preferences to apply the settings.
Fix 4 – Change the wallpaper path from Group Policy
Set the wallpaper path from the Group Policy settings.
Note down the path of the wallpaper file following the steps mentioned in Fix – 3.
1. Press the Windows key with the ‘R‘ key together.
2. Then, type “gpedit.msc” and hit Enter.

3. At the next step, go here-
User Configuration > Administrative Templates > Desktop > Desktop
4. On the right-hand side, double click on the “Desktop Wallpaper” policy settings.

5. At first, set the policy to “Enabled” settings.
6. Now, go down in the policy settings. Set ‘Wallpaper Name:’ as the path of the wallpaper that you have noted.

7. Don’t forget to click on “Apply” and “OK” to save these changes.

Once you have saved the settings, close the Policy settings.
Fix 5 – Delete the Slideshow.ini file
There is another file that may have caused this problem on your computer.
1. Right-click on the Windows icon and click on the “Run“.
2. Then, type or paste this address again and hit Enter.
C:\Users\%username%\AppData\Roaming\Microsoft\Windows\Themes

3. Here, you will notice the “slideshow.ini” file.
4. Right-click on it and click on “Edit” to modify it.

5. Once it opens up in NotePad, remove everything from this file to make it completely empty.

6. Then, press the ‘Ctrl+S‘ keys once to save the changes in the Notepad file.
Once you have done it, close and re-deploy the policy. Check if this helps. Otherwise, go to the next fix.
Fix 6 – Unrestrict the alteration of desktop background
You can unblock the prevent changing desktop background setting.
Step 1
1. Press the Windows key with the ‘R‘ key together.
2. Then, type “gpedit.msc” and hit Enter.

3. At the next step, go here-
User Configuration > Administrative Templates > Control Panel > Personalization
4. Then, on the right-hand side, double click on the “Prevent changing desktop background” policy.

5. In the policy settings, set the settings to “Not configured“.
6. Finally, you have to click on “Apply” and “OK” to save the settings.

This should fix the problem.
Step 2
If the issue is still there, check if there is any related registry key in the registry editor.
1. Open the Registry Editor.
2. Then, go here –
Compter\HKEY_LOCAL_MACHINE\SOFTWARE\Microsoft\Windows\CurrentVersion\Policies\
3. You will notice two values on the right-hand side.
4. Double click on the “NoAddingComponents” value.

5. Set the value to “0” and click on “OK“.

6. Similarly, double click on the “NoComponents” key.

7. Just the same as before, adjust the value to “0“.
8. Click on “OK“.

Close the Registry Editor. Restart the system and test if this has worked for you.
Your problem should be solved.