Printer Spooler is a service that holds the documents that are to print for a temporary time period. It usually functions pretty well, but sometimes it gets stalled and shows up ‘Spooler subsystem app has encountered an error and needs to close’ error message. this problem is pretty common when you are sharing your printer with multiple users and it gets multiple printing jobs.
Fix 1 – Restarting the Print Spooler using Command prompt
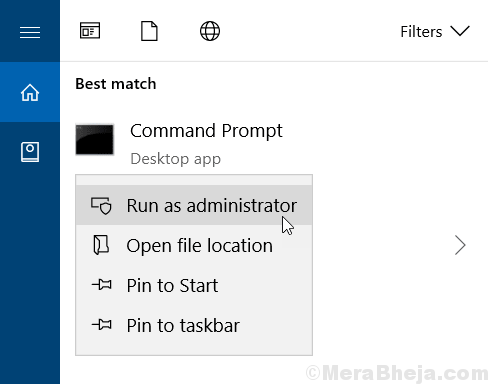
1. Search cmd in windows 10 search box.
2. Now, right click on Command prompt icon and click on run as administrator.

3. Now, copy, paste and hit enter key each time for each of the commands given below to run them one by one.
NET STOP SPOOLER

DEL %SYSTEMROOT%\SYSTEM32\SPOOL\PRINTERS\*.*

NET START SPOOLER

EXIT
Now, try again, your problem will be fixed.
Fix 2 – Empty spooler queue
Corrupted files in the spooler queue may cause this problem.
1. At first, search for “Services” from the search box.
2. After that, hit the Enter to access the Services utility.

3. You will notice a list of services.
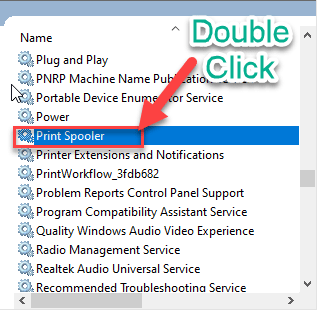
4. After that, double click on the Print Spooler” service once you have noticed it.

4. Next, you have to set up the ‘Startup type:’ to the “Automatic” setting.
5. Then, you need to click on “Stop” to stop the service.

6. To save the settings, click on “Apply” and “OK“.

Now, minimize the Services utility.
7. Right-click on the Windows icon and click on the “Run“.
8. Navigate this way –
C:\WINDOWS\system32\spool\PRINTERS
9. Once you see a prompt has appeared, click on “Continue“.

10. When the PRINTERS folder opens, select all the files and folders.
11. To empty the folder, press the ‘Delete‘ key.

Close the File Explorer window.
Maximize the Services screen.
12. Finally, right-click on the “Print Spooler” service and click on “Start” to resume the service.

13. Next, double click on the “Print Spooler” service.

14. Then, set the ‘Automatic startup’ of the service to “Automatic“.
15. Finally, click on “Apply” and “OK” to save the changes.

This should set the print spooler service to automatically startup.
Try to print something. This should fix the spooler issue on your computer.
Alternative Method –
If the above method isn’t working, you can do the same thing from the command line.
1. Click on the search box. Write “cmd” there.
2. Next, simply right-click on the “Command Prompt” from the search result. Then, click on the “Run as administrator“.

3. When the Command Prompt window appears on your screen, write or copy-paste this command in the terminal and then hit Enter.
net stop spooler
DEL %SYSTEMROOT%\SYSTEM32\SPOOL\PRINTERS\*.*
net start spooler

Close the Command Prompt and try to print again. Check if this resolves your problem.
Fix 3 – Hard reset the printer
You have to hard reset the printer on your computer. Just follow these steps –
Shutdown process-
1. First of all, turn ON your printer.
2. When the printer is switched ON, just take out the ink cartridges from it.
3. In the next step, switch OFF your printer by pressing the power switch once.
4. Then, unplug the printer cables from your system.
4. After that, shut down your system.
5. Ultimately, switch OFF the WiFi router (if you are using the printer having a WiFi connectivity feature.)
Wait for a minute.
Startup process-
1. You have to turn ON the printer.
2. At the next step, put the ink cartridges in the printer ink compartment.
3. Next, switch ON the computer.
4. Finally, turn ON the WiFi router to complete the process.
Check if the printer is still working or not.
Fix 4 – Use the printer diagnostics
There is a printer diagnostic in Windows 10. You can easily troubleshoot the problem.
1. Click on the search box and write “Troubleshoot“.
2. After that, hit ‘Enter‘.

3. After that, click on the “Additional Troubleshooters“.

4. On the right-hand side, click on the “Printer” troubleshooter.
5. Then, click on “Run the troubleshooter“.

6. Next, click on the “Advanced” to view the advanced settings.

5. Just check the box “Apply repairs automatically“.
6. Again, click on “Next“.

7. You will notice the list of printers connected to your system.
8. Finally, again click on “Next“.

9. Once Windows recommends a fix, click on “Apply this fix“.

10. To close the troubleshooter, click on the “Close the troubleshooter“.
This will identify and fix the problem on your device. Try to print anything.