CPU is the main brainpower for your system, but what if you see that the CPU is not running at its full capacity even when you are running a high power process. In most cases, a machine is set to balance performance mode or power-saving (if it is a laptop) mode by default. So, follow these easy solutions to set your CPU to offer the peak performance once it is required.
Fix 1 – Disable Ipppm using the registry
The Intel Power Management driver can cause this problem. You can use the registry editor to disable the Intel Power Management driver.
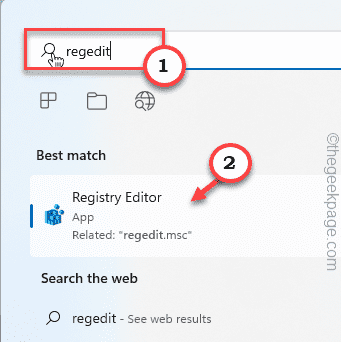
1. At first, type “regedit” in the search box.
2. Then, click on the “Registry Editor” to access it.
Warning – Registry Editor is a very sensitive place. A simple unaccounted alteration may lead to a fatal system error. So, please create a system backup just to be cautious.
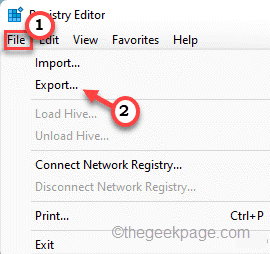
When the Registry Editor opens up, tap on “File“. Then click on “Export” to create a new registry backup on your system.

3. Then, go here –
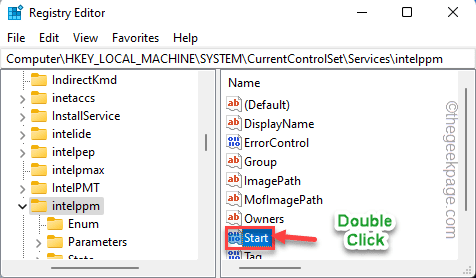
HKEY_LOCAL_MACHINE\SYSTEM\CurrentControlSet\Services\intelppm
4. Now, on the right-hand side, double click on the “Start” value to modify.
5. At the next step, set the value to “4“.
6. Then, click on “OK“.
Once you have done this, just close the Registry Editor and restart your system.
Test the CPU performances in the Task Manager.
[
NOTE – If the Registry Editor is blocked or you can’t use it, you can use th terminal to disable the intelppm service.
1. Type “cmd” in the search box.
2. Then, right-click on the “Command Prompt” and tap on “Run as administrator“.
3. Once the terminal opens up, type this command and hit Enter.
sc config intelppm start= disabled
This will stop the intelppm service from starting up once your system starts up.
Once you have executed the command, close the terminal.
After that, reboot the system and test the CPU performance.
]
Fix 2 – Choose the High Performance
The easiest solution you can opt for is to use the High-Performance mode.
1. At first, press the Windows key+R keys together.
2. Then, write this line and hit Enter.
powercfg.cpl
3. When the Control Panel opens up, tap on the “Show additional plans“.
4. After that, select the “High Performance” mode.
[NOTE – You can also use the “Ulitmate Performance” mode if you have enabled it. Want to enable this hidden power plan on your system, follow the steps mentioned in our guide.]
Once you are done, try running a high load process on your system and test whether the CPUs are offering peak performance.
Fix 3 – Restore the default plan settings
Some users have claimed to solve this issue simply by restoring the default settings of the power plan they are using.
1. Just, right-click on the Windows icon and tap on the “Run“.
2. Then, type this code and hit Enter.
powercfg.cpl
3. Then, look for the plan you are currently using.
4. Next, tap on “Change plan settings” to access it.
5. Now, in the next window, tap on “Restore default settings for this plan“.
6. You will see a warning message. Just tap on “Yes” to confirm it.
This will reset the power plan settings to their original settings. Now, play a game or run a power-hungry process to check whether the CPU is running at full speed.
Fix 4 – Set the processor to the maximum state
You should set your processor to run at the maximum state.
1. At first, press the Windows key+R keys together.
2. Then, type this code and hit Enter.
control.exe powercfg.cpl,,3
3. When the Power Options window opens up, expand the “Processor power management” settings.
4. Then, click on the “Maximum processor state“.
5. Next, set the “Setting:” value to “100“.
[If you are using a laptop, you will notice two options. Set “On battery:” and “Plugged in:” both settings to “100“.
6. Now, expand the “System cooling policy” settings.
7. Set it to “Active” settings.
[Just like before, if you are enacting this on a laptop, toggle “On battery:” and “Plugged in:” both settings to “Active“.]
8. Once you are done, tap on “Apply” and “OK” to apply and save this change.
Once you are done, close the Power Options window. Then, check the CPU performance from the Task Manager.
Fix – 5 Disable the Intel PM driver
If altering the registry doesn’t work, you have to rename the driver itself using a terminal command.
1. At first, press the Windows key+R keys together.
2. Then, type “cmd” and press Ctrl+Shift+Enter together to open the terminal with administrative rights.
3. Once the terminal appears, copy-paste these commands one at a time and tap the “Enter” key.
CD C:\Windows\System32\driver
ren intelppm.sys intelppm.sys.bak
This will rename the existing intelppm driver, which in turn will disable the driver.
Fix 6 – Clean boot the system
Clean booting the system will isolate all third-party apps and services.
1. At first, press the Windows key+R keys together.
2. Then, type this command and hit the Enter key.
msconfig
3. In the System Configuration window, go to the “General” tab.
4. Here, tap on the “Selective startup” option and then check the “Load system services” and the “Load startup items” options.
5. After that, tap on the “Services” section.
6. Here, you have to tick mark the “Hide all Microsoft services” box.
7. Next, tap on the “Disable all” option to disable all the third-party apps.
You have just removed all the third-party apps from interfering.
8. Finally, click on “Apply” and then on “OK“.

You will notice a prompt has appeared to restart your machine.
9. Just, click on “Restart” to reboot your system immediately.

This will restart the system without all the third-party apps running in the background.
Try running a CPU stress test online and check whether it is offering high performance.

