Chrome browser, with its highly appealing features and faster browsing experiences, has caught the users’ attention.If you are a regular user of Google Chrome, then there are chances that you might have come across the error that says Class Not Registered. It becomes quite annoying when we come across these errors, and you need to go behind it, finding methods to solve them.If you decide to reinstall the browser in order to help yourself out the error, you will be faced with the error again when it gets launched again. Also launching chrome using the shortcut menu from the Start has proved to be not of much use.
It is found much frequent in the recent versions of Windows, the Windows 10 operating system . They rarely occur in Windows 7 and 8.1 versions. One way out of it may be to install it directly from the .exe file downloaded in your system.
Also see: –
Wondering whether you can solve the issue using few basic steps? Here you go. This article discusses some simple steps to follow that can easily solve the error. I will recommend you to create a system restore point before you start anything, in case the steps you follow undergoes any alterations. This helps in restoring your system to the state it was in, before you had started applying the below mentioned steps.
Method 1 – By creating and importing registry file
Just , create a TextPad file on your PC and then copy and paste the commands given below to it.
Windows Registry Editor Version 5.00

[HKEY_CLASSES_ROOT\ChromiumHTM\shell\open\command]
"DelegateExecute"=-

[HKEY_CLASSES_ROOT\Chromium\.exe\shell\open\command]
"DelegateExecute"=-

[HKEY_CLASSES_ROOT\Chromium\.exe\shell\opennewwindow\command]
"DelegateExecute"=-

[HKEY_CLASSES_ROOT\Chrome\.exe\shell\open\command]
"DelegateExecute"=-

[HKEY_CLASSES_ROOT\Chrome\.exe\shell\opennewwindow\command]
"DelegateExecute"=-

[HKEY_CLASSES_ROOT\ChromiumHTM\shell\open\command]
"DelegateExecute"=-
Finally, save it as chrome.reg or any_other_name_of_your_choice.reg.
Now, double-click on it to import the settings.
METHOD 2 – Deleting items from Registry Editor
This deletes the application identifiers of the Chrome browser that might provide a solution.
STEP 1
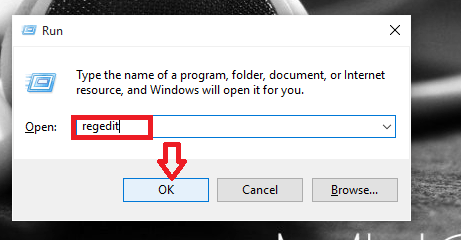
Open up the Registry Editor by opening the Run window using Windows Key +R and type in the text box given below the phrase regedit.
STEP 2
Now, in the window that pops up, you will find various different folders on the left pane. Navigate to the folders according to the path given below and delete the files as you find inside them.
HKEY_CLASSES_ROOT\Chrome
HKLM\Software\Classes\Chrome (all of it)
HKCU\Software\Classes\Chrome (all of it)
HKLM\Software\Classes\ChromeHTML\open\command\DelegateExecute
HKCU\Software\Classes\ChromeHTML\open\command\DelegateExecute
STEP 3
Restart your Windows PC and open up the Chrome browser to find the error fixed.
If this looks tedious to you , you can delete the registry keys by opening CMD as admin and running the commands given below.
REG DELETE HKEY_CLASSES_ROOT\Chrome REG DELETE HKLM\Software\Classes\Chrome REG DELETE HKCU\Software\Classes\Chrome REG DELETE HKLM\Software\Classes\ChromeHTML\open\command\DelegateExecute REG DELETE HKCU\Software\Classes\ChromeHTML\open\command\DelegateExecute

Method 3 – create another Shortcut to open chrome
Create another shortcut of chrome on your desktop in form of a batch file. Now, every time you have to open chrome , just click on this batch file to open it.
- Create a text file and paste the content given below.
start /d "C:\Program Files (x86)\Google\Chrome\Application\" chrome.exe
- Finally, save it as chrome.bat.

Now, click on to open chrome and use chrome.
METHOD 4 – Adding Extensions To Actual Path
STEP 1
Close the Chrome browser you are currently in and delete all the shortcuts for Chrome in your system.
STEP 2
Once you are done, find the chrome.exe file from the location where it is stored on your PC. Usually, it is in the path as provided below.
C:\Program Files (x86)\Google\Chrome\Application .
STEP 3
Right click on it to find the option Create shortcut. Click on it which creates a new shortcut on your desktop.
STEP 4
Now you will have to do a right click on the shortcut icon on your desktop and choose the option Properties.
STEP 5
You will find its path on the text box next to Target. Add the following prefix to the path provided there.
C:\Windows\explorer.exe
Once done,hit on the Apply button and then click OK.
STEP 6
Now,open up the Chrome browser to find it working without any errors.
That’s it. Hope you found this article useful.

