Windows Defender is a security app that comes by-default in Windows Vista and above versions. While it’s known to offer only basic protection for your device, it’s better to have it installed and running that having no antivirus software at all. However, in Windows 10, the Windows Defender comes enabled by-default.
However, the Windows Defender app does not include scanning of mapped network drives in the Full scan. This can make your system vulnerable and so, you would need to enable scanning of network drives for better security in Windows 10. Here’s how you can do it.
Solution: By Creating A New Registry Key “Analysis”
Before you proceed with making any changes to the registry, make sure that you create a backup of the registry data, so that in case you lose any data, you can restore it back.
Step 1: Press the Windows key and R on your keyboard together to open the Run command.
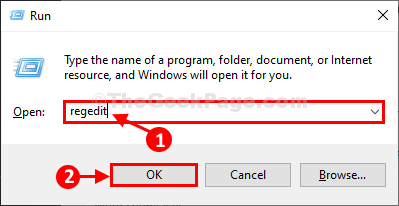
Step 2: In the Run command, type regedit in the search box and press the OK button to open the Registry Editor.

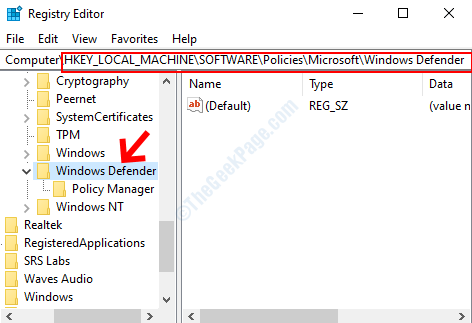
Step 3: As the Registry Editor window opens, copy the below path and paste it in the registry address bar. Hit Enter to reach the Windows Defender key.
HKEY_LOCAL_MACHINE\SOFTWARE\Policies\Microsoft\Windows Defender
Left-click on the Windows Defender key one time.

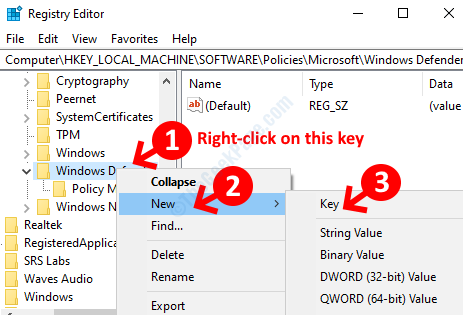
Step 4: Now, right-click on the Windows Defender key on the left and select New from the right-click menu. Then select Key from the sub-menu.

Step 5: Now, right-click on the New Key and select Rename from the right-click menu.

Step 6: Rename the new key as Analysis.
Now, go to the right side of the window, and right-click on the empty space. Select New from the right-click menu and click on DWORD (32-bit) Value in the sub-menu.

Step 7: Next, rename the new DWORD (32-bit) Value as DisableScanningNetworkFiles.

Step 8: Then double-click on it to open the Edit DWORD (32-bit) Value dialogue box. Just ensure that the Value Data field stays at 0.
Press OK to exit.

That’s all. Now, simply restart your PC for the changes to be effective and the network drive scanning features should now be enabled in the Windows Defender on your Windows 10 PC.