Are you having trouble running the MSI Afterburner on your new gaming rig? You will feel slightly relieved that you are not alone. Some MSI users have also complained about the failure of MSI Afterburner scanning process. So, try these basic workarounds and follow the rest of the main solutions if the problem still persists.
Workarounds –
1. Just close the current instance of MSI Afterburner. Restart the machine and retry the whole process.
Fix 1 – Change the GPU Performance Counters
MSI Afterburner needs the system permission to detect the GPU counters to initiate the OC scan.
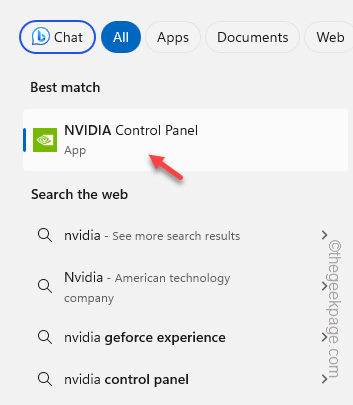
Step 1 – Search “NVIDIA Control Panel“.
Step 2 – Tap the “NVIDIA Control Panel” when it appears in the search results.
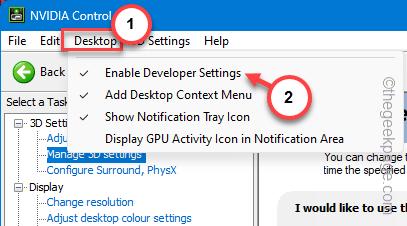
Step 3 – You have to enable the Developer settings in NVIDIA Control Panel. To do that, tap “Desktop” and turn on the “Enable Developer Settings” option from there.
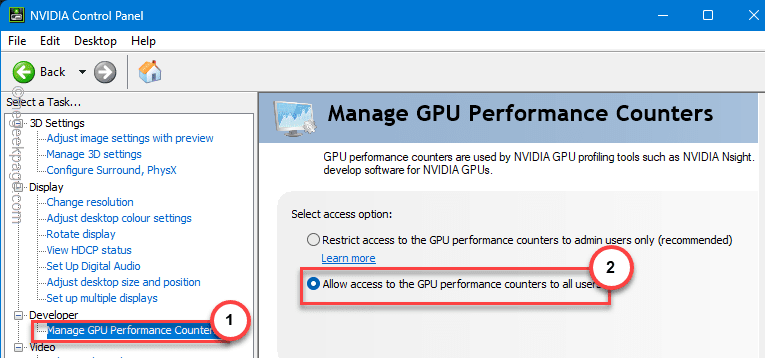
Step 4 – On the left pane, expand the “Developer” tab.
Step 5 – Set the “Manage GPU Performance Counters” to “Allow access to the GPU Performance counters to all users“.
Step 6 – Then, apply this change using the ‘Apply‘ button and save the changes.
Step 7 – Now, you must restart your computer for everyone to get access to the GPU Performance counters on your system.
After this, you can run the MSI Afterburner OC scanner once more and use the utillity properly.
Fix 2 – Enable the CUDA
Tweaking the 3D settings in the NVIDIA Control Panel should help you fix the MSI Afterburner problem.
Step 1 – Search and open the NVIDIA Control Panel.
Step 2 – Next, go to the “3D Settings” to select that.
Step 3 – After this, toggle the “Manage 3D settings” to select that.
Step 4 – Now, go to the “Global settings“.
Step 5 – After this, click the “CUDA-GPUs” option and toggle that to “All” mode.
Step 6 – Save the changes in the NVIDIA Control Panel.
Quit this and restart your computer. This should resolve the MSI Afterburner scanning problem.
Fix 3 – End the background processes
If there are multiple instances of MSI Afterburner is already running in the background, killing those should help you fix this.
Step 1 – Quickly, tap the Win+X hotkeys together.
Step 2 – Open the “Task Manager” from the context menu.
Step 3 – Look for any active program running in the background.
Step 4 – Right-click any such application and click “End task” to kill that.
End all the unnecessary active programs one by one to kill all the programs running in the background.
Close the Task Manager. Check if this works.
Fix 4 – Turn off the enable automatic tuning
The automatic tuning is the part of GeForce Experience overlay on your system.
Step 1 – Start by searching “GeForce Experience“.
Step 2 – Open that utility to open that up.
Step 3 – When the GeForce Experience app opens up, go to the “Drivers” tab.
Step 4 – Then, tap the gear icon to access the GeForce Experience settings.
Step 5 – Go to the “General” tab.
Step 6 – Turn the “In-game overlay” settings to On mode.
After this, exit the GeForce Experience application.
Step 7 – Now, tap the Alt+Z hotkeys to load the GeForce Experience overlay on your system.
Step 8 – Tap the gear icon to access the settings.
Step 8 – After this, choose the “Performance” tab in the overlay.
Step 9 – Next, switch the “Enable automatic tuning” to On mode.
After enabling the automatic tuning mode, close everything and restart your device.
This should solve the MSI Afterburner issue. If the scanning operation still fails, go for the next solution.
Fix 5 – Use the Legacy OC scanner
If the new version of the MSI Afterburner is not working properly, set it use the Legacy OC scanner.
Step 1 – Search “Afterburner” from the search box.
Step 2 – Next, right-click the “MSI Afterburner” and further, tap “Open file location“.
Step 3 – Next, right-click the “MSI Afterburner” shorcut file and further tap “Open file location” to load that once more.
This will lead you to the root folder of the MSI Afterburner.
Step 4 – Find the “MSIAfterburner.cfg” configuration file.
Step 5 – Double-tap the file to open that.
Step 6 – Choose the Notepad from the list and click “Just once“.
Step 7 – Press the Ctrl+F keys to open a Find box.
Step 8 – Type “legacy” there to detect the “LegacyOCScanner”.
Step 9 – Just switch the value to “1” in there.
Step 10 – Use the Ctrl+S hotkeys to save the changes in the configuration file.
Close the File Explorer.
Relaunch the MSI Afterburner application and test this.
Fix 6 – Lift the Voltage Control in Afterburner
There is a voltage control function in MSI Afterburner application.
Step 1 – Launch the MSI Afterburner application.
Step 2 – After this, tap the ⚙ button on the left pane to open the Afterburner settings.
Step 3 – Go to the “General” zone.
Step 4 – In the MSI Afterburner Properties page, uncheck these two –
Unlock voltage control
Unlock voltage monitoring
Step 4 – After this, save the changes.
Once you have revoked the voltage control from the MSI Afterburner application, try to run the OC scan one more time.
This time, it should be successful.
Fix 6 – Uninstall the MSI Afterburner
Uninstall the MSI Afterburner application from your system and reinstall the latest version of the MSI Afterburner application.
Step 1 – At first, click the Windows key and type “MSI Afterburner” in the box.
Step 2 – Then, right-tap the “MSI Afterburner” and tap “Uninstall“.
Step 3 – This will take you directly to the Settings page. Search “msi” in the box.
Step 4 – Once you have found out the MSI Afterburner app. Click that three-dot button and click “Uninstall“.
Once you have uninstalled the MSI Afterburner application, it is time to get the latest version of MSI Afterburner.
Step 5 – Open the MSI Afterburner website. Tap the “Download” button to download the latest version of Afterburner.
Step 6 – Unzip the downloaded zip file in a location of your choice.
Step 7 – Run the installer file on your system.
Step 8 – Tap “Next“. On the next screen, tap “Install” to start the installation of the MSI Afterburner files.
Step 9 – In the middle of the process, you have to install the Rivatuner module. So, tap “Install” to start the process.
Step 10 – Finally, when you are done with the Setup module, tap “Finish” to complete the whole process.
You won’t face any difficulty running the MSI Afterburner OC scan any more.


