In the recent times, there has been an increasing demand of internet all over the world. This has given an impetus to the Internet Service Providers (ISP’s). The ISP has now forced the policy of Fair Usage Policy (FUP) to their users. By the rules of FUP, a user is confined to a given speed in a capped data. As soon as the user exceeds the usage of capped data, speed is reduced to a smaller data transfer rate. For example, if a user has a FUP of 10 GB @ 8mbps, he/she can use the speed up to 10 GB only, after that it would be reduced to 512kbps or the speed mentioned by the ISP.
To increase the data transfer rate, the user has to pay extra fees to obtain the higher speed. To overcome this scenario of capped usage, Microsoft has come up with the idea of Metered Network Connections in Windows 10.If you have an access to unlimited data usage without any reduction in speed, Windows 10 will use the significant amount of data but in case of limited usage relating to downfall in data transfer rates, setting up a Metered Connection will permit you to measure the amount of data usage and make necessary changes to preserve data usage for a longer period of time.
How to enable Metered Connection in Windows 10
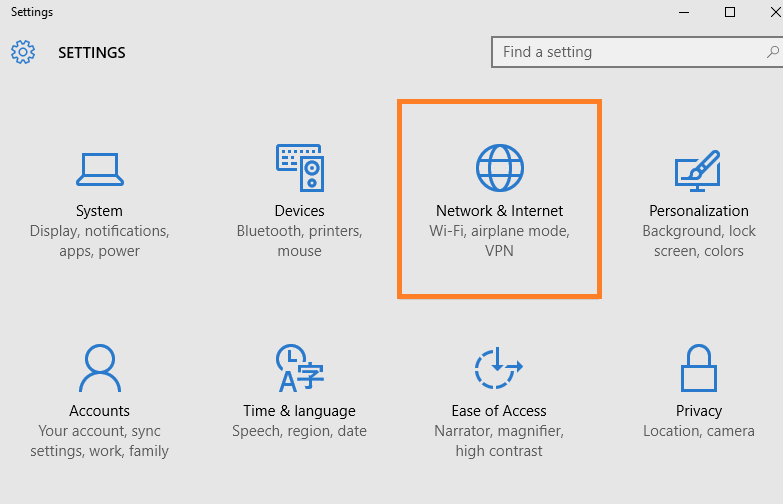
Click on start key and click “settings” or press windows key + i to directly open settings. This will open the System Settings app.
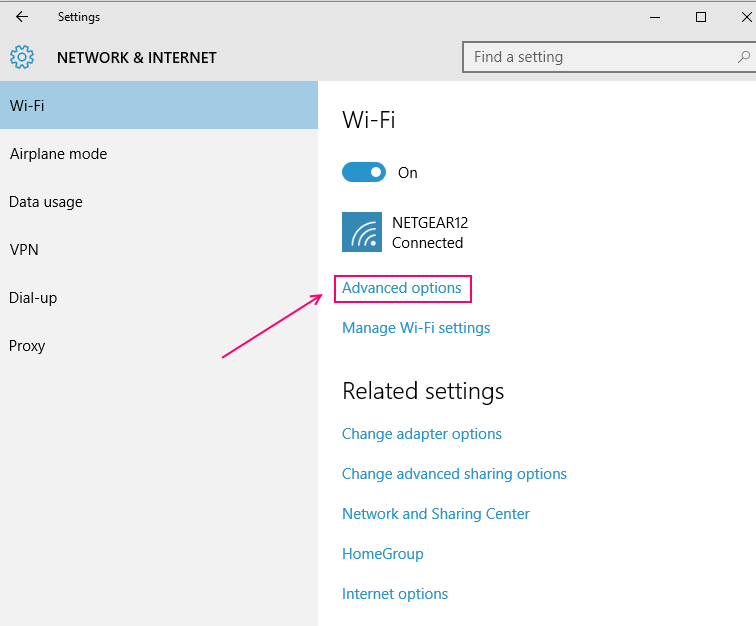
Go to the “Network & Internet” section. In the Wi-Fi section, you will observe the name of the network you are currently connected with.

To change the current network as a Metered Connection, click on “Advanced options” at the bottom of the section.
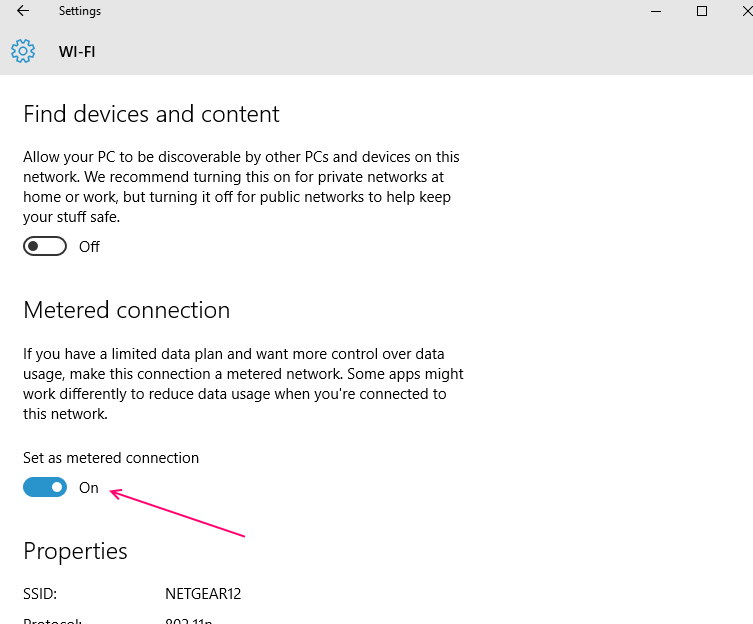
Change the “Set as Metered Connection” to “ON” by toggling over it.

Now, the Wi-Fi network will work as Metered Connection.
Note:- If you want to disable it again, just turn it off again.
What happens during a Metered Connection?
When you change your network settings from “Unlimited” to “Metered Connection”, the following changes are made:
- Deactivate automatic downloads of Windows Update.
No other update is installed other than the priority update. In this way, the user has more control over the updates that are necessary and unnecessary. - Deactivates downloading of apps update from Windows store.
The apps in Windows store won’t be updated in the background until the user permits. Desktop apps shall remain ineffective from this feature. - Deactivates peer-to-peer uploading.
It stops in sharing files stored in one PC to the other PC on the internet. - Deactivates the feature of Live Tiles.
- Synchronization of offline files is stopped. Companies like Dropbox, OneDrive allow the feature of synchronization over the cloud.Setting up a metered connection devoid this feature.
Which connection should be made as a Metered Connection?
As explained previously, if your ISP is charging as per the amount of data usage, you should make your network connection as metered. In windows 10, the Wi-Fi setting is set to unlimited connection and mobile data is set to Metered Connection.If you are working on a packed data plan on your smart phone or mobile hotspot, you can configure it as Metered Connection. In addition to this, you can also meter the connection if there is network congestion caused due to background content downloading in Windows 10.Metered Connection is applicable only on a Wi-Fi network or mobile data connection. It is not supported for wired Ethernet Connections at the moment.
