Most of the Headphones(Speakers) these days operate in the “Stereo” type. This means that some of the audio stream is sent to one headphone and the rest is sent to another headphone. Mono Audio means that all the audio streams are sent to both the headphones. This feature is of use when :
- The capability of hearing of one ear is less than the other. As the audio stream is sent to both the headphones, the entire audio stream can be heard from the efficient ear.
- In gaming applications when a decision is to be taken based on hearing
- While traveling and you want to listen to the songs but also listen to the announcements going on etc
In this article let’s see different ways of Enabling and Disabling Mono Audio Settings in your System.
Method 1: From Settings
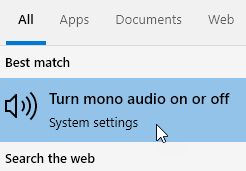
1 – Search Turn Mono Audio On Or off in Windows search and click on it

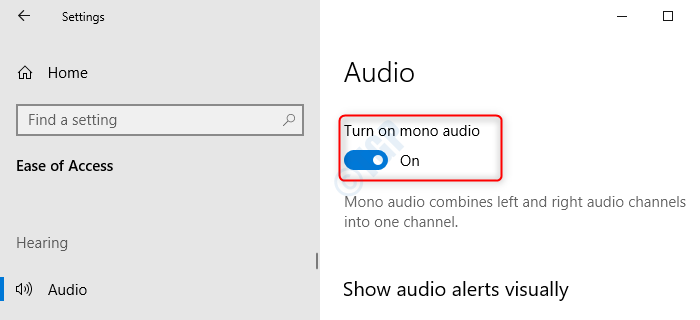
Enable Mono Audio Settings
In the Settings–> Ease of access–>Audio window, Toggle to Turn on mono audio

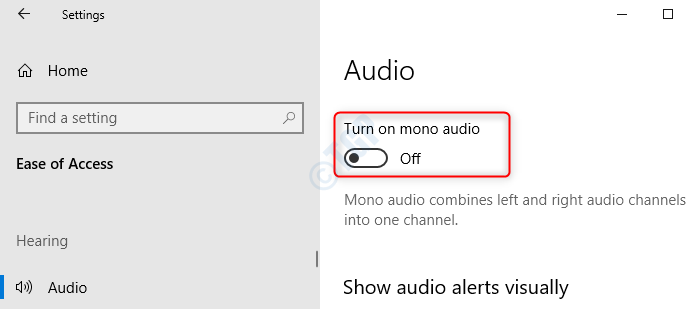
Disable Mono Audio Settings
In the Settings–> Ease of access–>Audio window, Toggle to button to turn off under Turn on mono audio

Method 2: Making Registry Changes
Hold Windows+r buttons together, a run window appears, type regedit, and press OK

Step 1: In the Registry Editor, type or copy-paste or browse to HKEY_CURRENT_USER\Software\Microsoft\Multimedia\Audio
Step 2: Right Click anywhere on the Right hand side , Select New –> DWORD(32-bit) Value

Step 3: Name the newly created Key as AccessibilityMonoMixState and press Enter

Step 4: Right Click on AccessibilityMonoMixState and Press Modify

Enable Mono Audio Settings
In the Edit DWORD(32-bit) Value Window , set 1 under the Value data Section to enable Mono Audio and press OK

Disable Mono Audio Settings
In the Edit DWORD(32-bit) Value window , set 0 under the Value data Section to disable Mono Audio and press OK

Method 3: Using PowerShell
For this method to work, we should make sure that the AccessibilityMonoMixState registry key is present in HKEY_CURRENT_USER\Software\Microsoft\Multimedia\Audio location. If not, follow Method 2 for the first time, and then we can use this method. Also, this method is useful for doing automation tasks.
Press Windows+r to open Run Window and type powershell and hit OK

Enable Mono Audio Settings
Enter the below command in the powershell window to enable mono audio Settings and hit Enter
powershell -windowstyle hidden -command "Start-Process cmd -ArgumentList '/s,/c,REG ADD "HKCU\Software\Microsoft\Multimedia\Audio" /V AccessibilityMonoMixState /T REG_DWORD /D 1 /F & net stop "Audiosrv" & net start "Audiosrv"' -Verb runAs"

The above-mentioned command is a combination of 3 commands that would,
- Set a value of 1 to AccessibilityMonoMixState Registry Key
- Stop the Audio service
- Restart the Audio Service
You can see that the command prompt opens, changes are made and messages are displayed as shown in the below image

You can now see that the mono audio is enabled.
Disable Mono Audio Settings
We can disable the mono audio settings by entering the below command in powershell,
powershell -windowstyle hidden -command "Start-Process cmd -ArgumentList '/s,/c,REG ADD "HKCU\Software\Microsoft\Multimedia\Audio" /V AccessibilityMonoMixState /T REG_DWORD /D 0 /F & net stop "Audiosrv" & net start "Audiosrv"' -Verb runAs"
Even in this case, the command prompt opens, changes are made via the commands and the messages are displayed.
That’s all. Hope this has been informative. Thank you for reading!