The disk checkup tool is very useful to scan and fix minuscule issues with the drives on your computer. The drives that you can scan and rectify are not only the HDD of your device, but it goes the same with other external media. But some users are seeing an error message ‘The Disk Check Could not be Performed Because Windows Cannot Access the Disk‘ while trying to perform a disk check operation. Try these fixes to solve the problem.
Fix 1 – Run check disk in CMD
Try running the check disk operation with CMD.
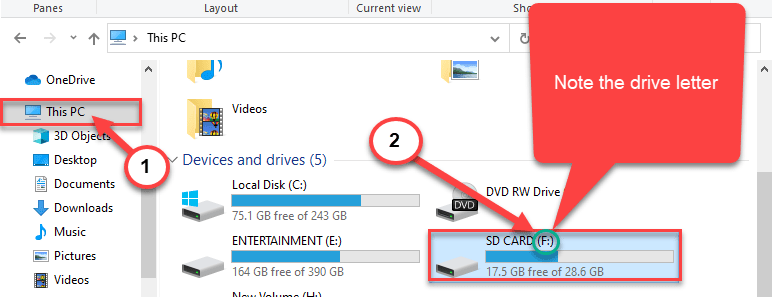
1. Pressing the Windows key+E will open up the File Explorer.
2. Now, you have to click on “This PC“.
3. Note the drive letter of the problematic drive.
(Example– In this case, the drive letter of the SD card is “F:“)

Close File Explorer window.
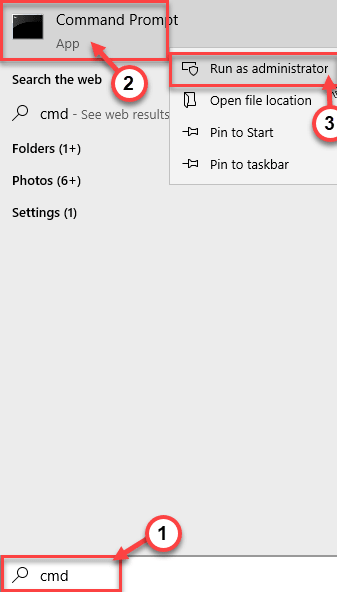
4. Write “cmd” in the search box.
5. Then, right-click on “Command Prompt” and choose “Run as administrator“.

Command Prompt with administrative rights will be opened.
6. Once the terminal opens up, just paste this code, modify it, and hit Enter.
chkdsk drive letter: /f
[Replace the <drive letter> with the drive letter you just noticed in the File Explorer.
Example– For us, the command will look like this-
chkdsk F: /f
]

Press Yes if you get any prompt
Restart your system. Next time your computer restarts, it will check the drive for issues.
Fix 2 – Check the drive is actually connected
Sometimes if you are trying to check up a removable drive, this error message pops up.
a. In case if you are facing this problem with the HDD drive on your system, check the connecting cables.
b. If the problem is there for the USB device, try using another USB cable to connect the external hard disk or try using another USB port on your system.
Fix 3 – Adjust the drive letter
Modifying the drive letter and running a check disk operation has worked out in multiple cases.
1. Just press the Windows key +X keys together.
2. Then, you need to click on the “Disk Management” to access it.

3. Once the Disk Management opens up, look for the problematic drive on your screen.
4. Right-click on the conflicted drive and click on the “Change Drive Letter and Paths…“.

5. Click on “Change“.

6. Check the option “Assign the following drive letter“.
7. Then, assign a new drive letter for the system.
8. Finally, To complete the change, click on “OK“.

After that, run a simple check disk operation. It should work out and fix the problem for you
Tip –
There is a chance that the drive you are trying to repair has gone out of order. We recommend you to consult with an authenticated hardware store and put the issue under a professional expert’s purview.