While using your Windows 10 or Windows 11 system you may face a peculiar Blue screen of death issue due to ‘Dxgkrnl.sys’ driver software. This problem is caused by corrupted or unstable graphics drivers on your system. No need to worry further. There are some easy fixes to solve this issue.
Restart your computer if you are facing this issue for the first time, check if it is booting up normally or not.
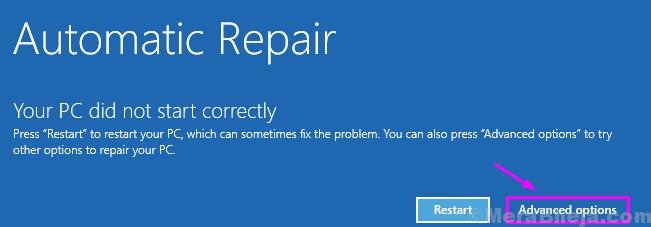
In case if you can’t access the PC normally, you need to open the ‘Automatic Repair‘ window.
a. Shutdown your computer.
b. Simply press the power button to boot up your system.
c. Then, when your system starts up, as soon as you have seen the manufacturer’s logo, press-hold the power button again to force shutdown your system.
d. Continue these steps for 2-3 more times and it will automatically reach the startup repair screen.
When your computer boots up, you will be in Automatic Repair mode.

Fix 1 – Update graphics driver
This problem is caused by a faulty graphics driver. Installing the latest update may solve this issue.
1. Appear at the Automatic Repair mode.
2. After that you need to click on the “Advanced options“.

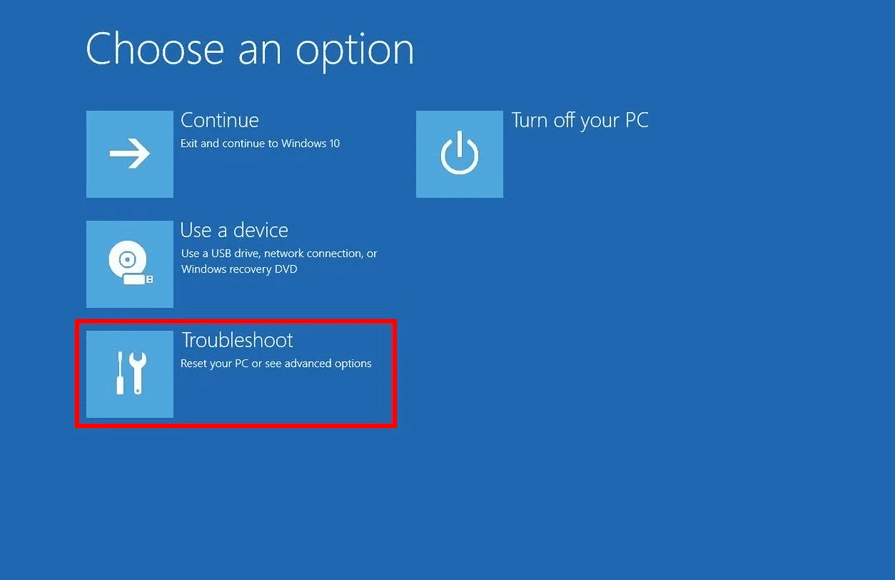
3. On the next screen you need to click on “Troubleshoot“.

4. When the Troubleshoot window prevails, simply need to click on “Advanced options“.

5. Next, click on the “Startup Settings“.

6. Simply, click on “Restart” on the bottom-left corner of the corner.

7. You need to press the ‘F5‘ key to “Enable Safe mode with Networking“.
As soon as you press that key, your system will boot into the safe mode.

[Safe mode appears to have a black desktop with ‘Safe Mode’ written at four corners of the desktop screen.]
8. When your computer boots into Safe mode, right-click on the Windows icon.
9. Then, you have to click on the “Device Manager“.

10. Click on the drop-down list of the “Display adapters“.
11. Then click on “Update driver“.

12. To let Windows search the driver itself, click on “Search automatically for updated driver“.

Now just wait for Windows to download and install the latest graphics driver.
This should fix your problem.
NOTE–
If Windows fails to discover a newer display driver, you can install a newer graphics driver itself.
1. You need to search for the “Nvidia drivers“.
2. Once the search results appear, click on “Download Drivers|NVIDIA“.

3. Simply set the ‘Product Type’, ‘Product series’, etc, and choose according to your graphics driver in ‘Option 1:’ settings.
4. To search for the latest driver, click on “SEARCH“.

5. On your screen you will notice that the latest driver has appeared.
6. Then click on “Download“.

6. Acess the downloaded driver file.
7. Then, double-click on it.

8. Simply choose the “NVIDIA Graphics Driver and GeForce Experience” option.
9. To agree with the policy settings, click on “Agree and continue“.

10. In the Installation Options screen, click on the “Express (Recommended)”
11. Finally, click on “Next” to start the installation process.

12. The installation process may take 5 minutes.
13. Click on “Close” to close the window.

Once it is installed, click on “Close“.
Don’t forget to restart your system.
Fix 2 – Turn Off NVIDIA Surround settings
NVIDIA Surround controls the synchronization between multiple monitors.
1. Search for the “NVIDIA Control Panel“.
2. Then you need to click on the “NVIDIA Control Panel” to access it.

3. When the NVIDIA Control Panel opens up, click on “3D settings” to expand it.
4. After that, click on the “Configure Surround, PhysX“.

5. On the right-hand side, in the ‘Surround configuration’ section, uncheck the “Span displays with Surround” option.
6. After that, click on “Apply“.

Restart your system.
Additional Tip –
NVIDIA Surround manages your multiple displays. If you continue to face the issue despite attempting the above fix, try booting your computer with a single display. Check if this helps.
Fix 3 – Disable SLI in NVIDIA settings
If you are using multiple GPUs on your device then this error may be caused due to SLI technology.
1. Click on the Windows key and type “NVIDIA Control Panel“.
2. Then you need to click on the “NVIDIA Control Panel“.

3. After accessing the NVIDIA Control Panel window, on the left-hand side, go here~
3D Settings > Set SLI Configuration
4. Now, on the right-hand side, in the SLI configuration settings, click on the radio button beside the option “Do not use SLI technology“.
5. Don’t forget to click on “Apply“.
Restart your system.
Check if the problem is still there or not.
Tips –
If the problem is still bothering you can consider running a DISM scan.
a. Open up the CMD terminal.
b. Execute this set of codes. To do so, copy-paste the first code and hit Enter. Do the same for the other two.
Dism /Online /Cleanup-Image /CheckHealth
Dism /Online /Cleanup-Image /ScanHealth
Dism /Online /Cleanup-Image /RestoreHealth

Once the CMD window.
Restart your computer.