Many windows users have recently reported that they are getting an error while registering any DLL file in the command prompt on windows 11. There might be a number of reasons why this error has occurred but we have listed down a few factors that are responsible for this problem.
- Corrupted system files
- Windows not being updated
- TypeLib Registry Key has no valid permissions
- The command prompt was not opened as an administrator
If you are also encountering such an issue on your system, then in this post we have compiled a few solutions that might assist the users to resolve this issue.

Fix 1 – Re-Register the DLL file using Command Prompt as admin
When the user tries to register a DLL file using the command prompt without admin privileges, then there is a possibility of getting such as error as mentioned above. So, we suggest that users re-register the DLL file in the command prompt as admin with the steps given below.
Step 1: Search cmd in Taskbar search box of your computer
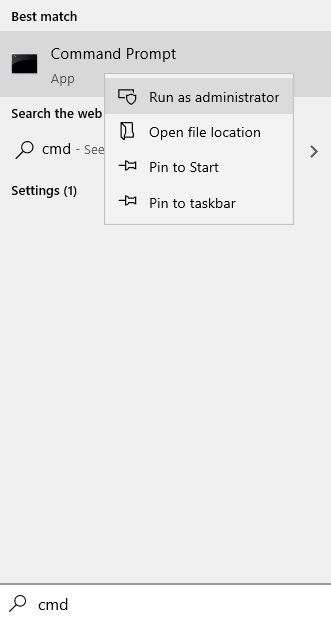
Step 2: When the command prompt icon shows up in the search result, Just do a right click on it and choose run as admin.

NOTE: Accept the UAC prompt by clicking Yes to continue.
Step 3: In the Command Prompt, type regsvr32.exe /s C:\Windows\system32\advpack.dll and press the Enter key to re-register the DLL file.
NOTE: You can replace advpack.dll with the name of the DLL file that you want to re-register on your system.

Step 4: After it finished re-registering the DLL file, close the command prompt on the system.
Fix 2 – Copy the file in Syswow folder
1 – Open file explorer by pressing Windows and E key.
2 -Go to C:/Windows/System32 folder.
3 – Locate the OCX file in the folder.
You can use the search box to search the file.
4 – Now, paste it in C:\Windows\SysWOW64 folder
5 -Now, open command prompt as admin
6 – Reregister the dll file
Fix 3 – Edit permissions in Registry
1 – Search registry editor in the search box and then click on Regsitry editor from the search.
2 – Now, go to the location as ashown below.
HKEY_CLASSES_ROOT\TypeLib
3 – Now, do a right click on TypeLib and then click permissions

4 – Now, select your user account and make sure full control is selected. If Full control is not selected , then select them and click Apply.

What to do if your user account is not listed here
5 – Click Add.
6 – Click Advanced.

7 -Click Find Now.

8 – Select your username
9 – Click OK.
10 – Click Apply and OK.
11 -Now, Change the permission to full control for this added user.
Fix 4 – Run SFC Scan and DISM Health Restore
There might be a number of causes for such type of error in any system but corrupted file system are not easily detected on screen unless it is scanned using a system file checker. It is better to scan the system for any corrupted data files and replace them if there are any files found.
Step 1: Press Windows + R keys to open the Run box and type cmd and hit the CTRL + SHIFT +ENTER keys to open the Command prompt as admin.
NOTE: Click Yes on the UAC prompt to continue.

Step 2: In the command prompt, type the below command and hit Enter key to execute it.
sfc /scannow

Step 3: After the SFC scan is done if there are any files found, then replace them.
Step 4: Now, copy and paste the command below and press Enter key.
DISM /Online /Cleanup-image /Restorehealth

Step 5: Wait till it finishes and then, close the command prompt.
Step 6: Now check if the error still occurs.
Hope this should fix the issue.
Fix 5 – Keep Windows Updated
Sometimes these types of errors occur because the system is not up to date. Microsoft often releases the updates for windows after receiving feedback from the users and this will enhance the system performance and user experience. So we recommend that the users follow the steps given below on how to keep the windows updated.
Step 1: Press Windows + I keys together to open the Settings app on your system.
Step 2: Click Windows update on the left side menu of the Settings window.
![Fix: DLLREGISTERSERVER not Found in Command Prompt in Windows 11 ,10 11 Settings Windowsupdate Min[1]](https://thegeekpage.com/wp-content/plugins/wp-fastest-cache-premium/pro/images/blank.gif)
Step 3: On the right side of the Settings app, Click Check for updates to see if there are any updates available.

Step 4: If there are any pending updates available, then please download and install them.
Step 5: Once it is done, restart the system.
Step 6: After the system boots up, check if the problem still exists.
Hope this solved the issue.
That’s it.
Hope you found this article informative and helpful. Please let us know in the comments section below.
Thank you!