Some users have recently complained an error message “Your digital ID name cannot be found by the underlying security system” while opening a secure, encrypted email in Microsoft Outlook. This is a mismatch between the older 3DES encryption and the current AES256 encryption. But, don’t worry. Run through these quick workarounds and if those can’t help you resolve the issue, follow the main solutions to fix the problem.
Workarounds –
1. Although the error message may seem to be quite complex, your problem can be temporary. Close the error message, wait for a minute or two. Then, reopen the mail.
2. Try opening other emails from the same sender and check whether you can access those emails or not. If you can, then you should request the sender to forward the email once more.
Fix 1 – Enable Server Authentication
Turn on the server authentication feature in Internet Options on your system.
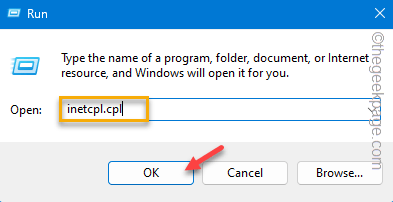
Step 1 – Quickly tap the Windows key and the R keys together.
Step 2 – Type this in there and click “OK“.
inetcpl.cpl
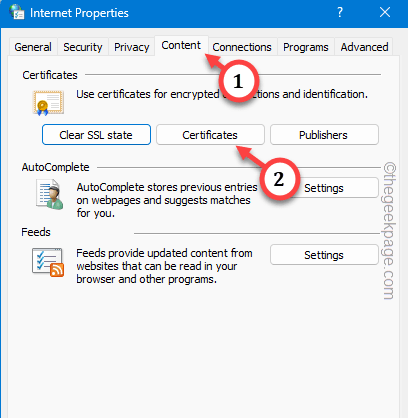
Step 3 – As the Internet Options page appears on the screen, go to the “Content” tab.
Step 4 – Find the Certificates section. Tap “Certificates” to open that up.
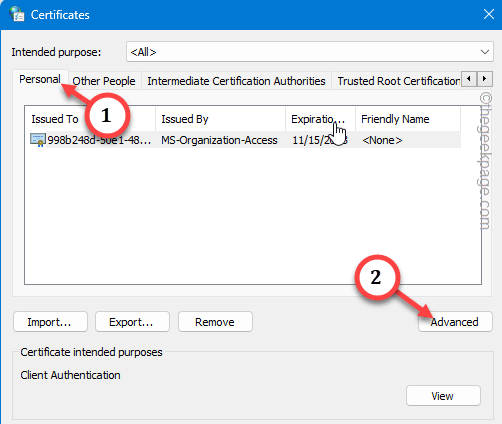
Step 5 – In the Certificates tab, go to the “Personal” section.
Step 6 – This section enlist all the personal certificates. Just tap the “Advanced” menu in the corner to open that.
Step 7 – In the Advanced Options dialog box, check these two options –
Server Authentication
Secure Email
Step 8 – Later, click the “OK” button once to save the changes.
Step 9 – Tap “Close” to close the Certificates tab.
Step 10 – This will return you to the Internet Options page. Don’t forget to tap “Apply” and “OK” consecutively to save the changes.
Reload the Outlook app on your device and retry accessing that email.
If the error still shows the Digital ID error message, follow the next solution.
Fix 2 – Check for the certificate
Verify that whether your account has the proper certificate to view the email.
Step 1 – To do this, you have to be present in the Microsoft Outlook.
Step 2 – If you are already there, follow this path –
File > Options
Step 3 – In the Outlook Options tab, go to the “Trust Center” tab.
Step 4 – Open the “Trust Center Settings…” setting.
Step 5 – In the Trust Center Settings page, go to the “Email Security” tab.
Step 6 – On the right-hand pane, look whether you can view the name of the Certificate file or not. (certificate file looks like – *.cert).
Step 7 – Tap “Settings” to explore more.
Step 8 – Check whether you can view anything in the Security Settings Name or not. Tap the drop-down option and select a security setting.
If it shows up blank, the certificate has expired and you have to buy one.
You can use the “Choose” options to choose a Signing Certificate and Encryption Certificate to load them up.
Check if this offers any help.
Fix 3 – Delete the sender certificate
There is a chance that the sender certificate is corrupt and you should remove that from your device.
Step 1 – To do this, hit the Win+R key combinations.
Step 2 – After this, paste this and hit Enter.
mmc
This will load Console1.
Step 3 – Now you have to open the Certificates Manager from here. So, tap “File” and click “certmgr” to open that up.
Step 4 – Go to the “Certificates- Current User” tab. Click it once to expand that.
Step 5 – Select the “Other People” and expand that as well. Click the “Certificates” to choose that.
Step 6 – Look on the right pane to see whether you can notice the faulty certificate in there or not.
Step 7 – If you can find that, right-click that and click “Delete” to remove it from your device.
Step 8 – Now, you have to save this change. So, go to the “File” and tap “Save” to save changes.
After this, you won’t have any problem accessing that email again.


