A lot of times, you may need to check the CPU or disk usage information due to different reasons like, if you want to save more files, a big file or you just need an idea of the remaining storage before you need to clear some space. For this, the easiest way to check the the hard disk usage is through This PC.
When you open the File Explorer and open the This PC folder, on the right side, under the Devices and drives section, where you see the different drives, you should see a bar below each drive and that’s the disk usage bar. However, you can view this bar when it’s set to the default view, that is, to Tiles view. But, even with the Tiles view, if you do not see the disk usage bar, then there’s a problem. While there’s another way to check your disk usage on your PC (we will discuss later), the File Explorer is the quickest and the most convenient ways.
However, this is a common issue and nothing to worry about. Here’s our post on how to fix the the missing disk space usage bar on your Windows 11/10 PC.
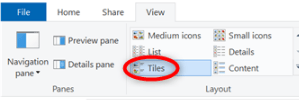
*Note – Before you proceed, make sure that you have enabled the Tiles view in your File Explorer and check if that was the problem. Here’s how to set the Tiles view:
Method 1: Choose select tiles Options
Step 1: Press the Win + E keyboard shortcuts and the File Explorer opens.
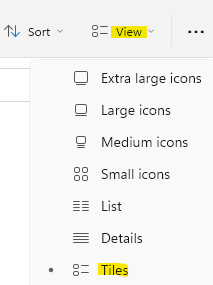
Step 2: In the File Explorer, navigate to the top right side of the window and click on the View option to expand it.
From the list select Tiles.

Note: – For Windows 11 users

Now, select This PC on the left side and on the right side, under the Devices and drives section, you should see the disk space usage bar.
However, if it does not appear, try the below solutions to possibly fix the issue.
Method 2: Reset Folders View in File Explorer Options
The first method to try by default will be to reset folders in the File Explorer Options. Follow the below instructions to reset the folders and see if it helps you view the disk usage bar again on your Windows 11 PC:
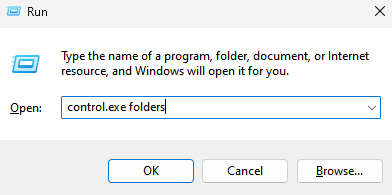
Step 1: Press the shortcut keys – Win + R simultaneously on your keyboard.
This will open the Run command window.
Step 2: In the Run command search bar, type control.exe folders and press OK to launch the File Explorer Options dialogue box.

Step 3: Now, select the General tab and under the Privacy section, press the Restore defaults button.

Step 4: Now, Go to View Tab and click on Restore defaults

Once done, press Apply and then OK to apply the changes and exit.
Now, go back to This PC folder in the File Explorer and check if you can now view the disk space usage bar under the drives.
Method 3: Modify the Registry Editor Settings
When some solutions fail to work, editing he registry editor settings prove to be useful in most cases. However, before you make any changes to the registry settings, do create a backup of the registry keys. This will help you to recover any data that you may lose during the process.
Now, here’s how to make the changes to the registry editor that may fix the missing disk space usage bar issue on your Windows 11 PC:
Step 1: Move your cursor to the Start button on your Taskbar, right-click on it and select Run.

You will now see the Run command window.
Step 2: In the Run command window, type regedit in the search bar and press the Enter key on your keyboard.

Step 3: In the Registry Editor window that opens, navigate to the below path:
HKEY_CLASSES_ROOT\Drive
Now, go to the right side of the window and double-click on TileInfo.
*Note – If you do not find the TileInfo string value, then on the right side, right-click on an empty area, select New and then select String Value. Name this TileInfo.

Step 4: Now, once you have TileInfo , Just double click on it.
You will now see the Edit String pop up box.
Copy and paste the below path in the Value data field:\
prop:*System.PercentFull;System.Computer.DecoratedFreeSpace;System.Volume.FileSystem
Press OK and then save the changes and exit.

Once done, close the registry editor window, and now go to File Explorer > This PC and check if you can view the disk space usage bar back again.
If it has not fixed the issue, try restarting PC.
Method 4: Reduce your Volume Label
The drive in This PC folder, usually shows three lines of info under the Tiles view mode. This includes – volume label with drive letter, disk space usage bar, and text information. Since all this information makes the volume label too long , it can sometimes wrap to the next line leading it to run out of space to show the text message.
So, this method is especially useful for the situation where you cannot see the text message below the volume label. Therefore, in this case, it’s recommended to shorten the length of the volume label. To do this, follow the below steps:
Step 1: Select the drive with longer name and press F2 from keyboard.
Step 2: Next, select Rename and now rename it with a shorter name.

*Note – This change usually asks for administrative rights. Simply click on Continue in the permission box to proceed with the renaming.
Method 5: Change Permission to Full Control
If you come across a situation where you cannot view the drive properties, along with the disk space usage bar, then changing the ownership from TrustedInstaller to your user id and then change the permission to full control can help fix the issue. Make sure that you change the ownership first, without which you won’t have permission to edit the security rules. Leets see how to change the ownership and then to full control to possibly fix the issue:
Step 1: Right-click on the drive and select Properties.
Step 2: In the Properties window, select the Security tab.
Here, click on the Advanced tab at the bottom right.
Step 3: In the Advanced Security Settings window, navigate to the bottom left and click on the Change permissions button.
Step 4: In the Advanced Security Settings window, go to the Owner field and click on the Change link in blue.
Step 5: As the Select User or Group dialogue box pops up, click on Advanced.
Step 6: In the next window, click on the Find Now button.
You will now see a list in the Search results field.
Here, select your user name and press OK.
Step 7: You will now return to the small Select User or Group dialogue box and press OK.
Step 8: Back in the Advanced Security Settings window, press Apply and then OK to apply the changes and return to the Properties window.
Step 9: Under the Security tab, in the Group or user names field, select your user name and click on the Edit button below.
Step 10: Now, go to the Permissions field below and next to Full control, check the box under Allow.
Hit the Apply button and then OK to save changes and exit.
Now, in the File Explorer > This PC check if you can view the drive properties and the disk space usage bar.
Method 6: Enable Percentage Full Column
This method worked for Windows 8 and now, it works for Windows 11 as well, albeit a little bit here and there in the placemen of the options. All you need to do is to enable the Percentage full column and it displays the disk usage bar next to the drive. Here’s how to enable the percentage full column:
Step 1: Navigate to the Windows icon (Start) on the Taskbar, right-click on it and select File Explorer to open file explorer.
Step 2: In the File Explorer window, click on This PC shortcut on the left

Now, on the right side of the pane, click on the View tab on the upper right and select Details.

Step 3: You will now see a detailed view of the drives under the Device and drives section.
Here, go to the top of any of the columns, right-click on it, for example, right-click on Type and select Percent Full.

This will add an additional column named Percentage Full on the right. Now, as you go to the drives, on the right side, you can see the disk space usage bar.