When some issues happen with any of the programs or applications in Windows, windows shows the user an error message asking the user whether they want to send some data to Microsoft so that they can analyse the issue better. Though it is good to send the data to improve the services, it can sometimes get pretty annoying. Also, this particular program is reported to be consuming too much of CPU power. Whatever be the reason, if you would like to disable this error report program, there definitely are ways!
Method 1: Through Services Windows
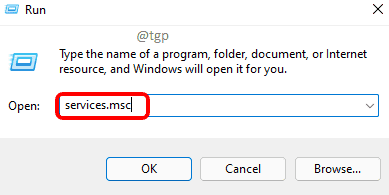
Step 1: Launch the Run window by pressing WIN + R keys together. Type in services.msc and hit the OK button.
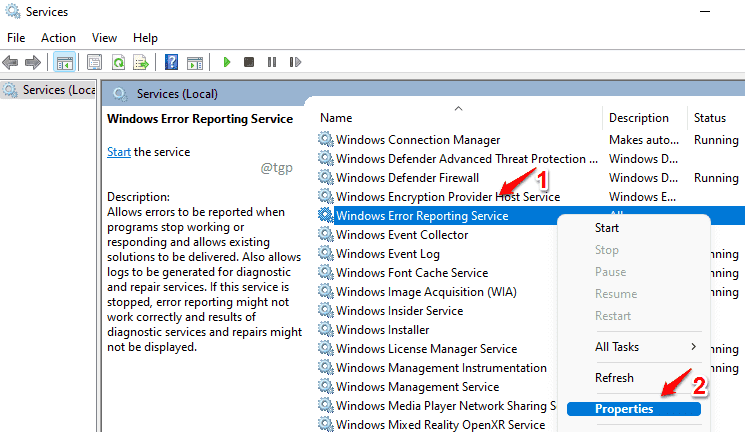
Step 2: When the Services window launches, in the right window pane, scroll down and locate the service entry named Windows Error Reporting Service.
Once located, right click on it and then click on the Properties option.
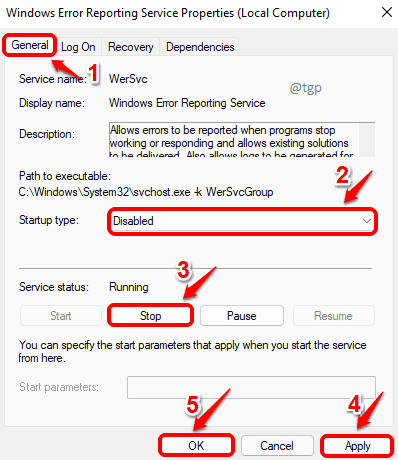
Step 3: Previous step would open up the properties window for the selected service. Perform the following steps next.
- Make sure you are on the General tab.
- Choose Disabled option from the Startup type drop down list.
- Click on Stop button if the service is in running state.
- Once done, click on Apply and then on OK buttons.
Restart your machine for the changes to take over.
Method 2: Through Group Policy Editor
Step 1: Launch Run window. Press WIN+R keys for that.
As next, type in gpedit.msc and hit OK button.
Step 2: Navigate to the following path next.
Computer Configuration -> Administrative Templates -> Windows Components -> Windows Error Reporting
In the left window pane, make sure you have reached the folder Windows Error Reporting.
As next, in the right window pane, scroll down, find and double click on the policy named Disable Windows Error Reporting.
Step 3: Now choose the radio button corresponding to the option Enabled. Hit Apply button and then Ok button.
Once you restart the machine, changes will take over.
Method 3: Through Registry Editor
Note: It is always recommended to take a backup of your registry editor before you make any changes to it, as any mistakes in registry settings could result in unwanted issues.
Step 1: Press WIN + R keys together to launch the Run window. Type in regedit and hit Enter key.
Step 2: Once the Registry Editor window opens up, follow the steps below:
1. Copy paste the following path in the navigation bar and hit Enter key.
HKEY_LOCAL_MACHINE\SOFTWARE\Microsoft\Windows\Windows Error Reporting
2. Right-click on the folder Windows Error Reporting.
3. Click on New option from the right-click context menu.
4. Click on DWORD (32-bit) Value next.
Step 3: Name the newly created Dword value as Disabled. Once naming is done, double click on it to edit its properties.
Step 4: In the Value data field, type in 1 and hit the OK button. That should be it. Restart your machine for the changes to take over.
Note: If you ever want to turn on the Windows error reporting through Registry Editor, then simply put 0 (zero) instead of 1 in the Value data field and restart your machine.


