As we all know, Online Speech recognition is a feature that allows users to convert what they have spoken into text format. This feature must be enabled if the user uses applications like Cortana or any other Windows-supported cloud-based speech recognition.
If you are looking out for ways to enable or disable Online Speech recognition in your system, this article provides you step by step guide with three different cases.
Method 1: From Settings
Step 1: Open Settings by Pressing Windows and I key jointly
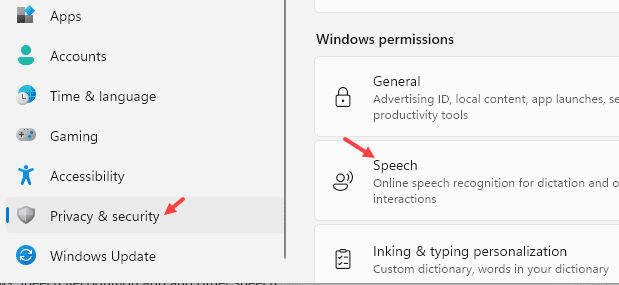
Step 2: Now, Click on Privacy & Security from left menu. Click Speech from right side

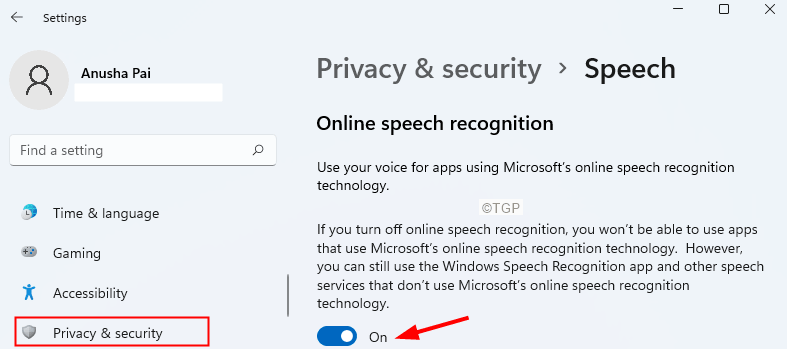
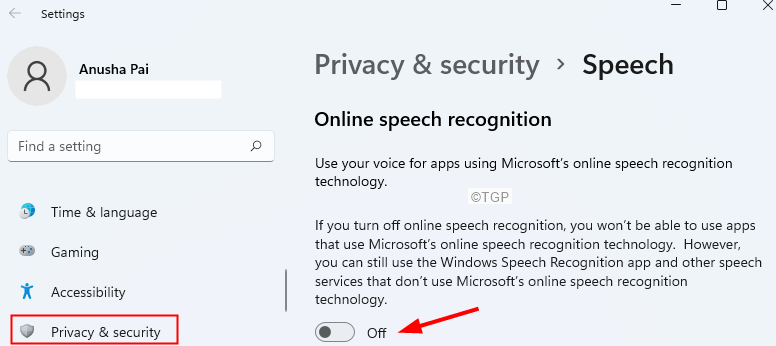
Step 3: You will see an Online Speech recognition window opening.
Step 4: In order to Enable Speech recognition, toggle the button to turn it ON as shown below.
Step 5: In order to Disable Speech Recognition, toggle the button to turn OFF as shown below.
NOTE: Windows Users can enable or disable the Online Speech Recognition from Settings. However, if you see the option greyed out, try out the below two methods.
Method 2: From Group Policy Editor
NOTE: Group Policy Editor is available only in Windows 10/11 Pro versions. This does not work in Windows 10/11 Home versions.
Step 1: Open the Run Command Window using Windows+R.
Step 2: Type gpedit.msc and hit Enter.
Step 3: In the Local Group Policy Editor window that opens, from the left-hand side, navigate to the following location. Simply double-click on the section to expand the selection.
Computer Configuration\Administrative Templates\Control Panel\Regional and Language Options\
Step 4: Double-click on Allow users to enable online speech recognition services.
Step 5: In order to Enable Online Speech recognition services, click on Enabled.
Step 6: In order to Disable Online Speech recognition services, click on Disabled or Not Configured.
Step 7: Click on Apply and then click on OK.
Method 3: From Registry Editor
Step 1: Open the Run Dialog using the keys Windows+R
Step 2: Type regedit and hit Enter

Step 3: In the UAC window that opens asking for permissions, click on Yes
NOTE:
Registry editing can harm the system even with the slightest mistake. It is advised to take the backup of the registry before proceeding. To take a backup, In the Registry Editor–> Go to File –> Export –> Save your Backup file.
Step 4: In the Registry Editor window, on the search bar at the top, copy-paste the following location
HKEY_LOCAL_MACHINE\SOFTWARE\Policies\Microsoft\InputPersonalization
NOTE: If you cannot see the InputPersonalization folder, you can create one. Right-click on the Microsoft folder. Choose New > Key. Name the newly created key as InputPersonalization
Step 5: From the left-hand side, double-click on the InputPersonalization folder.
Step 6: On the right-hand side, right-click on an empty area and then choose New>DWORD(32-bit)Value.
Step 7: Name the newly created key AllowInputPersonalization.
Step 8: Double-click on AllowInputPersonalization to modify its value.
Step 9: In order to Disable Online Speech Recognition, set the value to 0 and click on OK
Step 10: In order to enable Online Speech recognition, delete the Registry key AllowInputPersonalization.
That’s All Guys !!
We hope this article has been informative. Thank you for Reading.
Kindly comment and let you know the fix that helped you.
Please Stay tuned for more such tips and tricks.

