PageFile.sys is more like an additional RAM which is used by Windows for virtual memory. It’s basically known to improve the speed and performance of your system, but this way, you would not know what data Windows saves in the paging file. It may be possible that Windows is saving all your private data and passwords in the PageFile.sys, but it does not get removed on restart. This makes your sensitive data vulnerable to unauthorized users as anyone can access your data through C drive.
This is why, some users may want to change the way how it works. But, instead of deleting the PageFile.sys which can be risky for your system, you can follow the below process as recommended. This will help keep your data safe in the PageFile.sys.
Method 1: By Deleting the PageFile.sys from File Explorer
PageFile.sys is known to boost your system performance, but if you have decided to remove it completely, you should back up all your files first. This will help you to recover all your files easily if any issue arises due to he removal of the paging file.
All you need is an external storage device like a pen drive or a DVD and you can follow this method to backup your system automatically on Windows 10.
Once you have created a back up of your system, you cam move onto delete it.
PageFile.sys is a protected system file and hence, it’s hidden. Therefore, we would first need to unhide it.
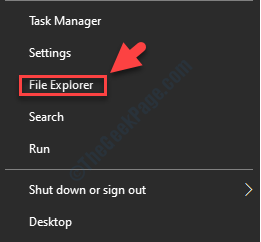
Step 1: Right click on the Start menu and select File Explorer.

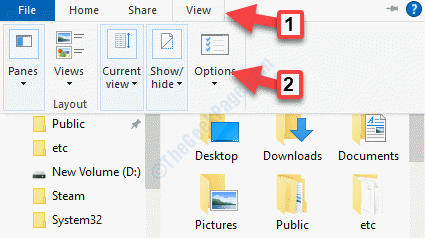
Step 2: In the File Explorer window, go to the View tab on the top and double-click on Options.

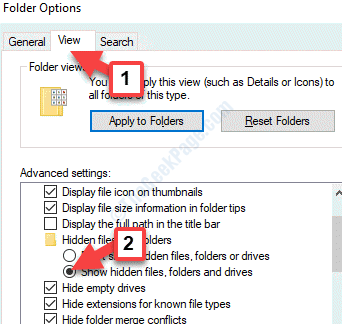
Step 3: In the Folder Options window, go to the View tab and under the Advanced settings, go to Hidden files and folders section.
Then, click the radio button next to Show hidden files, folders and drives.

Step 4: Next, uncheck the box next to Hide protected operating system files (Recommended).
Click on Apply and then OK to save the changes and exit.

Now that the PageFile.sys is uncovered, you can view it in the Windows Explorer. Proceed with the below steps to delete the paging file.
Step 1: Press Win + E hotkey on your keyboard to open the File Explorer.
Then, go to This PC shortcut on the left and on the right side of the pane, click on C drive.

Step 2: Now, look for pageFile.sys file, select it and hit Delete.

It doesn’t go to the Recycle bin, but rather gets deleted completely and therefore, make sure you back up all the files as shown above.
Alternatively, you can move the PageFile.sys to another drive.
Method 2: By Shifting the PageFile.sys to Another Drive
Step 1: Press the Win + X keys together on your keyboard and select Settings.

Step 2: In the Settings window, click on System.

Step 3: In the next window, on the left side of the pane, click on About.

Step 4: Next, go to the right side of the pane, scroll down and under Related settings click on System info.

Step 5: It opens the System window. Click on Advanced system settings on the left side of the pane.

Step 6: In the System Properties window that opens, go to the Advanced tab.
Now, go to the Performance section and click on Settings.

Step 7: In the Performance Options window that opens, go to the Advanced tab and under the Virtual memory section, click on Change.

Step 8: Next, in the Virtual Memory dialogue box, uncheck the box next to Automatically manage paging file size for all drives.
Now, select C: from the drive list.

Step 9: Then, scroll down, click the radio button next to No paging file and hit the Set button.
Click on Yes to confirm.

Step 10: Next, go to the Drive list above and select the drive where you want to save the paging file.
Now, click on the radio button next to System managed size and press the Set button.

Press Apply and OK to save the changes and exit. Now restart your computer and the PageFile.sys is now completely deleted from your main drive. However, it’s not recommended to delete the page file as the system will stop creating crash dumps whenever there’s a system error.
You can also set the system to remove the page file whenever it shuts down.
Method 2: By Setting your System to Remove Page File on Shutdown
While having the page file is important for the better performance for your system, it can also be challenging as it gets carried over each time your computer restarts. Therefore, deleting the page file on each shutdown is a solution so that on ever restart, Windows creates an all new paging file. However, it will also slow down the boot and the shut down times of your system. Let’s see how to delete the page file on each shutdown.
Solution: By Editing the Registry Editor
Before making any changes to the registry editor, make sure that you create a backup of the registry data. This will help you recover any data in case you lose any data in the process.
Step 1: Press the Win + X keys together on your keyboard and select Run.

Step 2: In the Run command that opens, type regedit in the search box and hit Enter to open the Registry Editor window.

Step 3: Copy and paste the below path in the Registry Editor address bar and hit Enter:
HKEY_LOCAL_MACHINE\SYSTEM\CurrentControlSet\Control\Session Manager\Memory Management
Now, go to the right side of the pane and double-click on the DWORD value named ClearPageFileAtShutdown.

Step 4: It will open the Edit DWORD (32-bit) Value window. Go to Value data and set it to 1.
Press OK to save the changes and exit.

*Note – If the ClearPageFileAtShutdown DWORD value is missing, then right-click on an empty area, select New > DWORD (32-bit) Value. Rename the new DWORD value as ClearPageFileAtShutdown. Then follow the Step 4 to set the Value data to 1. Press OK to save the changes.
Now, restart your computer and the PageFile.sys will now be deleted with each shutdown and a new page file will be created with each restart of your system.