Whenever you are looking for an alternative to the Windows Media Player, the next name that may come to your mind is the VLC Media Player. While it allows you to play all types of video and audio formats, it also offers a smart features and is easy to use. However, just like any other software, even VLC may show up errors at times like not playing the audio for your videos. So, if you are experience the VLC Media Player audio not working issue, you are at the right place. We have listed a a couple of solutions in this post that can help you fix the error and continue with the entertainment. Let’s see how.
Method 1: By Unmuting the VLC Audio
Before you proceed with the major fixes below, make sure that the VLC audio is not muted. If it is, then unmute it using the processes below.
Solution 1: Through Audio Tab or Speaker Icon
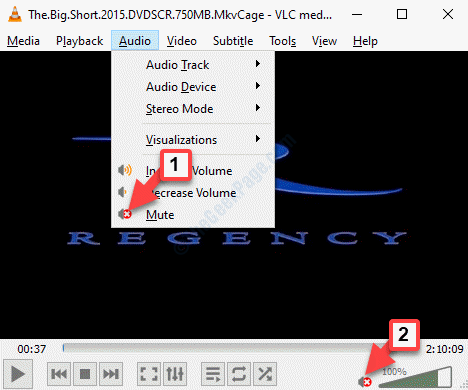
Step 1: Open the VLC media player, go to the Audio tab at the top and select Mute from the menu.
Alternatively, you can click on the red and white x symbol on the speaker icon located next to the volume control at the bottom of the player.

You can also try the alternative solution to unmute the audio.
Solution 2: Through the Volume Mixer
Make sure that you perform this method while the video is playing.
Step 1: Go to the Taskbar and right-click on the speaker icon seated on the bottom right.
The, select Open Volume Mixer from the menu.
![]()
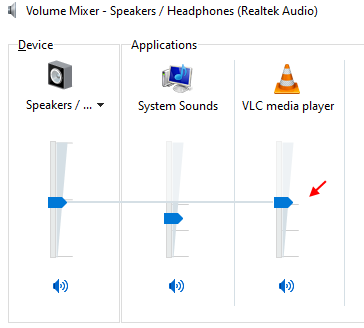
Step 2: In the Volume Mixer box, go to the VLC Media Player option and click on the speaker icon at the bottom (with a red stop sign) to unmute it.

Your VLC media player audio should be working now, but if the audio is still not working, you can proceed with the other fixes.
Method 2: By Enabling Audio Preferences
Step 1: Launch VLC media player, and click on the Tools tab at the top. Select Preferences.

Step 2: It opens the Simple Preferences window. Go to the Audio tab and under Audio Settings, check mark the box next to Enable audio option.
Click on Save to save the changes and exit.

You can now enjoy your video with its audio, but if you are still facing an issue, you may have to turn on the sound device.
Method 3: By Turning on the Sound Device
Step 1: Press the Win + R shortcut key on your keyboard to open the Run command.
Step 2: In the Run command window, type control and hit Enter to open the Control Panel window.

Step 3: In the Control Panel window, go to the View by field and set it to Category.
Then, select Hardware and Sound from the list.

Step 4: Next, go to the right side of the window and click on Sound.

Step 5: It will Sound dialogue box. Now, under the Playback tab, right-click on each of the devices (one-by-one) and select Enable for all the devices.
Press OK to save the changes and exit.

The VLC audio should be back up and running now, but if the problem persists, you can try resetting the audio preferences.
Method 4: By Resetting the Audio Preferences
Step 1: Launch VLC, go to the Tools tab and select Preferences.

Step 2: In the Simple Preferences window that opens, go to the Audio tab and navigate to the bottom of the window. Click on Reset Preferences.

Wait for the process to complete and once done, you should then be able to enjoy the VLC audio.
However, if you are still facing the issue, you can try turning off and then turning on the Audio Track.
Method 5: By Disabling and Enabling the Audio Track
Step 1: Open VLC Media Player, click on the Audio tab while the video is still playing, select Audio Track and select Disable.

Step 2: Now, enable the audio track back again following the path as shown:
VLC > Audio > Audio Track > Track 1 – [English].

This method should help you fix the VLC audio issue, however, if there’s still no sound, you can try chnging the VLC output model.
Method 6: By Changing the VLC Output Module
Step 1: Launch VLC, go to the Tools tab and select Preferences.

Step 2: In the Simple Preferences window, go to Audio and then under Audio Settings, go to the Output section.
Here, go to the Output module field and set it to Automatic.
Press Save to save the changes and exit.

Step 3: You can now check if the audio is back up and running, but if the problem persists, go to the same path again – VLC > Tools > Preferences > Audio > Audio Settings > Output modul.
Now, try the other output modules from the drop-down one by one and click Save each time. Then go back and check each time if the audio has started working with that specific module. If not try another one till it’s fixed.
If this method also does not solve your problem, then you may try turning off the audio enhancements.
Method 7: By Disabling All Enhancements in Control Panel
Step 1: Press the Win + R shortcut key on your keyboard to open the Run command.
Step 2: In the Run command window, type control and hit Enter to open the Control Panel window.

Step 3: In the Control Panel window, go to the View by field and set it to Category.
Then, select Hardware and Sound from the list.

Step 4: In the Sound dialogue box, go to Playback tab, right-click on the primary sound device and select Properties.

Step 5: Go to the Enhancements tab and under System Effects Configuration, check the box next to Disable all sound effects.
Press Apply and then OK to save the changes and exit.
Now, restart your service and launch VLC media player, The audio should now play without any issues.
If none of the above methods work, then the only option left is to check if you are running the latest version of VLC. If not, then make sure that you update the VLC Media Player to the latest version available. To know how to update VLC Media Player in your Windows PC, refer to this article.
These methods should help you fix the VLC Media player audio not working issue in your Windows 10 PC, however, it may be possible that the issue is with the sound on your Windows 10 PC and in that case, you can try the steps as mentioned in this article.