Gone are the times when you used to watch your movies on the big television. It was easy to put up a timer to power off your TV too, should you fall asleep. But with the intervention of laptops, TVs are old stories as you can watch movies more easily on your laptops. For many, the sleep timer feature in laptops could feel like a difficult task. But what if we tell you that you can set up a sleep timer on your laptop even easier than setting it up on your television?
This article is all about how you can easily set up a scheduled shutdown in your Windows 11, so that you can fall asleep watching movies, without having the fear of draining the power.
How to Automatically Shutdown Your Windows After a Certain Period via CMD
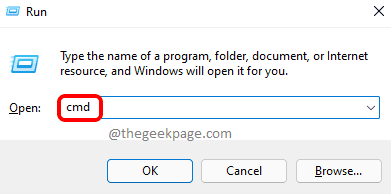
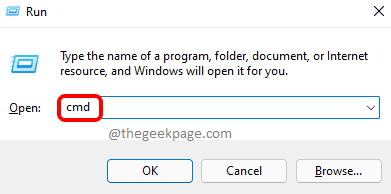
Step 1: Launch the Run window by pressing the Win + R keys together. Type in cmd and hit Enter key to launch Command Prompt.
Step 2: In the Command Prompt window, type in the following command and hit Enter key.
Shutdown -s -t <time_parameter>
Note: <time_parameter> in the command is the time in seconds. If you want to schedule the shutdown after 1 hour, you can give the time parameter as 3600.
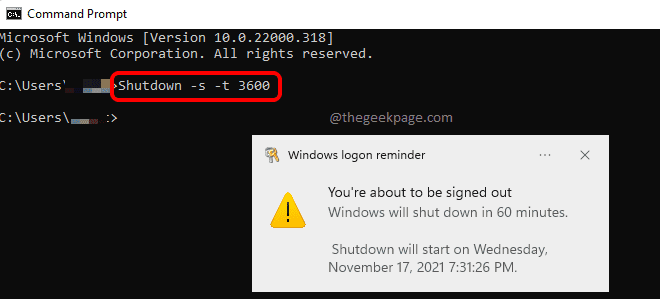
Eg: Shutdown -s -t 3600
You will now get a popup notification saying that your system will shut down in 60 minutes. That’s it. You have successfully scheduled your automatic shutdown.
Note: – If it is not working you can use the command given below
Shutdown /s /t 3600
How to Cancel the Scheduled Shutdown via CMD
If you scheduled a shutdown and change your mind later, you can always cancel the shutdown task. Follow the steps below to do it easily via cmd.
Step 1: Press the keys Win + R together to launch the Run window. To open Command Prompt, type in cmd and hit Enter key.
Step 2: As next, type in or copy & paste the following command and hit the Enter key.
Shutdown -a
Once the command is executed, you will see a popup notification saying your scheduled shutdown is canceled.
How to Automatically Shutdown Your Windows After a Certain Period via Desktop Shortcut
Even though Command Prompt method described above to schedule a shutdown is pretty easy and straightforward, if you frequently require to schedule shutdowns for your machine, it is well-advised that you create a desktop icon for the same.
Step 1: Right-click on an empty space on your Desktop. From the right-click context menu, click on New and then on Shortcut options.
Step 2: In the Create Shortcut window, under the field for Type the location of the item, copy & paste the following command and hit Enter key to move on to the next step.
Shutdown -s -t <time_parameter>
Note: <time_parameter> is the time in seconds. If you want to schedule the shutdown after 60 minutes, i.e., 1 hour, you can give the time parameter as 3600.
Eg: Shutdown -s -t 3600
Step 3: In the next step, give a name to your Shut down shortcut. Once done, hit the Enter key.
Step 4: You can now see that a new shortcut is created on your Desktop for scheduling shutdowns. Double click on the shortcut to schedule a shutdown right away.
You’ll now see a popup saying You’re about to be signed out in the time period you have specified in the shortcut.
Step 5: As the final touchup, if you would like to give your shortcut a cool icon, you can right click on your shortcut and then click on Properties.
Step 6: Click on the Change Icon button under the Shortcut tab.
Step 7: From the Change Icon window, choose an icon of your choice and then click on the OK button.
Step 8: That’s it. Your brand new shortcut, with a cool icon, is all ready for you to schedule shutdowns in your machine. Double-clicking on this icon would instantly schedule a shutdown for your machine.
How to Cancel the Scheduled Shutdown via Desktop Shortcut
It is very natural that you’ll need a shortcut to cancel your scheduled shutdowns as well. Follow the steps below to create a shortcut to cancel your scheduled shutdowns.
Step 1: On your Desktop, right click on an empty space to bring out the context menu. Click on the New option and then on the Shortcut option.
Step 2: In the Create Shortcut window, copy & paste the following command and hit Enter key.
Shutdown -a
Step 3: In the step that follows, you can give your shortcut any name of your choice. I have named mine as Shutdown Cancel Shortcut.
Step 4: That’s it. If you look at your Desktop now, you can see that your cancel shortcut is created.
Double click on it to cancel any scheduled shutdowns. Upon double-clicking, you will be getting a pop-up notification saying that your scheduled shutdown has been canceled.
Please tell us in the comments whether you found the article helpful.


