If you are seeing ‘Default gateway is not available‘ message during troubleshooting your internet connection, then the problem is associated with either incorrect IP address or ISP config settings. To solve this issue check out these workarounds first for simpler solutions and then go for the main solutions. Users experience Default gateway not available which most of the time is their router and that means there is a connection issue between your machine and the router.
Initial Workarounds-
1. Restart your computer. After restarting check if you can connect to the internet or not.
2. If you are using an antivirus or firewall, disable it temporarily and try to connect to the internet again.
If any of these didn’t work, go for these fixes-
Fix-1 Disable and Enable network
Disabling and re-enabling the network drive will surely work out for you.
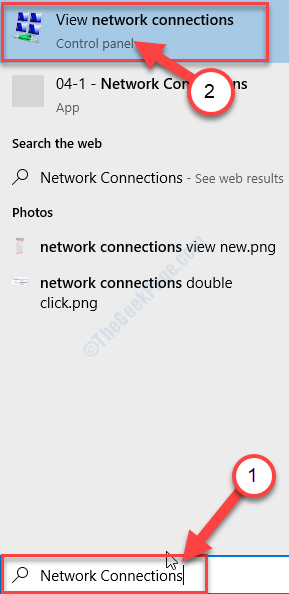
1. First, type “Network Connections” in the search box.
2. Then, click on the “Network Connections” in the search result.

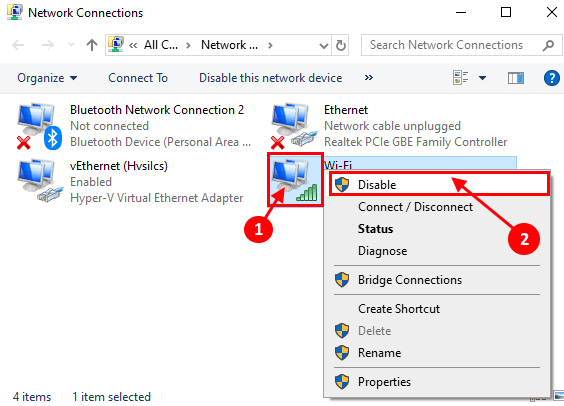
Network Connections window will be opened.
2. Then, right-click on your network adapter and then click on “Disable” to disable it.

3. Now, wait for a while.
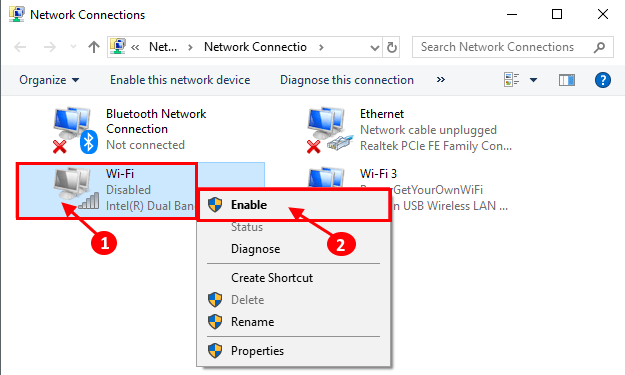
4. Then, again right-click on the disabled network drive and then click on the “Enable“.

This way you can the network drive will be reset on your computer.
The Default Gateway problem should be fixed.
For Windows 11 Users
1 – Press Windows key + I key together from your keyboard.
2 -Now, Click on Network & Internet from the left side and then click on Advanced network settings from the right side.

3 – Disable your network adapter (WiFi or Ethernet with which you are connected to the ineternet )
4 -Again Click on Enable to enable it.
Fix 2 – Disable Your anti Virus software
If you have a third party anti virus software (such as Mcafee etc.) installed on your System, please disable it and try again. An easy way to disable it is ,
1 – just press CTRL + SHIFT + Esc keys together from your keyboard to open task manager.
2 – Now, Go to startup tab and locate the Anti Virus from the list.
3 – Right click and Choose diable.
4 – Now, restart your computer.

Fix-3 Reset IP
Resetting IP on your computer will solve this issue.
1. Press Windows key+R.
2. Type “cmd” and then hit Ctrl+Shift+Enter keys together.

2. To reset the IP config, type or copy-paste these codes one-by-one and then hit Enter.
NETSH INT IP RESET C:\RESETLOG.TXT
netsh winsock reset
ipconfig /flushdns

Close Command Prompt window.
Reboot your computer. After rebooting your computer and try to connect to the network again.
Fix-4 Set IPv4 settings manually-
Setting IPv4 settings manually can solve this issue.
1. Press Windows key+R to launch Run window.
2. Now, type “cmd” and then press Ctrl+Shift+Enter.

Command Prompt window will be opened with Administrative rights.
4. In Command Prompt window, type “ipconfig” and then hit Enter.
You can see all details of network credentials on the CMD terminal.

5. Now, look for the adapter settings you are using (for us, it is “WiFi” settings).
6. Note down the details of the adapter (IPv4 Address, Subnet Mask, and Default Gateway).

Then, you need to minimize the Command Prompt window.
6. Press Windows Key+R, to launch Run, and type “ncpa.cpl” and click on “OK“. You will be able to open the Network Connections window.

7. As the next step, what you need to do is to right-click and the network adapter and click on “Properties“.

8. Then, double click on “Internet Protocol Version 4 (TCP/IPv4)“.

9. Then, click on “Use the following IP address:“.
10. What you need to do is to put these data in the particular tabs ( IP address, Subnet mask, Default gateway) .
11. Under “Use the following DNS server settings:” and input these following DNS servers settings-
Preferred DNS server: 8.8.8.8
Alternate DNS server: 8.8.4.4
12.To save these settings, click on “OK“.

This will surely fix your issue.
Try to reconnect to the internet again.
Fix-5 Set IPv4 settings manually-
If the previous method didn’t work out, modify the DNS settings of the IPv4 protocol manually to solve the issue.
1. Press Windows Key+R, to launch Run window.
2. Now, type this and hit Enter to open Network Connections window.
ncpa.cpl

3. To access the properties of the network, right-click on your network and click on the “Properties“.

4. After that, to access IPv4 properties, double click on “Internet Protocol Version 4 (TCP/IPv4)“.

5. Then, click on “Use the following DNS server addresses:“.
6. Now, put these server addresses correctly-
Preferred DNS server: 1.1.1.1
Alternate DNS server: 1.0.0.1

7. To save these settings, click on “OK“.

Close Control Panel window.
Try to connect to the internet and check if this works.
Fix 6 -Edit Registry to disable auto log on feature
1 – Search registry editor to open it.

2 – Now, go to the following path in the registry editor.
HKEY_LOCAL_MACHINE\SOFTWARE\Microsoft\Windows NT\CurrentVersion\Winlogon
3 – Now, in the right side, double click on AutoAdminLogon and change the value data to 1.
4 -Close editor and reboot.
