Gamers who play a lot of games, sometimes have to update their games to the latest in order to improve the changes in the game. But while doing so, many gamers have experienced an error message that says An error occurred while updating <Game Name> (corrupt update files) along with the path where the corrupt update files might exist.
This problem could have been because of the corrupt files present on the system or a problem with the hard drive or the steam client app. On researching this error message on the Steam client app and all the possibilities, we have come up with a bunch of solutions that will definitely assist the gamers who are facing this error message and unable to update any games.
Fix 1 – Verify the integrity of game files
Step 1: Open the Steam client app on your system.
Step 2: Then login with your credentials on the Steam client.
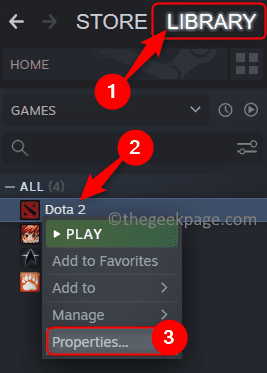
Step 3: Next, go to the LIBRARY option at the top menu bar.
Step 4: This will list all the games you have installed on your system via Steam.
Step 5: Right-click on the game which is causing this error message while updating.
Step 6: Then select Properties from the context menu as shown in the below screenshot.

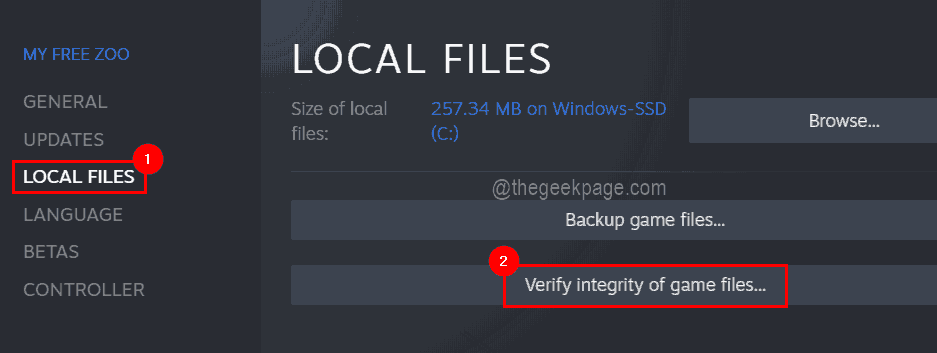
Step 7: In the Properties window, choose the LOCAL FILES option on the left panel and click Verify integrity of game files once.

Step 8: This will start to verify the integrity of the game files. Once done you may close the properties window.
Fix 2 – Repair the Download folder
Step 1: In the Steam client app, you should click the Steam option on top and then click Settings from the dropdown list.

Step 2: In the Settings window, select the Downloads option on the left panel.
Step 3: Then click the STEAM LIBRARY FOLDERS option at the top of the Settings window.

Step 4: This pops up in the Storage Manager window.
Step 5: Now click the three-dot menu on the right side of the Storage Manager and select Repair Folder from the more options list as shown below.

Step 6: Upon selecting it, it starts to repair the library folder on the system.
NOTE – You may have to accept the UAC prompted on the screen by clicking Yes.
Step 7: Once done, you can restart the Steam client app on the system.
Fix 3 – Clear the Steam client’s Download Cache
Step 1: Open Steam’s Settings window and select the Downloads option on the left side as explained in Steps 1& 2 from the previous method.
Step 2: Then click the CLEAR DOWNLOAD CACHE option at the bottom of the Settings window.

Step 3: Accept the popped-up small windows by clicking OK to continue clearing the download cache.

Step 4: This will delete all the files present in Steam’s download cache.
Fix 4 – Reinstall the game after changing the Download Region in Steam
Step 1: Open the Steam app on your system.
Step 2: Go to its LIBRARY page on the top and right-click on the game on the left side of the window.
Step 3: Navigate to Manage > Uninstall from its context menu as shown in the below screenshot.

Step 4: Once the game gets uninstalled from the system, go to Steam > Settings from the top menu bar.

Step 5: In the Settings window, choose Downloads on the left panel.
Step 6: Select a different region from the dropdown list of the Download Region option on the right side of the Settings window.
Step 7: Finally, save the changes made by clicking OK on the Settings window.

Step 8: Once this is done, you can search for the game on the Steam client app and install it carefully.
Fix 5 – Rename the downloading folder
Step 1: Open the Run console on your system by pressing the Windows and R keys together.
Step 2: Type the below path in the run box and press the Enter key.
C:\Program Files (x86)\Steam\steamapps

Step 3: This opens the steamapps folder on the system.
Step 4: You need to find a folder called downloading inside the steamapps folder.
Step 5: Now select this folder and right-click on it and then you can either rename it to something else or simply delete it.

Step 6: So next time, when you try to update any game on the Steam client app, it will create another downloading folder.