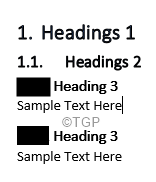
At times, the numbers present in the Heading of an MS WORD Document get blacked out. Meaning, instead of a number, a black box is being displayed. In the below example, instead of 1.1.1., a black box is displayed.
When there are many Headings present in the document, correcting the Heading numbers manually for each heading might become cumbersome. In such cases, one can prefer to solve this issue using one of the below fixes. In this article, we illustrate 2 different ways to get rid of the black box that appears on the headings instead of numbers in an MS Word Document.
Fix 1: Re-Apply the Style
Step 1: Open the MS Word document, which shows a black box instead of numbers in the heading.
Step 2: Select the black box completely. The black box will now be shown in grey. Refer to the below screenshot.
Step 3: Hold the keys Ctrl+Shift+S at the same time.
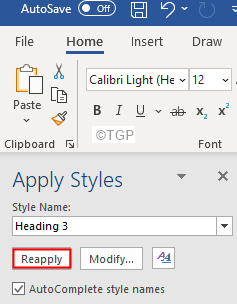
Step 4: You can see an Apply Styles window popping up
Step 5: Click on the Reapply button
You should be able to get rid of the black box and see numbers instead. On reopening the document, if you notice the black box again, try the next fix.
Fix 2: Change the Number Formatting to None
Step 1: Select the black box completely. The black box will now be shown in grey. Refer to the below screenshot.
Step 2: Hold the keys Ctrl+Shift+S at the same time.
Step 3: You can see an Apply Styles window popping up.
Step 4: Click on the Modify button.
Step 5: In the Modify Style window that shows up, click on the Format button in the bottom left corner of the window.
Step 6: From the drop-down menu, select Numbering
Step 7: From the Numbering and Bullets window, select None and then press OK
Step 8: Now, click on the Ok Button in the Modify Style window.
Step 9: You can see that the numbering will be removed.
Step 10: In order to add numbering again, place the cursor before Heading 3.
Step 11: Ensure that you are in the Home tab from the top menu.
Step 12: Click on Multilevel list
Step 13: From the drop-down menu, choose the option that suits your requirement
Step 14: If you see that the numbering level is not correct, say if you see the numbering as 1.1 instead of 1.1.1, select the numbers as shown below
Step 15: Click on the Multilevel list option
Step 16: Click on Change List Level
Step 17: Choose the appropriate level. In this case, 1.1.1
Step 18: If you see that there is a spacing difference, something like the one shown below
Step 19: Select the numbers. If you click on one of the Heading numbers, all of them will be selected.
Step 20: Click on the Ruler as shown below
Step 21: Drag and drop the ruler to adjust the spacing
Step 22: Finally, when all the changes are done, update the Heading so that all the headings with the same labels (eg- all the Heading 3s) look alike.
Step 23: Right-click on the required heading
Step 24: From the menu, select Update Heading to Match Selection.
That’s all.


