Are the apps on your Start menu underlined and greyed out in your Windows 10 computer? This phenomenon is prevalent mainly for the apps which are downloaded from Microsoft Store or come along with Windows 10. Don’t worry. To solve this issue, follow these simple fixes on your computer.

Fix-1 Re-install Microsoft Store-
Re-installing Microsoft Store may fix the issue.
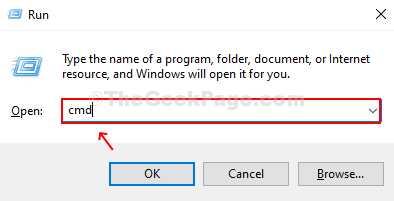
1. To open Run, press Windows key+R window.
2. Type “cmd” and then press Ctrl+Shift+Enter keys together to access the CMD terminal.

2. To reinstall Store on your computer, copy–paste this command in Command Prompt window and then hit Enter to execute it on your computer.
PowerShell -ExecutionPolicy Unrestricted -Command "& {$manifest = (Get-AppxPackage Microsoft.WindowsStore).InstallLocation + '\AppxManifest.xml' ; Add-AppxPackage -DisableDevelopmentMode -Register $manifest}"

Reboot your computer to save the changes in your system.
Check if this fix has solved the issue or not.
Fix 2 – Run WSreset
Resetting the Store on your computer may fix the issue.
1 – Search cmd in Windows search box. Right click and choose run as administrator

2 – Type wsreset in command prompt window and hit Enter key

3. After that, open the Store and start to update the apps again.
This should work out for you.
Fix- 3 Uninstall and re-install Store apps using PowerShell
If you are facing this issue with particularly an app or set of apps, uninstalling and re-installing them with PowerShell will fix the issue.
NOTE–
We will explain the process of how to uninstall Windows Photos, as an example. Follow this method on your computer to uninstall the problematic app.
1. Press Windows key+X and then click on “PowerShell (Admin)” to open PowerShell with administrative rights.

2. In PowerShell window copy-paste this command and hit Enter.
PowerShell Get-AppxPackage -AllUsers > C:\listofapps.txt

Minimize the PowerShell window.
Steps to uninstall the application-
3. Now, press Windows key+E to open the File Explorer window.
4. In the File Explorer window, on the left-hand side, click on “This PC“.
5. On the right-hand side, double click on “Local Disk (C:)“.

6. In the Local Disk (C:) window, scroll down and double click on the “listofapps” text file.

7. In the listofapps window, press Ctrl+F to open the Find box.
8. Now, enter the name of the problematic application in the Find box and then click on “Find Next“.
(In this case, it is “Photos“. )

You will see the name of the application, Publisher, PacakgeFullName, etc.
9. Now, right-click on ‘PackageFamilyName‘ of the application and click on “Copy” to copy it.

Maximize the PowerShell window.
10. In the PowerShell window, type and modify the command and hit Enter.
PowerShell Remove-AppxPackage <PackageFamilyName>
Note-Simply paste the copied ‘PackageFamilyName’ in the place of <PackageFamilyName> in the command.
Example–
In this case, the command will be-
PowerShell Remove-AppxPackage Microsoft.Windows.Photos_8wekyb3d8bbwe

The problematic app will be uninstalled from your computer.
To reinstall the application, follow these steps-
11. Coming back to the listofapps window, right-click on ‘Name‘ of the application and click on “Copy” to copy it.
(In this case, it is “Microsoft.Windows.Photos” which is copied.)

Close Notepad window.
Maximize the PowerShell window.
12. In the PowerShell window, type and modify the command and hit Enter.
PowerShell -ExecutionPolicy Unrestricted -Command "& {$manifest = (Get-AppxPackage <Name>).InstallLocation + '\AppxManifest.xml' ; Add-AppxPackage -DisableDevelopmentMode -Register $manifest}"
Note-Simply paste the copied ‘Name’ in the place of <Name> in the command and hit Enter.
Example–
In this case, the command will be-
PowerShell -ExecutionPolicy Unrestricted -Command “& {$manifest = (Get-AppxPackage Microsoft.Windows.Photos).InstallLocation + ‘\AppxManifest.xml’ ; Add-AppxPackage -DisableDevelopmentMode -Register $manifest}”

The application will re-installed on your computer.
This should fix the issue on your computer.
Fix – 4 Update NVIDIA Graphics Driver
Updating the NVIDIA Graphics driver may solve the issue on your computer.
1. Click on the Search box beside Windows icon and type “GeForce Experience“.
2. Click on “GeForce Experience” in the elevated search result.

3. In the GeForce Experience window, go to the “Drivers” tab.
4. Now, click on “CHECK FOR UPDATES“.

5. Now, click on “Download“.

The latest version of the graphics driver will be downloaded.
The time may vary system to system depending upon your network bandwidth.
6. Once the downloading process has finished, choose the “Express Installation“.

GeForce Experience will install the driver on your computer.
This will take 5-10 minutes.
7. When you see the “Installation Complete” message has appeared, click on “Close“.
Reboot your computer to save the changes.
After rebooting your PC, the apps will appear normally in the Start menu.
Additional Solutions
1 – Restart File explorer
Press CTRL + SHIFT + Esc keys together to open task manager. Locate Windows explorer from the list and choose restart.

2 – Download and run this Microsoft Offical tool to fix this issue.
3 – Downgrade your Nvidia Driver and Try again
4 – Open Intel Graphics control panel and Turn Off all 3D options present there.