DLLs (Dynamic Link Library) are files that contain instructions for use by other programs. The use of DLLs helps to save disk space and thereby makes your computer run faster. Different applications can make use of one shared DLL which provides quick access to code and data that is necessary for those applications to run. Generally, most of the DLL files come by default with the installation of Windows. DLL missing errors are seen if a particular DLL file required by a program is corrupt or missing from the system. Once such DLL missing error reported by the users is
“The program can’t start because AdbWinApi.dll is missing from your computer. Try reinstalling the program to fix this problem.”
The Android Debug Bridge Tool (ADB) consists of the AdbWinApi.dll file. This DLL file comes by default in Android SDK and is required in unlocking most of the smartphone models on the Windows system. Typically, the AdbWinApi.dll missing error is reported when the user tries to unlock their smartphone’s bootloader. Another situation wherein this error is encountered is when the Android SDK or the ADB is not installed properly or has been removed from the system.
If you are seeing this error while opening any application or game or unlocking your phone on your Windows PC, then go ahead and read this post. In this post, we have curated a set of troubleshooting methods that can help you fix this issue.
Method 1 – Use Autoruns to Remove Unused Data
If this error message pops up at system startup every time, then it means that the Android SDK or ADB or the Android Studio or any other app that calls AdbWinApi.dll may have been removed from your system. You can resolve this error by using the Autoruns software, which can identify and deal with the registry keys and unused startup items on your Windows PC.
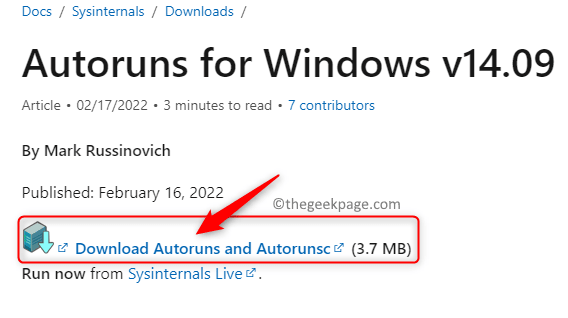
1. Click on this link to go to the Offical Download page for Autoruns for Windows.
On this page, click on the link Download Autoruns and Autorunsc.
2. After the compressed file is downloaded, use any decompression software like WinZip and extract the contents of this archive.
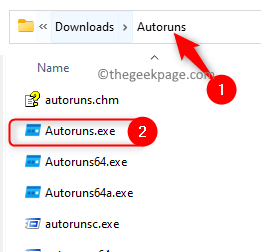
3. After the archive is extracted, open the Autoruns folder created by you.
Here, run the Autoruns.exe file by double-clicking on it to open the Autoruns program.
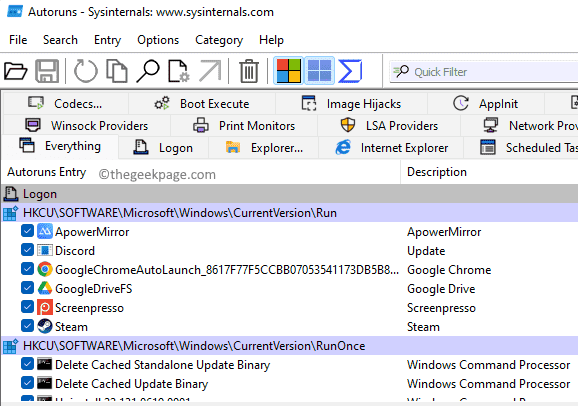
4. Wait for this program to open completely and let all the entries in the Everything tab be populated.
Note: This process will take some time to complete which depends on your PC specification and the number of startup items.
5. After all the startup items have been loaded, press the Ctrl + F key combination to open the Find window to search for the DLL file.
In this window, type AdbWinApi.dll in the text box next to Find what, and then tap on the button Find Next to run the search.
6. The entry found will be highlighted in blue.
You can delete this entry if you are not going to use this program or if it doesn’t exist on your system anymore.
Right-click on this entry and select the option Delete.
In the confirmation window, click on OK to delete this entry.
7. After you are done with the first occurrence found, then perform the search again by clicking on the Find Next button.
Repeat Step 6 and deal with every entry that is found by the search function that uses the AdbWinApi.dll file.
8. Exit the Autoruns program after you have found all the entries.
Restart your computer.
Check if you are still encountering the AdbWinApi.dll is missing error after the system startup.
Method 2 – Copy the AdbWinApi.dll File to the Unlock Folder
Are you facing the this error when performing an unlock operation on your Android phone? Go ahead and use this method to make sure that all the essentials needed to unlock the Android device are met.
1. Check whether Android SDK is installed on your PC.
In case you have Android Studio, Eclipse, or any other IDE related to Android already present on your system, then the Android SDK will be installed.
2. If the Android SDK is not installed, then you need to visit the Official Download page for developers of Android.
Go to the Downloads options on this page.
Here, locate the Command line tools only section.
Now, download the version for Windows.
3. After you have installed the Android SDK, navigate to the folder on your PC that contains the Android SDK installation.
4. Inside the default installation folder, open the folder named platform tools.
Select and copy the files mentioned below present in this folder
adb.exe
AdbWinApi.dll
fastboot.exe
5. Now, paste these copied files into the folder that contains files needed to unlock your Android phone.
After this, try performing the unlock operation.
Check if the Android device unlocks without an error message.
Method 3 – Register the DLL File
1. Press the Windows + R key combination to open the Run box.
Type cmd and press the Ctrl + Shift + Enter keys simultaneously to open the Command Prompt as an administrator.
Click on Yes when prompted by the UAC.
2. Here, type the command below and execute the command by pressing the Enter key.
regsvr32 ADBWINAPI.DLL
3. Once the DLL is registered, you will see a message saying that the DLL has been registered successfully.
Reboot your system and check if the problem is resolved.
Method 4 – Run the SFC Scan and DISM Tool
1. Tap on the Windows key on your keyboard.
In the Windows search box, type the text command prompt.
Once you see Command Prompt in the search result, click on the Run as administrator on the right side.
2. To run an SFC scan, type the command below and hit Enter.
sfc /scannow
3. Wait for the scan to find and repair any corrupt files found on your PC.
4. Reboot your PC and check if the issue is fixed.
5. If the problem still persists, then open the command prompt as an admin again.
6. Type the DISM command and execute it by pressing the Enter key.
DISM /Online /Cleanup-Image /RestoreHealth
7. Once the DISM tool completes running, restart your computer and check if the error is resolved.
Method 5 – Perform a Malware Scan
1. Click on the Windows Start button on the taskbar.
In the search box at the top, type the text Windows Security.
Click on Windows Security in the results displayed below.
2. This opens up the Windows security window.
Here, select Virus & threat protection tab in the left panel.
3. To perform a quick scan, click on the Quick scan button to quickly scan the system for any malware.
If there is any malware found, then you can perform the necessary action like remove or block it.
Then, restart your PC to check if this helped fix the issue.
4. If you want to run a full scan of your system, then click on the Scan options link on the Virus & threat protection page.
In the Scan Options, choose the Full Scan option.
Then, click on Scan now button to start the scanning process.
Once the scan completes, resolve any issues identified.
Reboot your computer.
Check if the AdbWinApi.dll is missing error is resolved.
Method 6 – Uninstall and Reinstall the Visual C++ Redistributable Package
1. To open the Run dialog, just press and hold the Windows + R keys at the same time on your keyboard.
Type ms-settings:appsfeatures and hit Enter to open the Apps & features page.
2. Scroll down to App list which contains a list of all the applications installed on your computer.
In the text box below the App list, type visual C++ to look for the Visual C++ Redistributable package.
3. Tap on the three-dot menu associated with the Microsoft Visual C++ Redistributable Package and choose Uninstall in the menu.
On the confirmation prompt that pops up, click on Uninstall again.
4. Follow the instructions and complete the uninstallation process.
Note: The above steps need to be done to uninstall all the Visual C++ Redistributable Packages installed on your PC.
5. Click on this link to go to the Official Visual C++ Redistributable Download page.
Download the package onto your computer based on your system specification.
Install the package following the instructions.
Reboot your PC after the installation. Check if the error is fixed while opening the specific app or game which was throwing this error.
Method 7 – Check for Windows Update
1. Press the Windows + I keys to open the Settings app.
2. In the Settings app, click on the Windows Update tab on the left panel.
3. Move over to the right side and click on the Check for Updates button.
4. Wait for Windows to check if there are any updates to the Windows version installed on your PC.
If there are any new updates available, then download and install them on your system.
5. Reboot your PC after the update and check if the error is fixed.
Method 8 – Reinstall the Conflicting Application
1. Tap on the Windows key on your keyboard.
Type apps and features in the Windows search bar.
Click on Apps & features in the search result displayed below.
2. On the Apps & features page, scroll and locate the conflicting application in the list of installed applications.
Click on the three vertical dots associated with this application and select Uninstall.
Click on Uninstall again in the confirmation prompt that appears.
3. Wait till the conflicting application has been uninstalled from your computer.
Restart your computer.
4. After the startup, go and download the installer for the application that you just uninstalled.
Complete the application installation and check if the error is fixed.
Method 9 – Use System Restore
1. Press Windows + R to open the Run dialog.
Type ms-settings:about to go to the About the system page in Settings.
On this page, click on System Protection in the Related links section.
2. You will see the System Properties window open with the System Protection tab selected.
Here, click on the System Restore… button.
3. In the System Restore window, click on the Next button.
On the next page, select the restore point from the list of restore points created on your PC.
Then, click on Next.
4. Confirm the restore point details on this page and click on Finish.
Close any pending files and programs.
5. System Restore will restart your PC and start the restore process.
Once the system starts up after the restore, check if the error is fixed.
Method 10 – Reset Windows
If the above methods did not help in resolving the AdbWinApi.dll is missing error, then perform a factory reset of your Windows PC. In order to perform a reset of your Windows 11 PC, follow the steps in the article How to Factory Reset your Windows 11 PC. If you are having a Windows 10 Pc, then follow the steps indicated in the guide How to reset Windows 10.
That’s it!
Thanks for reading.
If you have found the methods mentioned in this article useful in resolving the AdbWinApi.dll is missing error on your Windows PC, then let us know your opinions and the fix that worked for you in the comments section.


