Search folders in Outlook make your emails more manageable. In case you want to search for a particular email every time say an email with attachments, then you no need to search your whole inbox, instead, create a search folder and specify the condition, the next time when you receive the email with any attachments in it then it is automatically seen in the created search folder. You can even create a custom search folder as well. In this article, let us learn how to create search folders and make use of them.
Create And Use Search Folders In Outlook
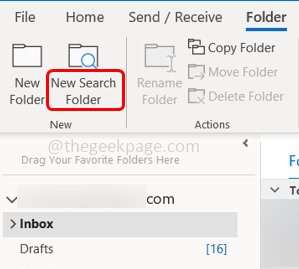
Step 1: Open Microsoft Outlook and at the top click on Folder
Step 2: Click on New Search Folder, the new search folder window will open
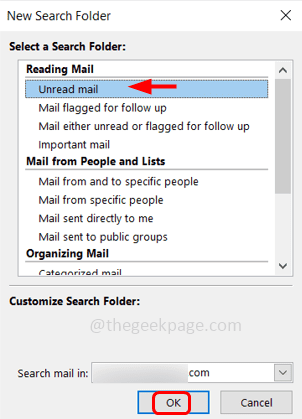
Step 3: It has different options you can select as per your need. For example, if you want to see only the unread emails in a single folder, then select Unread mail in the Reading email section and click on OK
Step 4: Now you can see the unread mail folder on the left side in Outlook. And it contains only the emails which you have not read
Step 5: If you want a customized search then in the New Search Folder window scroll down and find create a custom Search Folder under the Custom section and click on it
Step 6: There appears a choose button on the bottom right. Click on it to specify the criteria
Step 7: A dialog box will appear, you can give any name to the custom search folder in the Name box
Step 8: Then click on Criteria
Step 9: There opens a search folder criteria window, here there are 3 different tabs Messages, More Choices, and Advanced. You can choose different criteria like specific words, from, to, only attachments, flags, etc from the tabs
Step 10: Specify the criteria as per your need and click on OK. Now the custom search folder is created on the left.
Step 10: If you want to delete the created search folder, right-click on the folder and select delete folder from the list.
Step 11: A pop-up will appear asking for confirmation click on yes.
That’s it! I hope this article is helpful. Thank you!!


