When your computer is connected to a network, it is very important that your computer has a unique name for identification purposes and for avoiding communication issues as well. So, when in a network, you might want to figure out the name of your computer to send a file to the correct location or maybe you want to find the current name of your computer so that you can consider changing it to a unique one. Whatever be the reason, finding the name of your computer in Windows 11 is a piece of cake.
In this article, we explain in detail how you can find the name of your computer in Windows 11 through 4 different methods.
Method 1: Using System Settings App
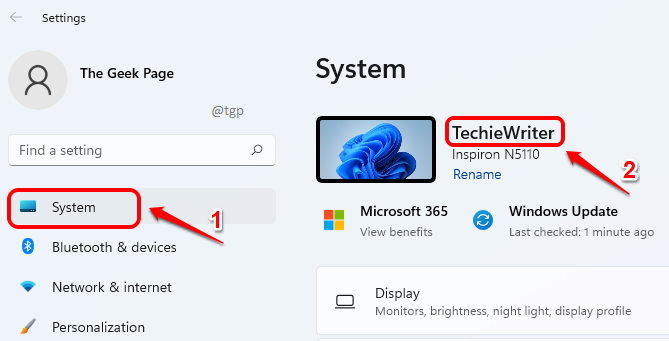
Step 1: Launch the Settings app by pressing the hotkey combination WIN + I.
In the left window pane, click on System tab.
In the right window pane, you can now see the name of your computer.
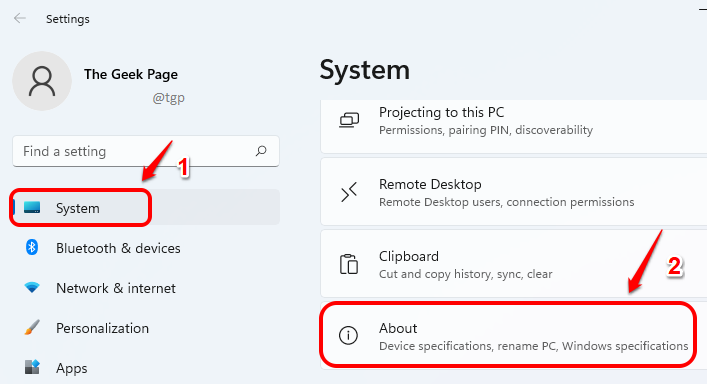
Step 2: Through the Settings app, there is one more way how you can view the name of your computer.
In the System tab itself, in the right window pane, scroll down and click on the section About.
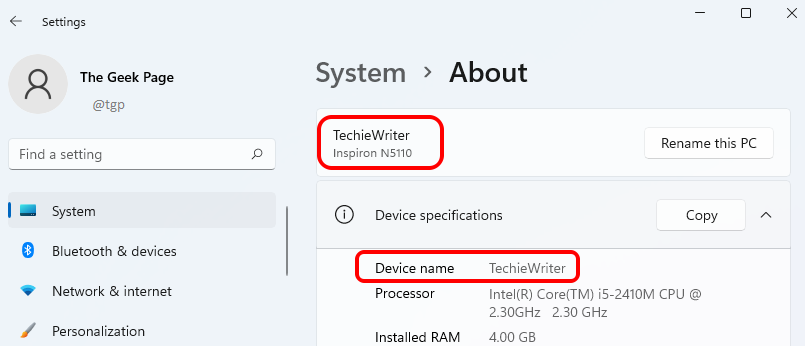
Step 3: Right at the top of the About window, you can see the name of your computer at 2 places as shown in the screenshot below.
Method 2: Using the Run Command
Step 1: Launch the Run window by pressing Win and R keys together.
When the Run window pops open, type in or copy paste the following Run command and hit OK button.
cmd /k hostname
Step 2: A command prompt window will now launch, which will give you the name of your computer.
Method 3: Through Command Prompt
Step 1: First of all, the Command Prompt needs to be launched. For that, press keys WIN + R together to open the Run window.
In the Run window, type in cmd and hit Enter key.
Step 2: When the command prompt launches, type in the following command and hit Enter key to see the name of your computer.
hostname
Step 3: There is one more command that you can use to view the name of your computer through the Command Prompt. Type in the following command and hit Enter key.
ipconfig /all
Now, under the Host Name entry, you can see the name of your computer.
Method 4: Through System Properties
Step 1: Launch Run window by pressing the keys WIN + R at once.
You can copy paste or type in the following command. Hit the OK button once done.
sysdm.cpl
Step 2: In the System Properties window, click on the Computer Name tab at the top.
Now against the field Full computer name, you can view the name of your computer.
Please tell us in the comments whether you found the article useful.


