Troubleshooters in Windows 10 provides an excellent way to fix and pinpoint certain problems. But sometimes, these troubleshooters also give errors. For example, many users have reported getting the following error message while running Troubleshooter.
An unexpected error has occurred. The troubleshooting wizard can’t continue. Error Code: 0x80070002
Here are working Fixes for this weird problem.
Fix- 1 Modify Service settings-
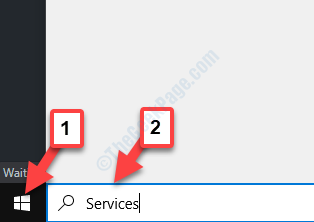
1. Write “services” and then hit Enter to access the Services utility.

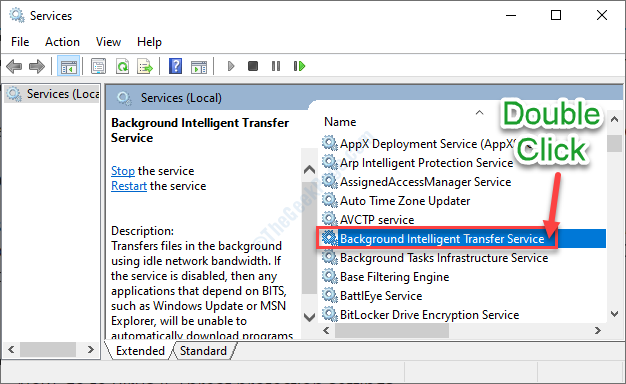
2. In the Services window, double click on the “Background Intelligent Transfer Service” to modify it.

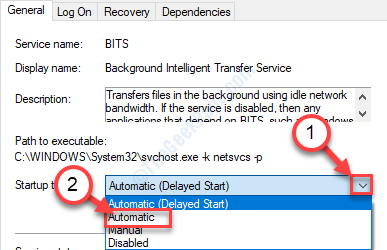
3. Simply set the ‘Startup Type:‘ to “Automatic“.

4. Then, click on “Start” to resume the service.
5. After that, click on “Apply” and “OK“.

6. Back to the Services, scroll down a bit, and double click on “Cryptographic Services“.

7. Similarly, click on the drop-down for ‘Startup type:‘. Choose “Automatic” startup.

8. After that, click on “Start” to instantly start the service.
9. Click on “Apply“, followed by a simple click on “OK“.

10. In a similar method, double click on the “Windows Update” service.

11. In the same process as before, make the startup type as ‘Automatic‘.
12. Don’t forget to click on “Start” to start the service, if it isn’t started yet.

13. Sequentially, click on “Apply” and then on “OK“.

Once you have automated all these services, you need to close the Services.
14 – Similarly , Do the above steps for services named below
Fix 2 – Reset IP Config
1. At first, click on the Windows icon and then type “cmd“.
2. Once you see that ‘Command Prompt‘ in the elevated window, right-click on it and choose “Run as administrator“.

3. When the Command Prompt appears, run this line. Simply write this and press ‘Enter‘.
ipconfig /flushdns

4. What you have to do next is to reset the Windows sockets. To do so, execute this code in the terminal.
netsh winsock reset

Close the terminal and restart your system.
Fix 3 – Run Sfc and Dism coomands
1 – Open command prompt as admin
2 -Run the commands given below one by one and wait for some time for the command to get completed
sfc /SCANNOW
Dism /Online /Cleanup-Image /CheckHealth
Dism /Online /Cleanup-Image /ScanHealth
Dism /Online /Cleanup-Image /RestoreHealth
3 -Close the cmd window and try again
Fix 4 – Using Notepad File
1. Search Notepad in Windows 10 Taskbar Search.
2. Click the Notepad Icon to Open Notepad.

3. Now, Copy and paste the following Code Below in the Notepad.
@echo off
net stop wuauserv
cd %systemroot%
ren SoftwareDistribution SoftwareDistribution.old
net start wuauserv
net stop bits
net start bits
net stop cryptsvc
cd %systemroot%\system32
ren catroot2 catroot2.old
net start cryptsvc
regsvr32 Softpub.dll
regsvr32 Wintrust.dll
regsvr32 Mssip32.dll
regsvr32 Initpki.dll /s
echo Restarting Computer
shutdown.exe -r -t 00
4. Now, in Notepad Click on File.
5. Choose Save as.
6. in the File name section Provide the name Fixer.bat.
7. In the file type Choose all files from Dropdown.

8. Save this file on Desktop.
9. Now, Click and Run this file Once.
Your Problem will get Fixed.
Fix 5 – Check the Service Manager
1. Search Services in windows 10 Taksbar.
2. Now, Open Service manager.

3. Now, in the Service Manager window, just check if the following services are running.
Diagnostic Policy Service. Make sure that the Startup Type should be Automatic.
Diagnostic Service Host. Make sure that the Startup Type should be Manual.
Diagnostic System Host. Make sure that the Startup Type should be Manual.
4. If the Services are not Running, Just Click on Start to start these services and Change the startup type as above to each of the services.

Note:- If you click on start to any of these services which are not running, some users may experience the error given below.
Windows could not start the Diagnostic Service Host service on Local Computer. Error 1079: The account specified for this service differs from the account specified for other services running in the same process
To get rid of this Follow the steps given below: –
1. Right-click on the particular service which threw the error and click on Properties.

2. Now, Click on the Log on Tab.
3. Next, Choose Browse.

4. Now, in the Section saying Enter the Object name to select a section, just write your Computer Username.
5. Now, Click on Check names and then Choose OK.

6. Now, Go again and try to start the service again.
Fix 6 – Repair .Net framework installation
1. Go to the Control panel.
2. Click on Uninstall a Program.
3. Now, Right-click on .NET Framework and Choose Uninstall/change.
4. Now, Choose repair .net Framework to its Original stage.

Most probably your problem must have got fixed.