You are trying to make a video call using an online application or Skype and bang comes an error, “Your webcam is currently being used by another application“. This error prevents you from using the camera for the application. You may try using two different web cameras of two different brands, use a USB 2.0 and 3.0 slots, use a free registry cleaner tool or restart the system, but the error remains as it is. “Your webcam is currently being used by another application” error in Windows 10 is a common issue. Fortunately, there are quite a few methods by which you can fix this issue. Let’s see how.
Method 1: Look closely if there is a camera key or switch on your laptop
Many laptop manufacturers put a dedicated camera key (For example F10), webcam switch on the keyboard or elsewhere in laptop. Look closely, if there is a key on keyboard or a switch for camera turn On/ Off .
If you can locate such key, try to press that once and check again.

Method 2: Disable and Enable the Integrated Camera
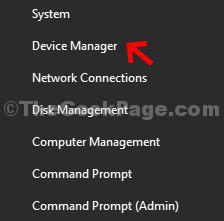
Step 1: Right-click on Start menu and select Device Manager.

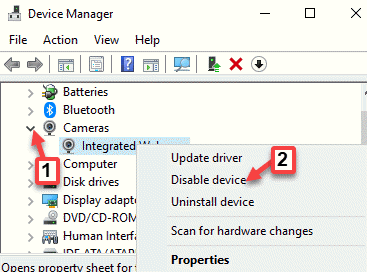
Step 2: In the Device Manager window, expand the Cameras section.
Note: – If there is not any Cameras in Device manager, Just locate imaging devices
Now, right-click on the integrated camera and select Disable device.

Step 3: Wait for a few seconds and then right-click on the integrated camera again and select Enable device.

Now, go back and check if the camera is working with the application.
Method 3: Reinstall the Integrated Camera
Step 1: Right-click on Start menu and select Run to open the Run command.

Step 2: Write devmgmt.msc in the Run command search box and press OK to open the Device Manager window.

Step 3: In the Device Manager window, go to the Cameras section, and expand it.
Note: – If there is not any Cameras in Device manager, Just locate imaging devices
Now, right-click on the integrated camera and select Uninstall device.

Step 4: Click Uninstall button in the conformation pop up.

Now, restart your Widows 10 PC and the missing driver will be installed automatically. If not, then visit the manufacturer website and download and install the driver manually.
You can now open the application and try running the camera, and it should work.
Method 4: Change Camera Privacy Settings
Step 1: Press Win + I keys together on your keyboard to open the Settings window.
Step 2: In the Settings window, go to Privacy.

Step 3: In the next window, go to the left side of the pane and click on Camera.

Step 4: Now, go to the right side of the window and under Allow access to the camera on this device, click on Change.

Step 5: In the pop up, enable the Camera access for this device.

Step 6: Scroll down and enable the Allow apps to access your camera section.

Step 7: Now, go to Choose which Microsoft Store apps can access your camera and enable the apps that want access to your camera.
For example, if you want Skype to access the camera, go to Skype and turn it on.

Now, exit settings and go to the application. Try using the Camera and it should be working fine now.
Method 5: Reset the Camera
Step 1: Right-click on the Start menu and select Settings.

Step 2: In the Settings window, click on Apps.

Step 3: You are directed straight to the Apps & Features section.
Now, go to the right side of the pane, scroll down and select the Camera app.
Click on the Advanced options link below it.

Step 4: Next, scroll down and reach the Reset section. Click on the Reset button below it.

Step 5: Click on Reset again in the pop up window to confirm the action.

Once the reset process is complete, restart your PC and check if the camera is working for the specific app.
Method 6: Run the Troubleshooter
Step 1: Click on the Start menu and select Settings (gear icon).

Step 2: In the Settings window, click on Update & Security.

Step 3: Next, click on Troubleshoot on the left side of the pane.

Step 4: Now, go to the right side of the window, scroll down and and click on Additional troubleshooters.

Step 5: In the next window, under the Find and fix other problems section, select the type of troubleshooting and click on Run the troubleshooter.

Step 6: Mow, wait for the troubleshooter to detect any issues. If any issues found it will automatically repair the error on the spot.
Then restart your PC and and try the camera for the website or the application and it should work.
If no issues found, you will see a message saying that no changes were necessary.
Method 7: Uninstall the Problematic Windows App
For instance, if you have a problem using the Skype camera, here’s how you can deal with the issue:
Step 1: Type the app name (for example, Skype) in the Windows search bar and right-click on the result.
Select Uninstall from the right-click menu.

Step 2: Now, in the prompt that appears, press the Uninstall button again to confirm.

Step 3: Now, go to the Windows search bar and type Microsoft Store.

Step 4: Left-click on the result to open the Store.

Step 5: In the Store, go to the upper left side and click to expand the three horizontal lines.
Then select My Library from the list.

Step 6: Find the app that you just uninstalled and click on the Install button to add it back.

Once the installation is complete, try using the camera for the application and check if it’s working.
Method 8: Turn Off the Firewall
Step 1: Press the Win + R hokey on your keyboard to open the Run command.
Step 2: In the Run command window, type firewall.cpl in the search box and hit Enter.

Step 3: It opens the Windows Defender Firewall page in Control Panel.
Click on Turn Windows Defender Firewall on or off option on the left.

Step 4: Select the radio button next to Turn on Windows Defender Firewall (not recommended) under both Private network settings and Public network settings.
Press OK to save changes and exit.

Now, go back to the application and check if the “Your webcam is currently being used by another application” error is gone.
You can also go to Microsoft Store and check if there are any updates available for the application. If there’s a recent update available, then complete the update process for the application and you should now be able to use the camera for that specific application.
Alternatively, you can also disable any 3rd party antivirus software on your PC, because these antivirus software may be one of the reasons why you are seeing the “Your webcam is currently being used by another application” error. Or, you may also reset the app that’s showing the message, uninstall the app, or any software updates.
If none of the above method works, you can perform System Restore based on a previously created restore point and revert it to a previous state.