Windows Tools in Windows 11 were previously called Administrative tools in the Windows 10. Before we get into how to open Windows Tools in Windows 11, let’s see what are the tools and what are they used for.
These are the usual Windows tools that we use often to make changes to the system (audio and video, fonts, security, troubleshooting, etc.) or to use the other built-in tools like the system file check or DISM/manually run apps and services. Some of the Windows tools we commonly use are – Command Prompt, Control Panel, Computer Management, Performance Monitor, Disk Clean-up, Run command window, Services, and so on.
While we can use the individual tools through different ways like using the Windows search, Start menu, Run command or the shortcut keys, not many new Windows 11 users know how to use the Windows Tools utility on your Windows 11 PC. This post will guide you on how to access the Windows Tools. Let’s see how
Method 1: Through Windows Search
The first and the basic method would be to pull up using the Windows search function. That’s the quickest and the easiest way to open Windows Tools in Windows11:
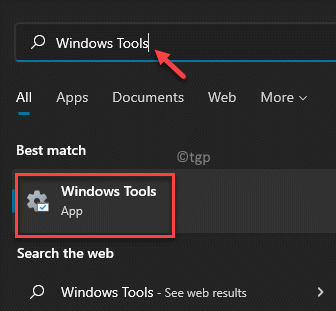
Step 1: Click on Start menu (Windows icon) on the Taskbar and type Windows Tools in the search bar at the top.
It will display the results in the Best match section.
Click on the result to open Windows Tools.
Method 2: From the Start Menu programs list
This is another quick method to open the Windows Tools through the apps list in the Start menu. Let’s see how:
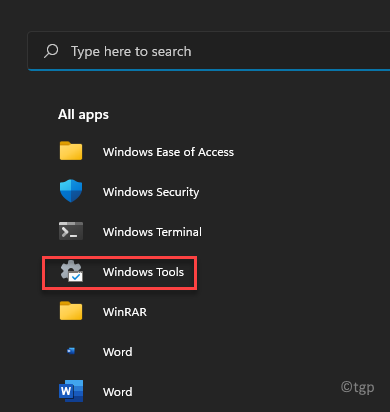
Step 1: Go to the Windows icon on your Taskbar (Start menu), click on it and click on All apps on the upper right side below the search field.
Step 2: As the app list appears, scroll down to find Windows tools in the list of programs.
Method 3: Through Control Panel
This method allows you to open the Windows Tool utility through the control panel. Here’s how:
Step1: Press the Win + R keys simultaneously on your keyboard to launch the Run command window.
Step 2: In the Run command search bar, type control.exe and press OK to open Control Panel.
Step 3: In the Control Panel window, navigate to the View by section on the upper right and select Large icons from the drop-down next to it.
Now, scroll down and in the list, towards the bottom, click on Windows Tools.
You have now successfully opened the Windows Tool utility in Windows 11.
Method 4: Through File Explorer
This method needs you to travel to the Windows Tools folder location in the File Explorer and then access the tools. Let’s see how to navigate to the Windows Tools location:
Step 1: Press the Win + E keys together on your keyboard to open the File Explorer.
Step 2: Copy and paste the below path in the File Explorer address bar and hit Enter to reach the Windows Tools location directly:
%ProgramData%\Microsoft\Windows\Start Menu\Programs\Windows Tools
It takes you straight to the Windows Tools folder in Start menu and now, you have access to all the administrative tools on your Windows 11 PC.
Method 5: By Creating a Desktop Shortcut
There are three ways that helps you create a Windows Tools shortcut in a quick and easy manner. Let’s guide you through the process:
Solution 1: Drag-and-Drop from All Apps to Desktop
Step 1: As explained in the Method 2, click on the Start menu (Windows icon) and click on All apps located on the upper right end (under the search bar).
Step 2: In the program list that appears, scroll down to the bottom and as you locate the Windows Tools option, point the cursor on it, press the left mouse button as you point at it and drag it to the desktop.
You have finished creating the desktop shortcut for Windows Tools and you can now open it directly from the desktop.
Solution 2: Drag-and-Drop from File Explorer
Alternatively, you can also drag-and-drop the Windows Tool file from the Windows Explorer to your Windows 11 desktop. Follow the below instructions to create a desktop shortcut of Windows Tools:
Step 1: As explained in Method 4, navigate to the below path in the Windows Explorer to reach the Windows tools folder directly:
%ProgramData%\Microsoft\Windows\Start Menu\Programs\Windows Tools
Step 2: Now, press and hold the left side of the mouse on the folder icon and drag it to your PC desktop.
This will create a shortcut for the Windows Tools folder with a folder image.
*Note – However, you won’t be able to pin the shortcut on the taskbar.
Solution 3: Through Control Panel
As a matter of fact, you can also create a shortcut for Windows Tools through Control Panel. Wondering how? Let’s see:
Step 1: Right-click on Start menu and select Settings from the list.
Step 2: In the Run command window that opens, type control in the search bar and hit Enter.
Step 3: This will open the Control Panel window.
Here, go to the View by field and set it to Large icons by selecting it from the drop-down next to it.
Now, scroll down towards the bottom of the screen, locate Windows Tools, right-click on it and select Create shortcut.
Step 5: In the Shortcut prompt, click on Yes to confirm the action.
Once done, the Windows tools shortcut will be create on your desktop and you can now access the tools easily.
Solution 4: By Creating a Shortcut Manually
However, if you are not so comfortable with the drag-and-drop process, you can create a shortcut for the Windows tools utility manually. Let’s learn how:
Step 1: Go to your desktop, right-click on an empty area, select New and then click on Shortcut.
Step 2: In the Create Shortcut window, go to the Type the location of the item field and enter the below path in the field and click Next to continue to the next screen:
explorer.exe shell:::{D20EA4E1-3957-11d2-A40B-0C5020524153}
Step 3: In the next screen, in the Type a name for this shortcut field, enter a desired name for your shortcut. For example, I named it as Windows Tools for easy identification,
You can name it anything based on your convenience.
Click on Finish.
You have now completed creating the desktop shortcut manually and successfully. Now, double-click on it to open Windows Tools on your Windows 11 PC.
Method 6: Pin to Start and Taskbar
This is a bit tricky since, you are not allowed to Pin the Windows Tools folder to the Taskbar directly from the Control Panel. However, there are three other ways using which you can Pin the utility to the Start menu and Taskbar of your Windows 11 PC. Refer to the below solutions:
Solution 1: Through the Desktop Shortcut Right-Click Menu
Step 1: Create a desktop shortcut of your Windows Tools utility with the help of the Method 5 above.
Now, right-click on the Windows Tools shortcut and select Show More Options from the context menu.
Step 2: Next, as a list of options appear on the screen, select Pin to taskbar.
This will help you Pin Windows Tools to the Taskbar instantly.
Solution 2: Through the Start Menu
Step 1: Click on the Start menu and then click on All apps located on the upper right side of the pane.
Step 2: In the programs list, look for Windows Tools towards the bottom.
Right-click on it and select Pin to Start.
Step 3: To add the shortcut to the Taskbar, right-click on Windows Tools again, click on More and select Pin to taskbar.
This is one way to pin Windows Tools to the Start menu and Taskbar.
Solution 3: Through Windows Search
This is another quick way to Pin Windows Tools shortcut to the Start menu and Taskbar. Let’s see how:
Step 1: Click on Start and type Windows Tools in the search bar.
As the result shows up, right-click on Windows Tools and click on Pin to Start or Pin taskbar from the right-click menu.
This is also another super quick method to pin the shortcut on your Start menu and/or Taskbar.
Method 7: Using Run Command Shortcuts
And the quickest possible way to open the Windows Tools would be using shortcut commands through the Run command window. Let’s see how:
Step 1: Right-click on Start menu and select Run.
Step 2: This will open the Run command window.
Here, type either of the commands and hit Enter to open the Windows Tools folder in the file explorer directly:
control admintools

OR

control /name Microsoft.AdministrativeTools
That’s it. You can now open Windows Tools in your Windows 11 PC easily.


