If you are wondering what’s with the Microsoft Teams chat icon on your Taskbar and you want to disable the Teams chat icon from Taskbar in Windows 11 then read on for some tips.
The all new Windows 11 comes with some new features that includes the new Taskbar with some apps added to it and also the Microsoft Teams app built-in with the new OS. The Taskbar automatically comes with the apps like Widgets, Edge, Windows Store, etc. on it. Along with it, you will also notice the Teams Chat icon by-default. With the rise in Work from Home cultures, the Microsoft Teams have become all the more important these days and hence, Windows 11 decide to offer the same to its users by-default.
However, if you are already using some other similar app or the chat icon simply bothers you and you do not want it, you can choose to disable it or completely uninstall it from your PC. This post will show you a couple of methods that will help you to hide, disable and even uninstall the Microsoft Chat icon from Taskbar on your Windows 11 PC.
Method 1: Hide Teams Chat Icon from The Taskbar
If you want to simply hide the Microsoft Teams chat icon, you can do so directly from the Taskbar. Let’s see how:
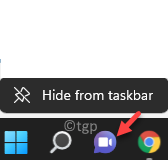
Step 1: Go to the Taskbar and right-click on the Teams chat icon.
Select Hide from taskbar.
This will immediately hide the icon from your Windows 11 Taskbar.
Method 2: Disable teams Chat Icon from Settings App
However, if you want to disable the Microsoft Teams chat app and not just hide the icon, this can be done through thee Settings app. Follow the below instructions to turn off the Teams chat icon:
Step 1: Press the Win + I shortcut keys on your keyboard to open the Settings app.
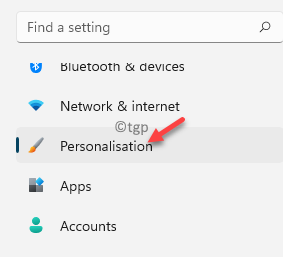
Step 2: In the Settings window, on the left side of the pane, click on Personalisation.
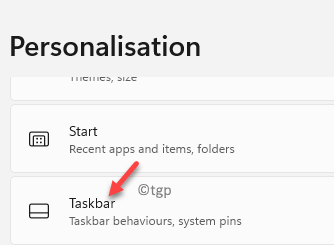
Step 3: Next, navigate to the right side of the window, scroll down and click on Taskbar.
Step 4: In the next screen, under the Taskbar items, go to Chat and move the toggle switch to the left to turn it off.
You have successfully disabled the Teams chat icon on your Windows 11 PC.
Method 3: Uninstall Teams App From Apps Settings
However, if you are comfortable using a different similar app and do not want the Microsoft Teams app at all, you can uninstall the app and it will not start automatically in future. Let’s see how to uninstall the Teams app completely remove it from your Windows 11 PC:
Step 1: Right-click on Start and select Settings from the right-click context menu.
Step 2: In the Settings app that opens, click on Apps on the left side of the pane.
Step 3: Now, navigate to the right side of the pane and click on Apps & features.
Step 4: Next, on the right side, scroll down and under the App list, look for Microsoft Teams.
Click on the three vertical dots on its right and select Uninstall.
Step 5: Click on Uninstall again in the prompt to confirm the action.
Thee Microsoft Teams app is now uninstalled and you should not see the chat icon on your Windows 11 Taskbar anymore.
Method 4: Turn Off Teams Chat Through Apps Settings
Sometimes you may simply want to hide or turn off the Microsoft Teams chat and not uninstall it completely. In such a case, you can disable the app from the Apps settings to turn off the chat icon. Here’s how:
Step 1: Press the Win + I keys simultaneously on your keyboard to open the Settings window.
Step 2: In the Settings app, click on the Apps option on the left side.
Step 3: Next, travel to the right side and click on Apps & features.
Step 4: In the Apps & features screen, on the right side, go to App list and look for Microsoft Teams.
On its right side, click on the three dots and select Advanced options.
Step 5: In the next window, under the Background apps permissions section, select Never from the Let this app run in the background.
Step 6: Now, go to the Runs at log-in section and turn off the Microsoft Teams app.
You have now successfully disabled the Teams chat icon on your Taskbar
Method 5: Remove Microsoft Teams Chat Icon Using Registry Editor
As a more fool proof method, you can always rely on making changes to the Registry Editor. However, you have to be careful while making any changes to the registry and hence, make sure that you create a backup of the Registry settings. This will help you recover any data you may lose during the process. Let’s see how to disable the Teams chat icon by editing the Registry Editor:
Step 1: Press the Win + R keys together on your keyboard to open the Run command window.
Step 2: In the search bar, type regedit and hit Enter to open the Registry Editor window.
Step 3: In the Registry Editor window, navigate to the below path:
HKEY_CURRENT_USER\Software\Microsoft\Windows\CurrentVersion\Explorer\Advanced
Now, go to the right side, scroll down and double-click on TaskbarMn.
Step 4: In the Edit DWORD (32-bit) Value dialogue box, set the Value data field to 0.
Press OK to save the changes and exist.
This will disable the Teams chat icon on your Windows 11 Taskbar.
*Note – To enable the Microsoft Teams chat icon once again, repeat the Steps 1 through 3 and then set the Value data field to 1.
Press OK to save the changes and exit.
Method 6: Disable Teams Chat Through Group Policy Editor
Those who have access to the Group Policy Editor can also make changes to it, to hide or enable the Teams chat icon. This is another sure way to hide the Teams chat icon on the Taskbar. Let’s see how:
Step 1: Press the Win + R hotkeys to open Run command.
Step 2: In the Run command search field, type gpedit.msc and hit Enter to open the Group Policy editor.
Step 3: In the Group Policy editor window, navigate to the below path:
Computer Configuration > Administrative Templates > Windows Components > Chat
Now, travel to the right side of the window and double-click on Configures the Chat icon on the taskbar.
Step 4: In the Configures the Chat icon on the taskbar dialogue box, select the radio button next to Enabled.
Now, go to the Options field and select Hide from the drop-down next to State.
press Apply and then OK to save the changes and exit.
This will disable the Teams chat icon on your Taskbar.
*Note – To enable the Teams chat icon on your Taskbar back again, follow the Step 1 to Step 3 and then select Not Configured in the Configures the Chat icon on the taskbar window.
Press Apply and then OK to apply the changes and exit.


