Windows users are not new to the issues related to Windows Update and the Store errors. Windows Store Error 0x80246019 is one error that mostly occurs when you try to install the new updates released by Microsoft. The error message reads as,
Something Unexpected happened.
Error Code : 0x80246019
If you are a Windows Insider Preview member, the error may read as,
Update Status
Windows 10 Insider Preview 14385-Error 0x80246019
This Error 0x80246019 stops your system from downloading and installing the latest update. The basic reason is that your system files are corrupted or simply a glitch in your PC can cause this error. This article jotted down the tried and tested fixes that may help you in fixing the issue.
Before, going further, if there are more than one USB device connected to your PC (a number of USB Devices may sometimes cause this error), remove them for their ports and see if the error is resolved. If not try these fixes one by one to remove the error 0x80216019.
Fix 1: Update Windows Update components
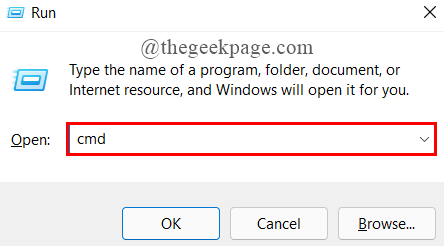
Step 1: Press the Win+R keys to open the run window.
Step 2: Type cmd and press Cltr+Shift+Enter to open the command prompt as Admin.
UAC asks for permission, click Yes.
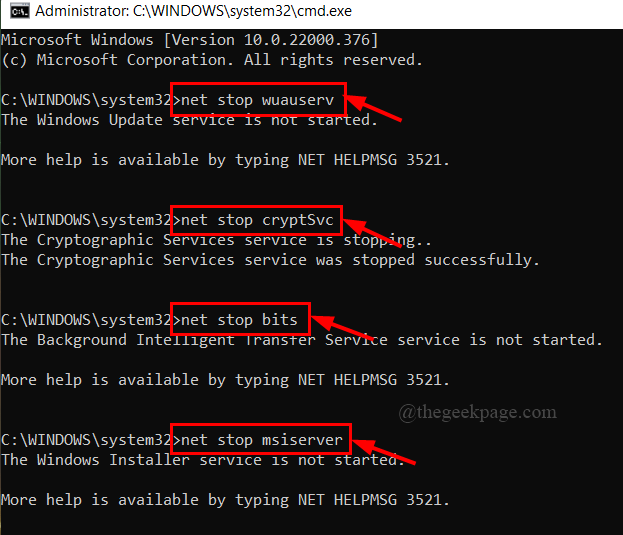
Step 3: Now, copy-paste the commands given below one after the other and hit Enter. These are used to stop some services.
net stop wuauserv
net stop cryptSvc
net stop bits
net stop msiserver
Step 4: After, the above commands are processed, copy-paste the following commands and hit Enter. These will rename your Software Distribution Folder.
ren C:\Windows\SoftwareDistribution SoftwareDistribution.old
ren C:\Windows\System32\catroot2 catroot2.old
Step 5: Now again copy-paste the given commands and hit Enter. These will start the services that we stopped earlier.
net start wuauserv
net start cryptSvc
net start bits
net start msiserver
Step 6: After all the commands are executed, type exit to close the command prompt window.
Step 7: Restart your system for the changes to apply and see if the error is resolved.
Fix 2: Change the service configurations
Step 1: In the taskbar search tab, type cmd.
Step 2: Right-click on the command prompt to open as administrator.
UAC will ask for permission, click Yes.
Step 3: Now, copy-paste the four commands below one by one and hit Enter to execute them sequentially.
sc config wuauserv start = auto

sc config bits start = auto

sc config cryptscv start = auto

sc config trustedinstaller start = auto
Step 4: Finally, type exit to close the command prompt.
Step 5: Restart your system to see if the error is resolved.
Fix 3: Check for the latest available Microsoft Updates
Step 1: In the taskbar search tab, type PowerShell.
Step 2: Right-click to open as Admin.
UAC will ask for permission, click Yes.
Step 3: Type the command below and hit Enter.
wuauclt.exe /updatenow
Step 4: After the command is executed, type exit to close the Terminal.
Step 5: Restart your system.
Fix 4: Run the Windows Update Troubleshooter
Step 1: Click on the start button, type Troubleshoot and hit Enter.
Step 2: Click on Other Troubleshooters.
Step 3: Click the Run Button present against Windows Update.
Step 4: The Troubleshooter will run to see if any threats are detected. If found, click on Yes to resolve the issue.
Step 5: Close the troubleshooter window and restart the system.
Fix 5: Reset Window Store
Step 1: Press the Win+R keys to open the run window.
Step 2: Type wsreset.exe and hit Enter.
Step 3: Close the command prompt terminal.
Fix 6: Run the SFC and DISM Scan
If the above fix did not work, try repairing the corrupt Windows Store using the DISM tool.
Step 1: Press the Win+R keys to open the run window.
Step 2: Type cmd and press Cltr+Shift+Enter to open the command prompt as Admin.
UAC asks for permission, click Yes.
Step 3: Copy-paste the command below and hit Enter.
DISM.exe /Online /Cleanup-image /Restorehealth
Step 4: Next, copy-paste the command below and hit Enter.
sfc /scannow
Step 5: After running the above scans, type exit to close the command prompt window.
Step 6: Restart your system.
Fix 7: Turn off the Windows Insider Program settings
If you are a member of the Windows Insider Program, try this particular fix and see if the error is resolved.
Step 1: In the taskbar search tab, type Windows Insider Program and hit Enter.
Step 2: Now, click on Stop getting preview builds and switch the toggle button to On.
Step 3: Restart your system.
Fix 8: Disable the antivirus
If you are using a third-party antivirus, this may also lead to the Windows Store Error. You have to disable the antivirus and see if the error is resolved.
Step 1: In the taskbar search menu, type Control Panel and hit Enter.
Step 2: Click on Uninstall a program under Programs.
Step 3: Scroll down to search for the antivirus ( Here, it is Norton Security)
Step 4: Right-click on it and select Uninstall. UAC will ask for permission, click on Yes.
Step 5: Restart your system.
Fix 9: Delete the $Windows.~BT Directory
Windows Update creates a file named Windows.~BT Directory to store the temporary files. This may lead to errors sometimes in your system. Try deleting the Directory to see if the error gets resolved. To do this,
Step 1: Click on the Start button and type Disk Cleanup.
Step 2: Select the drive. ( C:\ Drive is selected as default)
Step 3: Now, select the files you wish you delete and click on OK. ( Make sure you select Temporary Files)
Step 4: Restart your system.
Fix 10: Delete all the files in Software Distribution Folder
Step 1: In the taskbar search menu, type Recovery Options and hit Enter.
Step 2: Under Advanced Startup, click on Restart Now.
Step 3: Click on Troubleshoot.
Step 4: Click on Advanced Options.
Step 5: Click on Startup Settings.
Step 6: Press Restart.
Step 7: Press the F4 key to open the system in Safe Mode.
Step 8: Navigate to the Software Distribution Folder using C:\Windows\SoftwareDistribution.
Step 9: Delete all the files in this folder.
Step 10: Restart your system and run Windows Update.
Fix 10: Perform a system restore in Safe Mode
If all the above fixes do not work, try performing a system restore using the Recovery Options. To do so,
Step 1: In the taskbar search menu, type Recovery Options and hit Enter.
Step 2: Under Advanced Startup, click on Restart Now.
Step 3: Click on Troubleshoot.
Step 4: Click on Advanced Options.
Step 5: Click on System Restore.
Step 6:Select and log in with your account.
Step 7: Next, select your Keyboard Layout.
Step 8: A system restore window pops up. Click on Next.
Step 9: Click on the latest restore point you wish and click on Next.
Step 10: Finally, click on Finish.
Step 11: Wait for your system to restore and click on Restart from the pop-up window.
That’s all. Your problem should be resolved.
Hope this article has been informative and useful.
Thanks for Reading.


