Windows+Shift+S shortcut key allows users to take a screenshot for the Microsoft OneNote. It is the most useful screenshot shortcut as the user can pre-decide what type of screenshot (rectangular, full screen, partial screenshot) they prefer. But, what if the Windows+Shift+S key stops working? It is caused by the conflict of the shortcut keys of Snipping Tool and OneNote keyboard shortcuts.
Workarounds –
1. If you have a USB controller plugged into your system, unplug or disconnect it from your system. Then, plug or connect it back again.
2. Restart the system and check again.
[
NOTE –
Snip & Sketch has been rebranded into the Snipping Tool in Windows 11.
]
Fix 1 – Reset the Snipping tool
You can reset this Snipping Tool and set it to the default settings.
1. At first, press the Windows key+I keys together.
2. Then, tap on the “Apps” on the left-hand side.
3. On the right-hand side, click on the “Apps & Features“.

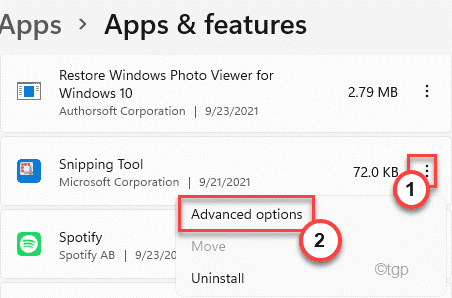
4. Now, look for the “Snipping Tool” in the list of apps.
5. Then, click on the three-dot menu and click on the “Advanced options” to access it.

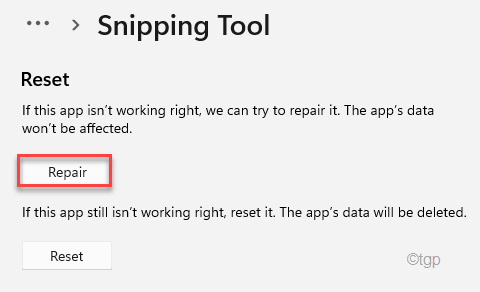
6. You will see these two options. We suggest you try to repair and check. If that doesn’t work, then reset the app.
Repair
Reset
7. Now, tap on “Repair” to repair the application.
Once the repair process is done, try to use the Windows key+Shift+S key.

8. If Snipping Tool is still showing the error message, click on “Reset“.
9. Then, confirm the action with a tap on “Reset“.

After resetting the app, it should work just fine.
Fix 2 – Enable the Clipboard History
You can enable the Clipboard History and check if it offers any help.
1. At first, press the Windows key+I keys together.
2. Then, click on the “System” on the left-hand side.
3. After that, on the right-hand side, tap on “Clipboard“.

4. Same way, on the right-hand side, set the “Clipboard History” option to “On“.

Now, close the Settings window.
Try to take a screenshot using the Windows+Shift+S keys together.
Fix 3 – Enable Snipping Tool notification
This error may be triggered by the disabled notification of the Snipping Tool.
1. Open the Settings.
2. Next, click on the “System” settings on the left-hand side.
3. Then, scroll down through the right pane and click on the “Notifications“.

4. Again, scroll down through the same window, and find the “Snipping Tool“.
5. Make sure it is turned “On“.

After that, close the Settings window.
Now, try to take a screenshot using the shortcut key.
Fix 4 – Restart Windows explorer in Task manager
1 – Open Task manager by Hitting CTRL + SHIFT + Esc keys from your keyboard together.
2 – Now, Locate Windows explorer from the list in Processes Tab.
3- Do a right click on windows explorer and then click Restart.

Fix 5 – Disable Use the Print screen button to open screen snipping
1 – Open Settings by jointly pressing Windows and I keys from your keyboard
2 -Now, click on accessibility from Letf menu and then click keyboard from the right side.

3 – Now, In the right side of settings panel , Just turn off Use the Print screen button to open screen snipping option

Alternative Tip: – You can also Turn this feature On and start using PrntScrn instead of Windows+shift+S to open snipping tool
Fix 6 – Use the OneNote icon on the system tray
There is an alternative you can use to take a screenshot.
1. Open the OneNote on your computer.
2. While it is open, click on the hidden icon on the taskbar and right-click on the “OneNote” icon, and click on “Take screen clipping“.

This will let you take a screenshot of the portion of a window.
Fix 7 – Uninstall and Install Snipping Tool
You can uninstall this Snipping Tool from your computer and re-install it again.
1. Open the Settings window.
2. Then, tap on “Apps“.
3. Same way, on the right-hand side, click on the “Apps & Features“.

4. Next, look for the “Snipping Tool“.
5. Once you have found it, click on the three-dot menu and click on “Uninstall“.

6. Confirm your action with a click on “Uninstall“.

Close the Settings window after this.
7. Open the Microsoft Store.
8. Then, type “Snip & Sketch“.
9. Now, click on the “Snip & Sketch” app to open it up.

10. Now, click on “Install” to install it again.

After installing the app, press the Windows key+Shift+S keys to check whether it is working or not.
Fix 8 – Disable the global shortcut key
There is a registry hack that can disable the hotkey.
1. Press the Windows key + R keys together.
2. Then, type “regedit” and then hit Enter.

3. In the Registry Editor, expand the left-hand side this way –
HKEY_CURRENT_USER\Software\Microsoft\Windows\CurrentVersion\Explorer\Advanced
4. On the right-hand side, right-click on the space and click on “New>” and then click “String Value“.

5. Name this new string as “DisabledHotkeys“.
6. Then, double-click on this key.

7. Set the value to “S“.
8. Then, click on “OK“.

Restart your computer to save this changes.
Fix 9 – Change the OneNote hotkey
There is a registry hack that you can use to tweak this shortcut to another shortcut Windows+Shift+Z.
1. At first, press the Windows key and write”regedit“.
2. Then, tap on “Registry Editor” from the search results.

Warning – Registry Editor is a sensitive location of the system. Before you create and modify a new key on your computer, we request to make a backup of the registry on your computer.
After opening the Registry Editor, click on “File“. Then click on “Export” to back up the existing registry key on your system.

3. Now, go to this location on your computer –
HKEY_CURRENT_USER\Software\Microsoft\Office\16.0\OneNote\Options\Other
[ NOTE – 16.0 Represents the Installed MS Office version 2016 on your system. It may differ based on which version of Office is installed on your system. ]
4. Now, on the right-hand pane, right-click on the right-hand pane and click on “New>” and then tap on “DWORD (32-bit) Value“.

5. Next, name this new key as “ScreenClippingShortcutKey“.
6. Then, double-click on the key.

7. Then, choose the base as “Hexadecimal“.
8. Further, set the value to “5A” and click on “OK” to save it.

This will set the new shortcut key to Windows key+Shift+Z.
When you are done, close the Registry Editor and restart your computer.
After restarting the system, press the Windows key+Shift+Z keys to take a screenshot.
Alternative Tips –
Alternatively, you can use the Print Screen key or the Alt+Prt Sc key to take a screenshot. There are different alternatives that you can try while taking a screenshot from here.