‘Eject’ option is provided to the users to safely eject their USB devices. This protects the users from forcibly ejecting the USB that can corrupt the data on the USB. But, sometimes if you have to forcefully/manually eject the USB from your system, this message may appear on your screen afterward – “The last USB device you connected to this computer malfunctioned and Windows do not recognize it“. If you are facing this issue, you can solve it with some quick fixes.
Fix 1 – Change the USB port/ USB cable
If you are experiencing this issue, again and again, you can try this simpler solution.
1. Use a different port on your computer. Plugin the USB device into one of the rear ports on your system.
2. If you are trying to connect a device with a USB cable, try using a different USB cable.
Delve right into the main fixes if this quick workaround doesn’t work out.
Fix 2 – Change USB prompt settings
If you are annoyed with this same repetitive prompt, you can opt for not receiving any prompt if there are any USB connection issues.
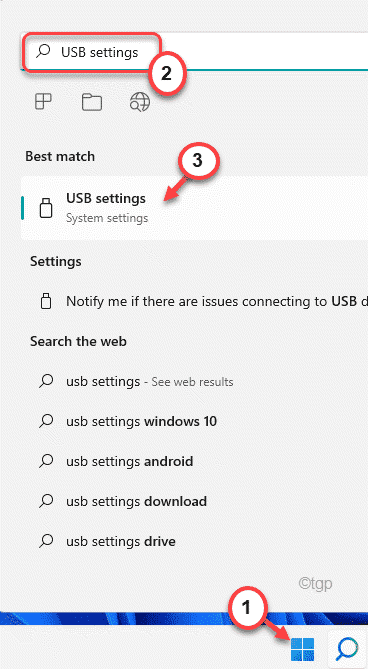
1. At first, click on the Windows key and type “USB settings” in the search box.
2. Then, tap on the “USB settings“.

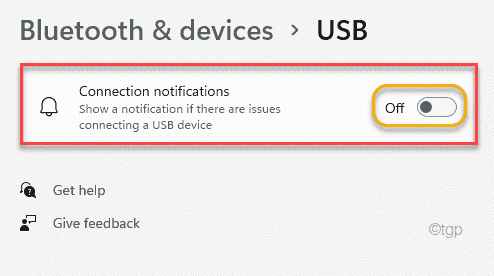
3. When the USB Settings opens up, on the right-hand side, toggle the “Connection notifications” option to “Off“.

Close the Settings window.
After that, you won’t receive any kind of error message related to the USB device connection.
Fix 3 – Update the Generic USB Hub
You can update all the generic USB hubs on your computer.
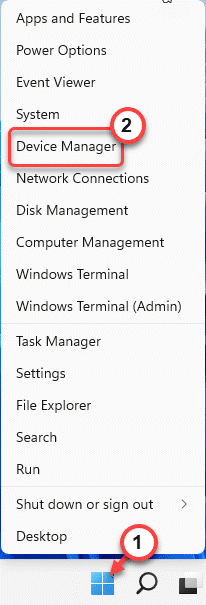
1. At first, press the Window key+X keys together.
2. Then, click on the “Device Manager” to open the Device Manager.

3. Now, scroll all the way down and expand the “Universal Serial Bus controllers“.
4. Here, you may find several USB Hub devices.
5. Then, right-click on the first “Generic UBS Hub” and tap on “Update driver“.

6. Now, click on the “Browse my computer for drivers“.

7. Next, click on the “Let me pick from a list of available drivers on my computer“.

8. This will open up the list of existing drivers on your screen.
9. Select the “Generic USB Hub“.
10. Finally, tap on “Next“.

Now, Windows will install the driver on your computer.
11. Then, update the other generic USB Hub devices following the same way.

Finally, when you are done, restart your computer. After restarting, check the status of the issue.
Fix 4 – Modify the USB Selective Suspend settings
You can disable the USB Selective Suspend feature to stop this error message from appearing.
1. At first, press the Windows key+R keys together.
2. Then, paste this UTR command and paste Enter.
control.exe powercfg.cpl,,3

3. Now, expand the “USB settings:“.
4. Then, select the “USB selective suspend setting“.

5. Then, click on the drop-down icon of “Setting:”.
6. Finally, choose “Disabled” from the drop-down option.

7. Finally, click on “Apply” and “OK” to save the changes.

Finally, restart your computer.
Fix 5 – Perform a Power Drain
Power Drain is a process with which you can clean up the residual electrons from your computer.
1. At first, completely switch off your computer.
2. Then, remove the power supply plug from your system (If you are using a laptop, take out the battery).
3. Next, try to power up the computer using the power button. This will drain out any residue electrons from the whole system (If it is a laptop, first drain the battery and then try to power up using the power button).
4. Now, plug the USB device into your system.
5. After the usb device is plugged into your system, plug in the power supply to your computer.
6. Then, start your device.
Now, check whether you are still seeing the error message after ejecting the device or not.
Fix 6 – Uninstall and reinstall drivers
Uninstalling the corrupted drivers may help you resolve the issue.
1. At first, press the Windows key+R keys together.
2. Then, type “devmgmt.msc” and hit Enter.

3. Now, expand the “Universal Serial Bus controller“.
4. Upon expanding it you will see a driver carrying a yellow triangle ⚠ symbol.
(As you can see on our system, it is “USB Root Hub 3.0” that carries that mark)

6. Finally, click on “Uninstall” to uninstall it from your computer.

After that, close the Device Manager window. Then, restart your computer.
During the restart, Windows should install the default driver in place of the uninstalled one.
If this doesn’t install the driver, you have to manually install it. Follow these steps –
1. Open the Device Manager.
2. Then, tap on “Action” on the menu bar and then click on “Scan for hardware changes“.

This will scan and install the missing driver.
3. This way, try to locate any other unknown devices under the other devices section.
If you can find any device with a yellow triangle ⚠ symbol, reinstall that following the same way we have discussed.

After doing all these, you won’t see the error message again.
Fix 7 – Run Hardware device troubleshooter
If nothing is working out for you, you can try to run the hardware device troubleshooter to find and fix the issue.
1. At first, press the Windows key+R keys together.
2. Then, copy-paste the command and hit Enter.
msdt.exe -id devicediagnostic

3. Now, tap on “Next” to let Windows identify and fix the hardware issue on your computer.

Now, just wait for Windows to solve the issue for you. This should have solved the problem with your system.