Windows Security or formerly known as Windows Defender Security provides security to your system from all kinds of foreign malware. Usually, you can easily take control of the Windows Security settings and toggle various features on or off. But, sometimes you may see this Windows Security is completely greyed out and you can’t change it.
Fix 2 – Use the Group Policy setting
Group policy setting is a tool that system administrators use to block users from accessing the Windows Security settings. So, if you are using a Windows Pro or Business edition device, follow these steps.
NOTE –
System Administrators restrict user action with several policies. Before enacting this solution, ask permission from the concerned IT administrator as this may breach security protocols.
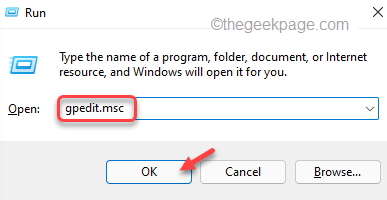
1. Just press the Win key and the R key from your system keyboard.
2 Then, write down this term there and hit Enter.
gpedit.msc
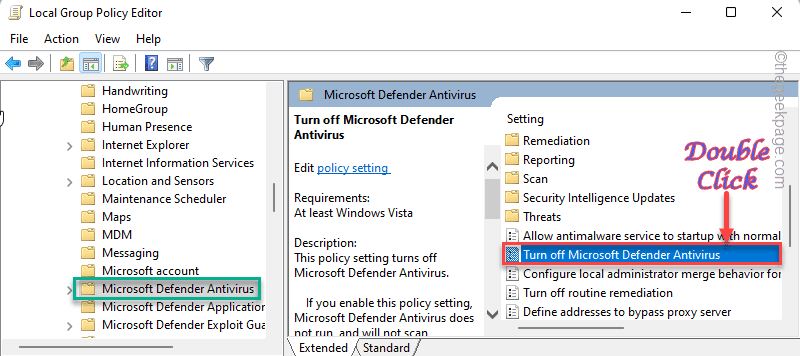
3. Now, when you have opened the Local Group Policy Editor page, reach this location of Microsoft Defender policy –
Computer Configuration > Administrative Template > Windows Components > Microsoft Defender Antivirus
4. Then, on the right-hand pane, try to look for “Turn off Microsoft Defender Antivirus“.
5. When you find this policy, double-tap this to modify it.
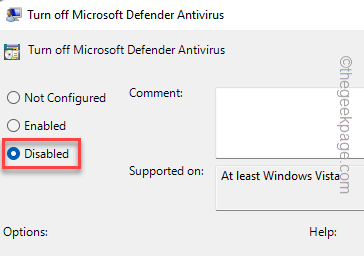
6. Coming to the next page, set the policy to “Disabled“.
7. After that, click “Apply” and “OK” to save this policy modification on your computer.
Finally, close the Local Group Policy Editor page. Then, restart your system after this.
Fix 3 – Restart the Windows Security Service
You can restart the Windows Security service and test.
1. You can find the Windows Security Service on the Services page.
2. So, just press the Windows key and type “services“.
3. Then, tap “Services” in the search results to open the Services screen.
4. On the Services page, scroll down to the lower side of the screen to see the “Windows Security Service” service in the list.
5. Now, right-click the service and tap “Restart” to restart the service.
This way, when you restarted the service, close the Services window. Next, try to open Windows Security once more.
Fix 1 – Disable/Uninstall the other antivirus
Usually, when you have a dedicated third-party antivirus already installed on your system, it will take control of all the Windows Security settings. When you open the Windows Security features, you wil notice various settings like “Real-time protection” is controlled by another antivirus. You can uninstall the third-party antivirus if you want.
1. At first, press the Win key+R together to invoke the Run panel.
2. There, type this word and click “OK” to open the Programs & Features page.
appwiz.cpl
3. When you have opened this page, look for the antivirus software in the list of apps.
4. Just, right-tap the antivirus software and tap “Uninstall” to uninstall it from your device.
You can follow the steps on the uninstaller to uninstall the antivirus from your system.
Uninstalling the antivirus doesn’t mean that all of its components are now removed. To do that, you have to restart your device once. When you restart the device, the antivirus will be gone.
Now, open Windows Security and test it out yourself.
Fix 4 – Force the Windows Security
If you still can’t use Windows Security, you can force it with a code using the terminal.
1. At first, you have to write “cmd” in the search box.
2. Then, right-tap the “Command Prompt” and tap “Run as administrator” to open the terminal as an administrator.
3. Now, copy this line from here and paste it into the terminal. Then, hit Enter to remove a particular registry entry from your computer.
REG DELETE “HKLM\SOFTWARE\Policies\Microsoft\Windows Defender” /v DisableAntiSpyware
After this, close the terminal.
Reboot your machine so that this change can take effect. Check if Windows Security still appears to be greyed out or not.
Fix 5 – Automate the RPC service
The Remote Procedure Call service and WMI service need to be started for Windows security to access those properly.
1. Press the Windows key along with the R key.
2. Then, type this there and tap “OK” to open the Services menu.
services.msc
3. In the Services tab, scroll down below and double-tap the “Remote Procedure Call (RPC)” service.
4. Coming to the properties page, you have to set the ‘Startup type:’ to “Automatic” mode.
5. Now, just take a look at the ‘Status’ of the service. If it is ‘Running’ don’t do anything.
6. But, if it is in the ‘Stopped’ condition, just tap “Start” to start the service immediately.
7. After this, tap “Apply” and “OK” to save the changes.
8. You should be back at the Services screen once more.
9. After this, go down through the list once more in search of the “Windows Management Instrumentation” service.
10. Just, right-click that and tap “Properties” to access it.
11. Now, just like the RPC service, make sure to set the ‘Startup type:’ to “Automatic” as well.
12. Then, if the service is not running, tap “Start” to resume the WMI service.
13. Now, you have to just save these settings. So, click “Apply” and “OK” to save it.
Close everything and restart your PC. Check if this solves the problem.
Fix 6 – Use the Microsoft Safety scanner
Try running the Microsoft Safety Scanner tool on your computer. It will solve the problem.
1. Download the Microsoft Safety Scanner tool.
2. Next, tap on “Download Microsoft Safety Scanner (64-bit)“.
[If you are using a 32-bit Windows 10 device, tap on the link of the 32-bit tool. ]
3. After downloading the tool, go to the download location.
4. Then, double-tap the “MSERT‘ tool.
5. On the first page, check the “Accept all terms of the preceding license agreement” box.
6. Then, tap “Next“.
7. In the ‘Scan type’ screen, choose the “Full scan” option to run the scan over the entire system.
8. After this, click “Next“.
9. This will commence the full scan. This scan usually takes the longest of the other scans. So, wait patiently.
You can try to out other things while the scan runs in the background.
10. Once the process is complete, you will notice the “The scan completed successfully” message has appeared on the screen.
If it finds any malware, it will remove it from your computer.
11. Finally, tap “Finish” to complete the process.
Open Windows Security and test whether it is greyed out.
Fix 7 – Update the system
Microsoft pushes regular security patches through the update channels. So, you must install the latest update.
1. If you right-tap the Windows icon on your taskbar, a context menu appears. Just, tap “Settings” in there.
2. Now, click on the last option “Windows Update” on the left-hand side.
3. Now, go to the right-hand pane and check whether any updates are already downloading.
4. Then, tap “Check for updates” to check for the latest updates.
Patiently wait for some time for Windows to download all the updates and install those on your computer.
5. Once the process is complete, you’ll see the message ‘Restart required’.
6. Tap “Restart now” to restart the machine.
Once the update process completes and your device restarts properly, open the Windows Security and test.
Fix 8 – Run SFC and DISM scan
The main reason behind this issue can be some data file corruption.
1. After pressing the Windows key and write this in the search box.
cmd
2. After that, right-tap the “Command Prompt” and tap “Run as administrator“.
3. To start the SFC scan, copy-paste this line on the terminal and hit the Enter key from your keyboard.
sfc /scannow
Wait until Windows checks the system file for corruption and fix that.
4. Then, write this line in the terminal and press the Enter key to run the DISM check.
DISM.exe /Online /Cleanup-image /Restorehealth
Once the DISM scan is complete, close the terminal.
After running both scans, restart your system.


