Are you running into a problem while installing Windows Update on your Windows 11/10 PC? Most of the time, rebooting the system can resolve the issue if the update is stuck at a percentage, or the update has failed or you see an unknown error code. This issue is mostly encountered if the update services on your PC are not working properly. If this issue shows up even after rebooting your system, then you need to restart the Windows Update Service.
Read this post to find two ways using which you can restart the Windows Update Service on your Windows 11/10 PC.
Method 1 – Restart Windows Update Service Using Services App
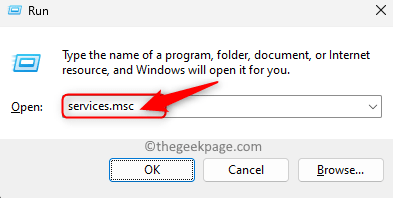
Step 1. Open the Run box using the Windows + R key combination.
Step 2. Type services.msc and hit Enter to open the Services app.
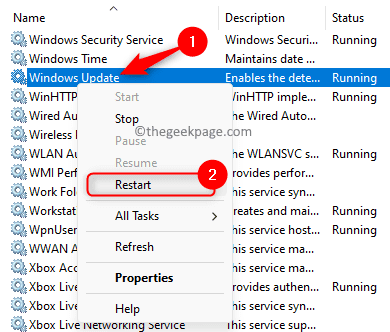
Step 3. Scroll down through the list of services and locate the Windows Update service.
Step 4. Right-click on Windows Update and choose Restart.
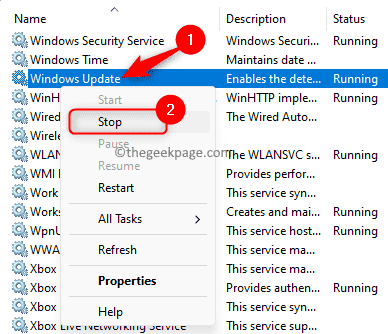
Note: You can restart the service in another way.
Right-click on the service and choose Stop.
Then, again right-click and choose Start to start the service manually.
Step 5. Restart all the other Windows Update-dependent services mentioned below in the same way as mentioned in Step 4.
- Background Intelligent Transfer Service
- Cryptographic Service
- Windows Installer Service
Note: If the services are stopped, then you can’t restart them you will need to start them.
Step 6. Now, check if you are able to install the Windows Update without any issues.
Method 2 – Use Command Prompt to Restart Windows Update Service
Step 1. Hit the Windows key on your keyboard and type “command prompt” in the Windows search box.
Step 2. Once the search result Command Prompt is selected, click on “Run as administrator” at the right.
Step 3. When prompted by User Account Control for permissions, click on Yes.
Step 4. Type the commands one after the other and hit Enter after each one to execute them.
net stop wuauserv
regsvr32 %windir%\system32\wups2.dll
net start wuauserv
Step 5. Check if the problem is resolved.
Step 6. If the problem persists, you may need to restart all the other services dependent on Windows Update and clear the update cache so that Windows can look for updates and download them again.
Run the commands below one after the other after opening Command Prompt as an administrator.
net stop wuauserv
net stop cryptSvc
net stop bits
net stop msiserver
Ren C:\Windows\SoftwareDistribution SoftwareDistribution.old
Ren C:\Windows\System32\catroot2 Catroot2.old
net start wuauserv
net start cryptSvc
net start bits
net start msiserver
Note: In the Ren command above, replace C: with the drive that contains your Windows installation.
Make sure to run the commands in the same order as mentioned above.
That’s it!
Thanks for reading.
We hope using one of the methods above, you have been able to restart the Windows Update service and install the updates on your Windows 11/10 PC. Did you find this post informative enough? Please comment and let us know your thoughts and opinions on the same.


