The system file checker is a great tool if there is something that does not work in the Windows operating system. It scans your computer and restore the corrupted Windows system files. However, many users have reported that they can’t perform the sfc/scannow command and get the error that says windows resource protection could not perform the requested operation.
We have gathered some solutions that will help you solve this error, follow the solutions below.
Solution 1 – Run SFC in safe mode
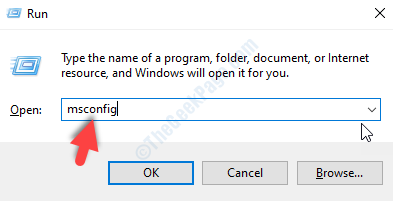
STEP 1: Press Windows and R keys together to open the run dialogue box. In the box that opens type msconfig and press the OK button.

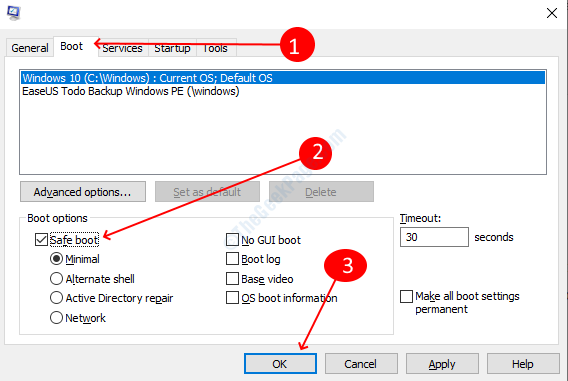
STEP 2: A new window will open now. First, switch to the boot tab in the main menu. You will find boot options there, check the checkbox titled safe boot option. Once you have selected the safe boot option, Click OK button to save the settings.

STEP 3: A prompt will tell you to restart the computer when you close the boot options window, click on the Restart option.
After the computer restarts, check if now you can run the SFC scan command without this error or not.
Solution 2 – Run CHKDSK
The SFC scan also doesn’t run because of the errors in the hard drive. CHKDSK will help you to check that your hard disk is working properly to run the system file checker tool. Follow the steps below to run CHKDSK.
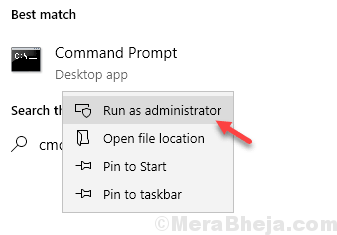
STEP 1: Press the Windows key to search for command prompt, type cmd in the search box. Right click on the option that says command prompt and choose the run as administrator option.

STEP 2: Click Yes option on the User Account Control prompt.
STEP 3: In the command prompt window, type chkdsk /r and press enter key to run the command. Type y to confirm the command. Wait till the executions of the command complete and then close the command prompt window.

STEP 4: Restart the computer, it will automatically start to check and repair your hard drive. CHKDSK process will take some time depending upon the size and content of your hard disk.
When the process gets completed and the computer starts to run the SFC command and check that if it is working.
Solution 3 – Modify the security descriptors on the winsxs folder
Winsxs folder contains the files that are crucial for the SFC scan to run. Many times SFC could not run because the winsxs folder’s security descriptions have some issues. So, you first you have to fix the winsxs folder in order to run the SFC scan.
STEP 1: Right click on the windows button and select the command prompt (admin) option from the menu that opens up.

STEP 2: A user account prompt will pop up, click the Yes button.
STEP 3: In the command prompt window, type the following command and then press enter key to execute the command.
ICACLS C:\Windows\winsxs

Wait for the command to execute and then close the command prompt window. Restart your computer and try the sfc scan in the command prompt.
Solution 4 – Enable Windows Module Installer
If the Windows Modules Installer service is disabled on your computer, it is the reason that sfc scan is not working. Follow the steps below to fix the issue:
STEP 1: Press Windows + R keys to open the Run dialogue, type services.msc in the text box and click the OK button. Windows services windows will open up.

STEP 2: Scroll down in the Services windows and locate the Windows Module Installer. Right click on the service and click on the start option.

It will restart the Windows Module Installer service on your computer and you will be able to run the SFC scan after starting the service.
Solution 5 – Run Recovery commands
If the error has happened in the current boot version of the windows operating system then you have to boot into recovery mode to solve the issue. In this method, we will run commands in the command prompt of the recovery mode to enable SFC scan utility.
STEP 1: Restart your computer from the power options in the start menu. Wait till the computer shuts down and when the computer starts to boot into the recovery mode (depending upon your manufacturer recovery boot button will be different like f10 or f12 or some other key, look it up).
STEP 2: When you are into the recovery mode, find the command prompt program, and run it.
STEP 3: Type the following command in the command prompt and press enter to execute the command
sfc /SCANNOW /OFFBOOTDIR=c:\ /OFFWINDIR=c:\windows
Once the command gets executed, exit the recovery mode and boot into the operating system normally. Open command prompt window and run the SFC scan command to run the scan.