If you are seeing ‘Windows can’t communicate with the device or resource (Primary DNS Server)‘ in the Windows Network Diagnostics window during diagnosing network issues on your computer, then the problem you are dealing with is associated with the DNS and IP settings of your network adapter. Follow these simple solutions to fix your issue.
Fix-1 Set IPv4 settings to automatic-
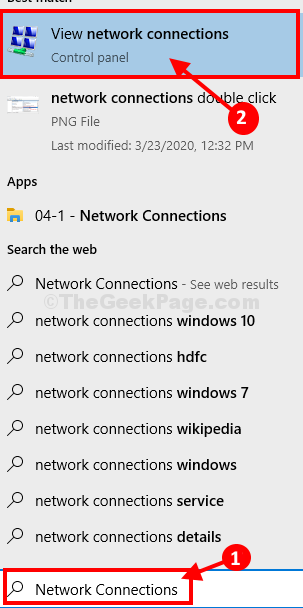
1. Press the ⊞ Win key on your computer and type “Network connections“.
2. In the elevated search result, click on “View network connections“.

Network Connections window will be opened. You will see the list of adapters available.
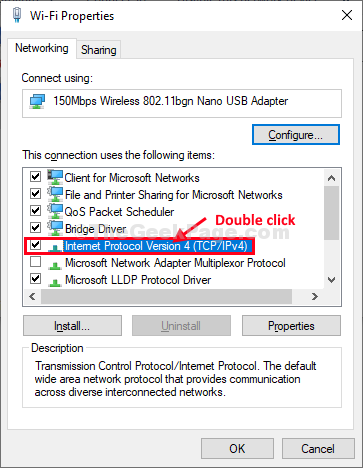
3. Right-click on problematic network adapter and click on “Properties“.

4. Now, under the section ‘This connection uses the following items:‘, scroll down
5. Then, double click on “Internet Protocol Version 4 (TCP/IPv4)“.

6. In Internet Protocol Version 4 (TCP/IPv4) Properties window click on “Obtain an IP address automatically“.
7. Next, choose the radio button beside the option “Obtain DNS server address automatically“.
8. Finally, click on “OK” to save the changes on your computer.

Close Network Connections window.
Reboot your computer to save the changes on your computer.
After rebooting, check if you can connect to the internet or not.
Fix-2 Set DNS to Google’s public DNS-
Setting the DNS setting to Google’s public DNS settings will solve this issue.
1. Press Windows Key+R, to launch Run, and type “ncpa.cpl” and hit Enter.

Network Connections window will be opened.
2. In the list of available drivers, right-click on the wifi driver.
3. Then, you need to click on the “Properties“.

3. Now, choose the option “Use the following DNS server addresses:” and input the following DNS servers-
Preferred DNS server: 8.8.8.8
Alternate DNS server: 8.8.4.4

4. Click on “OK“.
Close Control Panel window.
Reboot your computer and check if it helps or not.
Fix-3 Reset IPconfig-
Resetting IPconfig on your computer may solve this issue.
1. By pressing the Windows key+R keys together to launch the Run window.
2. Now, type “cmd” and then press Ctrl+Shift+Enter.

Command Prompt window will be opened with Administrative rights.
4. To modify the network configuration copy-paste this command and then hit Enter.
netsh int ip config

5. Now, run the commands given below one by one
ipconfig/flushdns

ipconfig /flushdns

ipconfig /registerdns

ipconfig /release

ipconfig /renew
Once done, close Command Prompt window.
Reboot your computer to complete the process.
After rebooting your computer, you should be able to connect to the internet.
Fix-4 Reinstall WiFi Adapter
1. Press Windows key + R key together to open run.
2. now, write devmgmt.msc in it and click OK.

3. Now, expand network adapters.
4. Locate your network adapter and right click and choose uninstall.

5. Now, click on Action and then click on scan for hardware changes from the popped up menu.

Fix 5 – Reboot your router
1. Turn off your router.
2. Wait for 5 seconds.
3. Turn it ON again.
4. Now, connect your PC with wifi.
Your problem should be solved.