Whether you are checking for a Windows 10 or Windows 11 update, there are sometimes when the Windows Update download may get stuck at 100% due to some internal glitch. This can be frustrating because you may need to finish the update installation and move on with your work. Sometimes, the system may slow down unless the update is installed.
So, if you have recently installed the Windows 11 and as you start using the OS, you come across the Windows Update stuck at 100% while downloading, we have a few potential solutions for you. While the updates should usually download and install automatically in the background, if it’s not, then go to Settings > Windows Update > Check for Updates and the update process should begin.
The Windows update download process could also be interrupted due to internet disconnection or power issue. You can wait for a while and check if it gets resolved once the internet or the power is back up. However, if the Windows 11 update is stuck at 100% for hours, you can try the below methods.
Method 1: By Disabling and Enabling Windows Update Service
This method needs you to first disable the Windows Update service, clear the SoftwareDistribution folder a nd then re-enable the Update service back again. Follow the below instructions to check if this helps fix the Windows 11 update stuck at 100% issue:
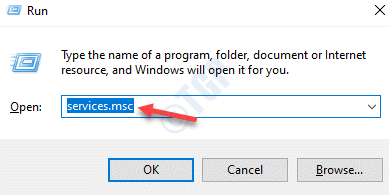
Step 1: Press the Win + R keys together on your keyboard to open the Run command window.
Step 2: In the Run command search bar, type services.msc and hit Enter to launch the Service manager window.

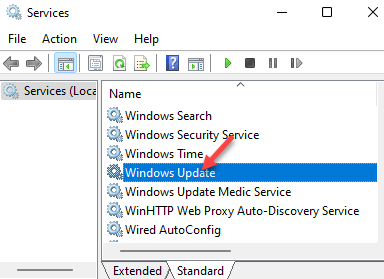
Step 3: In the Services window, go to the right side and under the Names column look for Windows Update service.
Double-click to open it’s Properties window.

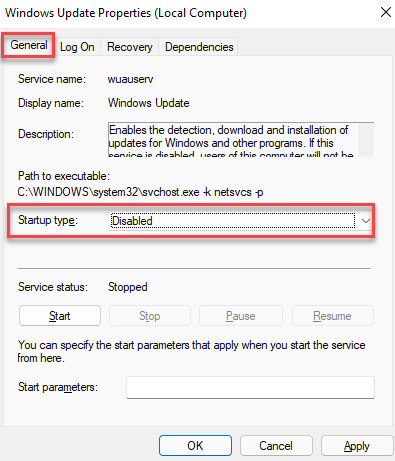
Step 4: In the Windows Update Properties dialogue box, under the General tab, go to the Startup type section and change it to Disabled.
Press Apply and then OK to save the changes and exit.

Step 5: Now, restart your PC and then press the Win + E keys simultaneously on your keyboard to open the File Explorer window.
Now, navigate to the below path:
C:\Windows\SoftwareDistribution

Step 6: Now, close the File Explorer and repeat the Steps 1 through 3 to open the Windows Update Properties dialogue box in the Services window.
In the Windows Update Properties dialogue box, under the General tab, navigate to the Startup type section again change the field to Automatic.
Press Apply and then OK to apply the changes and exit.
Also , Click on Start to start the service again.

Now, restart your PC again and try downloading the Windows 11 update again and it should finish downloading and installing normally.
*Note – As you open the Services window in the Step 1 and Step 2 above, under the Names column, check if the DCOM Server Process Launcher and the RPC Endpoint Mapper is running.
If both or any of the services are showing Stopped, right-click on them one by one and select Start to start these services.
Method 2: Reset Windows Update Components
When none of the above method works, you may reset the Windows Update components to check if it helps fix the Windows 11 update stuck at 100% issue. Follow the below instructions to reset the Windows update components to its original state:
Step 1: Press the Win + R hotkeys on your keyboard and the Run command window opens.
Step 2: In the search field, type cmd and press the Ctrl +Shift + Enter keys together on your keyboard to open the Command Prompt in admin mode.

Step 3: In the elevated Command Prompt window, run the below command one by one and hit Enter after each one to stop the Background Intelligent Transfer Service, Windows Update Service, Cryptographic Services, and Application Identity Service:
net stop bits
net stop wuauserv
net stop appidsvc
net stop cryptsvc
Step 4: Next, execute the below command to remove the qmgr*.dat file:
Del "%ALLUSERSPROFILE%\Application Data\Microsoft\Network\Downloader\qmgr*.dat"
Step 5: Now, copy and paste the below command and hit Enter:
cd /d %windir%\system32
Step 6: Here, you would need to run the below commands one after another and press Enter after each one to re-register the BITS and Windows Update files:
regsvr32.exe atl.dll

regsvr32.exe urlmon.dll

regsvr32.exe mshtml.dll

regsvr32.exe shdocvw.dll

regsvr32.exe browseui.dll

regsvr32.exe jscript.dll

regsvr32.exe vbscript.dll

regsvr32.exe scrrun.dll

regsvr32.exe msxml.dll

regsvr32.exe msxml3.dll

regsvr32.exe msxml6.dll

regsvr32.exe actxprxy.dll

regsvr32.exe softpub.dll

regsvr32.exe wintrust.dll

regsvr32.exe dssenh.dll

regsvr32.exe rsaenh.dll

regsvr32.exe gpkcsp.dll

regsvr32.exe sccbase.dll

regsvr32.exe slbcsp.dll

regsvr32.exe cryptdlg.dll

regsvr32.exe oleaut32.dll

regsvr32.exe ole32.dll

regsvr32.exe shell32.dll

regsvr32.exe initpki.dll

regsvr32.exe wuapi.dll

regsvr32.exe wuaueng.dll

regsvr32.exe wuaueng1.dll

regsvr32.exe wucltui.dll

regsvr32.exe wups.dll

regsvr32.exe wups2.dll

regsvr32.exe wuweb.dll

regsvr32.exe qmgr.dll

regsvr32.exe qmgrprxy.dll

regsvr32.exe wucltux.dll

regsvr32.exe muweb.dll

regsvr32.exe wuwebv.dll
Step 7: You would now need to run the below command and hit Enter again to reset Winsock:
netsh winsock reset
Step 8: Now, type the below command in the Command prompt window to restart the Background Intelligent Transfer Service, Windows Update Service, Cryptographic Services, and Application Identity Service:
net start bits
net start wuauserv
net start appidsvc
net start cryptsvc
Once done, close the Command Prompt window and restart your PC.
Now, check if you can finish downloading the Windows 11 update normally.
Method 3: Run the Windows Update troubleshooter
Running the Windows update troubleshooter should be one of the basic things to do before you proceed with the other methods. Hence, try running the troubleshooter and check if this helps resolve the issue:
Step 1: Press the Win + I shortcut keys to open the Settings app.
Step 2: In the Settings window, go to the left side of the pane and click on System.

Step 3: Next, navigate to the right side, scroll down and select Troubleshoot.

Step 4: Now, on the right side, click on Other trouble-shooters.

Step 5: In the Other trouble-shooters window, under the Most frequent section, go to Windows Update and click on Run.

Now, wait for the troubleshooter to look for any issues and if any found it will display the suggested fix automatically. You can press the “Apply this fix” option to finish fixing the issue.
Once done, restart your PC and the update should download and install now.
Method 4: Run SFC Scannow
Sometimes, the issue could be due to corrupted or missing system files. Using the System File Checker tool can help you fix the issue in most cases. Let’s see how:
Step 1: Right-click on Start button (at the center of the Taskbar) and select Run.

Step 2: In the Run command window that opens, type cmd in the search bar and press the Ctrl + Shift + Enter keys together to open the elevated Command Prompt window.

Step 3: In the Command Prompt (admin) window, run the below command hit Enter:
sfc /scannow

Now, wait till the scan is over as it takes a while.
It will detect any corrupt system files and repair or replace them automatically.
Once done, restart your PC and try downloading the Windows 11 update.
Method 5: Run disk cleanup
If the Windows update stuck at 100% issue is due to the accumulation of junk files and temporary files, removing all these files using the built-in Disk Cleanup tool can help fix the update issue. Follow the below steps to run the disk cleanup tool:
Step 1: Press the Win + R shortcut keys on your keyboard to launch the Run command window.
Step 2: In the search field, type Cleanmgr and hit Enter to open the Disk Clean-up : Drive Selection pop up window.

Step 3: In the Disk Clean-up : Drive Selection pop up window, select the drive you want to clean, from the drop-down below C drive and press OK.

Step 4: As the Disk Clean-up dialogue box opens, select the files from the Files to delete field and click on the Clean up system files button below.

Method 6: Disable all non-Microsoft services using msconfig
Step 1: Right-click on the Windows icon at the center of the Taskbar and select run to open the Run command window.
Step 2: In the Run command, type msconfig in the search field and press OK to open the System Configuration window.
Step 3: In the System Configuration window, go to the Services tab and check the box next to Hide all Microsoft services.
Next, press the Disable all button.
Click on Apply and then OK to save the changes and exit.
Now, restart your PC and you should now be able to complete Windows 11 update download.
Method 7: Turn off Firewall Temporarily
Chances are that the Windows Firewall is blocking any component in the Windows 11 update and hence, the issue arises. In such a case, you can try turning off the Firewall and check if it works. Here’s how:
Step 1: Press the Win + R keys together on your keyboard to open the Run command box.
Step 2: In the search field, type Firewall.cpl and hit Enter to open the Windows Defender Firewall screen in the Control Panel windows.

Step 3: In the Windows Defender Firewall screen, click on Turn Windows Defender Firewall on or off option on the left.

Step 4: Next, in the Customize Settings window, select the Turn Off Windows Defender Firewall option under both Private network settings and Public network settings.
Press OK to save the changes and exit.

Now, go to Windows update and check if the problem is resolved.
*Note – You should later turn on the Windows Defender Firewall to continue with the security of your PC.
Method 8: Force Restart your System
Some users have evidently benefitted from simply force restarting their PC. Here’s how to do it:
Step 1: Press and hold the power button till your PC shuts down.
Step 2: Disconnect the power supply if any and detach the battery if its a laptop.
Step 3: Now, keep the power button pressed fro 15 more seconds.
Step 4: Wait for a couple of minutes and then connect the charger or attach the laptop battery again.
Step 5: Now, press and hold the power button again to restart your PC.
Step 6: If you see a warning that your computer shut down abnormally, choose the option to boot normally.
You can now go to Windows Update and check if the update is downloading normally.
Method 9: Disconnect Any External Devices and Wait for the Update to Finish
Sometimes, the Windows update stuck at 100% is not actually an issue as it appears. Some updates may take a while as Windows may be just busy with configuration and installation of the update packages. In such cases, waiting for around 2 to 3 hours without using your PC can be a smart idea and sometimes, this helps.
At the same time, make sure that you disconnect any attached external devices like a pen drive, printers, etc. This trick has reportedly helped finish the Windows 11 update download within 2 to 3 hours for some users.
Alternatively, you can also try running a virus scan using a trusted 3rd party Antivirus software, because the issue could be sometimes due to a malware or a virus blocking the Windows 11 update. It will help you identify and quarantine your PC from any potential virus.