There a huge number of BSOD issues that can crash your system and force-reboot the system. Sometimes your system can crash when ‘win32kfull.sys’ fails, causing the blue screen of death. Win32kfull.sys is one of the kernel-mode drivers that is used by your system. If gets corrupted or incompatible with your system, this problem may occur. Follow these easy fixes to solve the problem.
Fix 1 – Run an SFC check
You can run an SFC and DISM check on your system to check for any system file corruption.
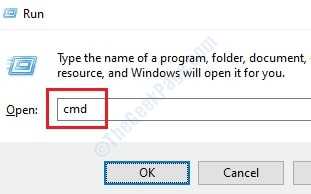
1. Press the Windows key+R.
2. Then, type this code and hit CTRL + Shift + Enter.
cmd

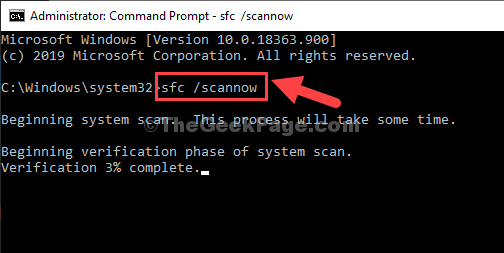
3. To run an SFC scan type this command and hit Enter to run a simple SFC scan.
sfc /scannow

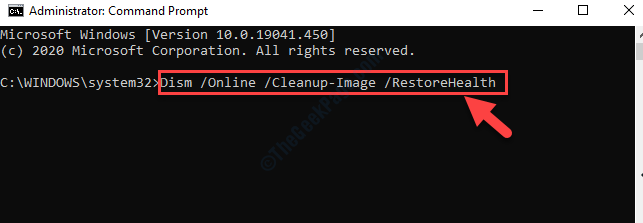
4. You have to run a DISM check. To run a DISM scan, paste this command in the terminal and then hit Enter.
DISM.exe /Online /Cleanup-image /Restorehealth

Once all these checks are complete, close the terminal and restart your device.
Fix 2 – Install optional Windows Update
It may be a while since you have installed all the updates on your device.
1. At first, press the Windows key+I keys together.
2. Then click on the “Updates & Security“.

3. Now on the right-hand side, click on “View optional updates” to search for the latest driver updates.

4. You will notice a list of drivers ready-to-be installed on your system. Check all the updates.
5. Then, click on “Download and install“.

6. When all the updates are downloaded and installed on your device, just click on “Restart Now“.

Restarting your machine will install the update on your device.
Fix 3 – Uninstall recent Windows updates
If you are facing this issue after receiving a recent Windows Update recently, you can try uninstalling it in Safe Mode.
STEP 1 – Boot into Safe Mode
1. Switch off your computer.
2. Then, start your computer.
When you see that the computer is starting up, press-hold the power button for 5 secs to completely switch off your device.
3. Keep repeating this process of start-force shutdown-start 3 times and at 4th time let your computer start normally.
You will see the Automatic Repair window.
4. Then, click on “Advanced options“.

5. After that, you need to click on “Troubleshoot“.

6. Then, click on the “Advanced options“.

7. To access the “Startup Settings“, click on it.

8. Then, click on “Restart” to restart your computer in safe mode.

9. Some Startup settings options will be visible.
10. Press “5” to ‘Enable Safe Mode with Networking‘ access.

Your computer will be booted into Safe Mode with Networking access.
STEP 2 – Uninstall the recent update
Once you have booted into your system, uninstall the Windows Update that has caused this issue.
1. Press the Windows key+R.
2. After that, press “appwiz.cpl“. Click on “OK“.

3. Once the Program and Features window opens up, click on “View installed updates“.

4. Now, simply scroll down to find out the most recent update that may have caused the issue.
5. Right-click on it and click on “Uninstall“.

This will uninstall the update from your computer. Restart your computer.
This should fix the problem with your computer.
Fix 4 – Check Memory
Run a check to detect any memory issue on your computer.
1. At first, right-click on the Windows icon and then click on “Run“.
2. Type “mdsched.exe” and hit Enter.

3. Once the Windows Memory Diagnostics opens up, you have to click on the “Restart now and check for problems (recommended)“.
Otherwise,
If you want you can schedule this search. Click on the “Check for problems the next time I start my computer” option.

Your system will reboot. Windows will check for any fault in RAM in your computer.