Extensible Host Controller Interface (xHCI) clarifies the host controller interface for the Universal Serial Bus drivers of version 2.0 and above. But in some laptop computers, particularly some Dell or HP laptops, users are seeing an error message stating “This device is not working properly because Windows cannot load the drivers required for this device. (Code 31)“. If you are facing this issue on your computer, don’t worry. There are some easy fixes to fix the issue on your device.
Fix 1 – Uninstall USB xHCI driver
Uninstalling the USB xHCI driver should remove the corrupted xHCI driver.
Step 1 – Uninstall the xHCI driver
1. Press the Windows key+X.
2. Then, click on the “Device Manager“.

3. When the Device Manager opens up, expand the “Universal Serial Bus controllers“.
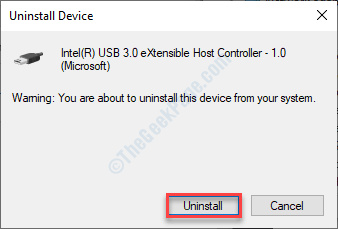
4. Right-click on the “Intel(R) USB 3.0 eXtensible Host controller” driver and click on “Uninstall device“.

5. Click on “Unisntall“.

This will uninstall the xHCI driver from your computer. Reboot your computer and check if this offers any solution.
STEP 2 – Install Intel Driver Support Assistant
You have to install the Intel Driver & Support assistant on your device.
1. At first, go to the Intel Driver & Support Assistant (Intel DSA).
2. After this, click on “Download now“.

3. Once it is downloaded, double click on the “Intel-Driver-and-Support-Assistant-Installer” to install it.

4. Check the option “I agree to the license terms and conditions“.
5. Click on “Install“.

Wait till this installation process finishes up. After that, open up the Intel Driver & Support Assitant on your device.
The latest version of the xHCI driver will be installed on your computer.
This should fix the issue on your computer.
Fix 2 – Change USB selective suspend settings
1. Press Windows key+R.
2. Copy-paste this line in the terminal. After that, click on “OK“.
control.exe powercfg.cpl,,3

5. In the Power Options window, check out for the “USB settings“.
6. After that, expand the “USB selective suspend setting“.

7. Click on the drop-down beside ‘Setting:’ and then select the “Disabled” settings from the drop-down.
[NOTE– If you are enacting this on a laptop device, you will notice two options, ‘On battery‘ and ‘Plugged in‘ settings.
You can easily “disable” both these options. ]

8. After all these steps, click on “Apply” and “OK“.

Close Power Options.
Restart your computer to save the changes on your computer.
Fix 3 – Modify Registry Editor
If the selective suspend method doesn’t work for you, try these steps.
1. Click on the search box and write “regedit“.
2. After that, press the ‘Enter‘ key from your keyboard.

Warning – Registry Editor is a very delicate location on your computer. Before going further modifying the registry, we request to make a backup of the registry on your computer.
After opening the Registry Editor, click on “File“. Then click on “Export” to make a new backup on your computer.

3. After taking the backup, go to this location-
Computer\HKEY_LOCAL_MACHINE\SYSTEM\CurrentControlSet\Services\USBXHCI
4. Right-click on the space and click on “New” and then click on “DWORD (32-bit) Value“.

5. Name the key as “DisableSelectiveSuspend“.
6. Double click on the key to modify it.

7. Set the value of the registry to “1“.
8. Then click on “OK“.

Close the Registry Editor.
Fix 4 – Check for Windows Update
Windows delivers critical updates for the drivers on your computer.
1. Press the Windows key+I.
2. Click on the “Update & Security“.

3. On the left-hand side, click on “Windows Update“.
4. Then, click on “Check for updates“*.

Windows will check for updates and install it on your computer.
*NOTE–
Sometimes, there are some driver updates for your system. Those are usually listed in the’ Optional update’ section. Follow these steps-
a. You need to click on “View optional updates” to view the list of drivers.

b. You will notice a list of drivers ready-to-be installed on your system. Check all the updates.
c. After that, click on “Download and install“.

d. Once the updates are downloaded and click on “Restart Now“.

This should fix the issue on your computer.