There are many features on your Windows 11 that come turned On. One of these annoying features is the Widgets box on the right-hand corner of the Taskbar. In the ideal scenario, you could just turn this feature off with two to three clicks of your mouse. But, sometimes you may not see the Widget box in Settings. If you go through these easy instructions to fix the Widget box.
Location of the Widget in Settings
In normal cases, you can easily find the widget box settings inside the Taskbar settings. This is the detailed path to it –
Settings > Personalization > Taskbar
We recommend you check this at least once before you proceed to the main solutions.
Fix 1 – Edit the registry
This is a direct method that you can use to tweak the registry on your computer to enable or disable Widgets. This may not be a direct solution to this issue, you can easily tweak it whenever you need.
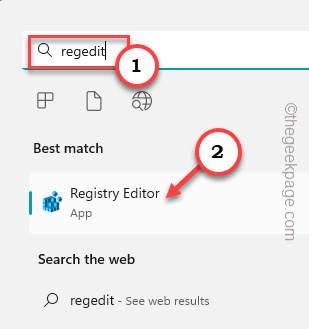
Step 1 – You can easily open the Registry Editor. To do that, type “regedit“.
Step 2 – When you see the “Registry Editor“, open it.
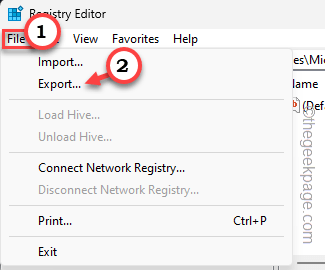
Warning – Before you jump to the main fix, you have to take a mandatory registry backup. If do anything wrong, this backup will save the day. These are the steps –
a. On the menu bar, just click “File“, and then, click “Export“.
b. Name this backup something and store it somewhere accessible.
Step 3 – Once you have created a registry backup, go to this point using the left-hand pane-
HKEY_CURRENT_USER\Software\Microsoft\Windows\CurrentVersion\Explorer\Advanced
Step 4 – You can locate several Taskbar-related registry keys. Locate the “TaskbarDa” value on the right side of the Registry Editor screen.
Step 5 – Just, double-click that modifier so that you can change the value.
Step 6 – Now, these are the conditions you can preset this modifier.
To hide - 0

To show - 1
Like, if you want to see the widget icon on your taskbar, you have to set the value to “1“.
Step 7 – So, according to your preference, set the value.
Step 8 – Finally when you are done, click “OK” to save this change.
Now, you might be wondering why the Widget is still appearing/not appearing on your taskbar. This is because you have to perform a system restart to enact this change.
After restarting the system, you will see/ won’t see the widget in the taskbar.
Fix 2 – Uninstall the Web Experience Pack
This problem is related to the recently installed Web Experience Pack. So, uninstalling it should help. We have explained two ways of uninstallation –
Way 1 – Using a terminal
You can easily uninstall the Web Experience package using a command from an elevated terminal.
Step 1 – You need to open a terminal with administrative rights. So, start to write “command” in the search bar.
Step 2 – After this, right-click the “Command Prompt” and then click “Run as administrator” which you will find in the context menu.
Step 3 – When the CMD terminal page opens up, copy-paste this uninstallation command into the terminal screen.
winget uninstall "Windows web experience pack"
Step 4 – Now, as soon as you hit Enter Windows will start the process of removal of the Web Experience package from your system.
Step 5 – When this question appears, press the “Y” key and hit Enter to assert it.
Do you agree to all the source agreements terms?
Patiently wait until Windows uninstalls the package completely.
Exit the Command Prompt screen. After exiting the terminal, make sure to restart the system.
Step 6 – As soon as the system restarts, open Settings and check whether you can locate the widget settings.
Settings > Personalization > Taskbar
Step 7 – Open the Run panel using the Win+R keys together.
Step 8 – Then, type this and use the Ctrl, Shift, and Enter keys together to directly open the terminal as the system administrator.
cmd
Step 9 – Finally, run this code to download and install the Web Experience package once more.
winget install 9MSSGKG348SP
Step 10 – Again, you have to assert this confirmation message using the “Y” key.
The publisher requires that you view the above information and accept the agreements before installing.
Windows will now download and install this feature on your system. You can directly track the progress in the CMD terminal.
Once it is installed, you will notice this message – “Successfully installed” on your screen.
Exit Command Prompt and then, restart the system.
Way 2 – Regular way
If your system doesn’t have the latest Web Experience Pack, you can directly get it from the Store.
Step 1 – Open this link in Google Chrome or any other browser. This will open up on a separate page.
Step 2 – Now, click the “Get in Store app” option.
Now, this should take you directly to the Store app.
Step 3 – But, if that doesn’t throw up a prompt, click “Open Microsoft Store“.
Step 4 – On the Store app, you will see Windows Web Experience Pack has opened up. So, click “Get” to get the app.
Now, the Web Experience app will be installed.
But you won’t notice any changes until you restart the system. So, reboot the machine once.
After that, go ahead and check whether you can find the Widgets option on the Settings page. This should have solved the issue.
Fix 3 – Sign in using the MS account
If you are using a local account to log in to the system and you haven’t activated it yet, you may face this bug. So, sign in to the system using an MS account.
Step 1 – Open Settings.
Step 2 – There you will find a section called “Accounts“. Go there.
Step 3 – Once are there, tap the first option called “Your info“.
Step 4 – Now, if you are using a local account, you will see this “Sign in with a Microsoft account instead” option. So, open that.
Now, sign in using your Microsoft account. If you don’t have one, you have to create one.
Fix 4 – Remove and install the display
Some users have also recommended uninstalling the display adapter and reinstalling the same has fixed this bug.
Step 1 – You can find the display adapter in the Device Manager.
Step 2 – Now, right-click the Win key and click “Device Manager“.
Step 3 – Now, just right-tap the display and click “Uninstall device“.
Step 4 – Click “Uninstall” to disable the display adapter.
After uninstalling the display adapter, exit Device Manager.
Then, restart your computer. When the system is restarted, the display adapter will be reinstalled.
After rebooting, check whether you can view the widget box in Settings.
Fix 5 – Install all the pending updates
Sometimes a single build may contain this bug. So, updating the system to the latest edition should get back the widget in Settings.
Step 1 – You can click the search bar and type “windows update“.
Step 2 – Look for “Check for updates” in the search results.
Step 3 – Now, on the right-hand pane, tap “Check for updates“.
If there are any updates pending for your Windows 11 device, it will get installed shortly. So, you have to wait.
Step 4 – Final step of this update process involves a system restart. Once the installation process, click “Reboot now“.
After updating the system, you won’t face this issue again.


