Are you seeing that WUDF.exe is eating up an enormous amount of processing power of your system? If it is, then the problem is associated with the Windows Driver Foundation (formerly known as Windows Driver Framework). At first, try out these workarounds to fix the issue with minimum steps. Otherwise, if the problem continues to bother you, go for those fixes.
Initial Workarounds-
1. Unplug any unnecessary peripherals (like- USB devices, external HDD, ) from your system. Then, check the status of the problem.
2. Check if there are any updates pending for your device.
Fix-1 Run System Maintenance troubleshooter-
System Maintenance can solve the issue if the problem is caused by unused files and shortcuts.
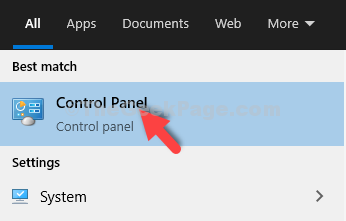
1. Search “Control Panel“.
2. You have to click on the “Control Panel“.

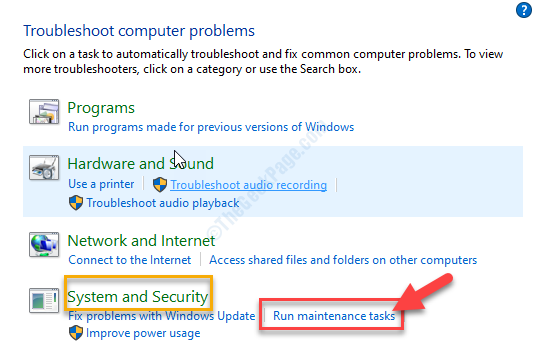
3. Here you need to click on “Troubleshooting“.

4. Then you need to access the “Run maintenance tasks“.

5. When the System Maintenance window appears, click on “Next“.

6. After that, you need to click on “Try troubleshooting as an administrator” to continue with the process.

7. Click on “Close the troubleshooter“.

Open and Task Manager and check out if the WDUF has stopped consuming a huge amount of CPU power.
Fix- 2 Re-install network adapter
According to some users, they have solved the issue simply by uninstalling the network adapter driver and re-installing it.
1. Press Windows key+S and then type the “Network Connections“.
2. After that, click on “View network connections“.

3. Simply note down the network adapter driver you are using.

4. Open Run window.
5. Next, type “devmgmt.msc” and click on “OK“.

6. Then, expand the “Network adapters” section.
7. In order to uninstall the adapter, right-click on the problematic adapter and then click on the “Uninstall device“.

Now, the network adapter driver will be uninstalled from your system.
Now, we will re-install the same network adapter on your device. Follow these easy methods-
Method 1–
Restart your system. After your computer boots up, the network driver will be re-installed.
Method 2–
If you can’t see the driver on your computer even after restarting your system, you can scan for the driver to reinstall it-
1. Press Windows key+X together and then click on “Device Manager“.

2. Once the Device Manager appears on your screen, click on “Action“.
3. After that, click on “Scan for hardware changes“.

Your problem will be fixed for sure.