Every CPU, especially the older, less powerful ones doesn’t have the ability to virtualize. Even in all the latest CPUs, from both Intel and AMD, the Virtualization feature is disabled by default. If you try to create and run a virtual machine on an unsupported system, it will show you this “VT-X/AMD-V Hardware Acceleration is Not Available on Your System” error message. In that case, follow the steps of this article to fix the issue.
Fix 1 – Check whether your system supports Virtualization
All the modern, decent CPUs support the hardware-based Virtualization feature. How to check whether your system supports that? Follow these steps.
1. There are many official tools but those may differ from one CPU vendor to another. So, download the Securable.
2. This is a portable tool, so no need to install it.
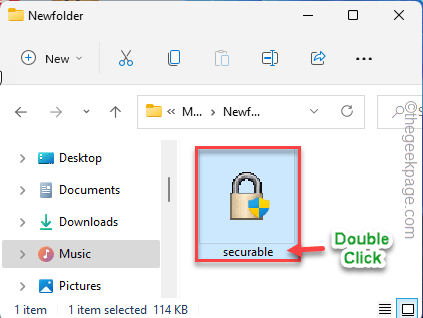
3. Once it is downloaded, just double-click on the “securable” tool to run it on the system.
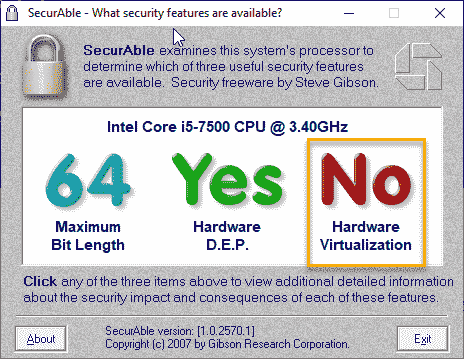
4. It will show you the current Maximum Bit Length, Hardware D.E.P., and Hardware Virtualization state.
5. Check what the status of ‘Hardware Virtualization’ is showing on your system.
If it is “Yes“, then Hardware Virtualization is supported by your system and there is a chance that this feature is disabled. Follow the steps of Fix 2 to manually activate the Virtualization feature.
But, if it shows “No“, you can’t enable hardware-based virtualization. So, your machine may not run virtual machines.
NOTE –
If your system is using an Intel processor, you can run the Intel Processor Identification Utility. Here, in the ‘CPU TECHNOLOGIES section, check whether the CPU has the Intel Virtualization Technology or not.
Fix 2 – Enable Virtualization manually
You have to enable Virtualization from the BIOS page.
Step 1
1. You have to right-tap the Windows icon and tap the “Shut down or sign out>“.
2. Then, click on the “Restart” option to restart the system.
3. Once the screen goes black, and the machine is restarting, just press and hold the “Delete” key on your keyboard to access the BIOS settings.
NOTE –
One thing to remember is that this Boot key may not be the same on your device. It varies from manufacturer to manufacturer.
Keep your eyes open for the actual button to access BIOS while your computer boots up.

3. When you reach the BIOS window opens up, go to the “Advanced” tab*.
4. Following that, use the arrows on your keyboard to go to the “Virtualization” from the list and set it to “Enabled“.
[
*NOTE –
On some machines, you may not find the ‘Virtualization’ option in the ‘Advanced’ tab. Look for it in the “Performance” tab.
]

5. Once this is done, press the Save key to save the changes.
[It is the “F10” key for this computer.]

6. After that, select “Yes” to finally save and exit the bios settings on your computer.

Your computer will start up normally.
IF YOUR SYSTEM IS RUNNING ON AMD CPUs –
1. Go to the BIOS settings.
2. Here, navigate to the “M.I.T” section.
3. Here you find the “Advanced Frequency Settings” option.
4. In this section, tap the “Advanced Core settings“.
5. Here you will see the ‘SVM Mode’ on your screen. SVM Mode is the Secure Virtual Machine mode.
6. Set it to “Enable” to switch it ON.
7. Now, just finally, save and exit the BIOS.
After doing this, let your computer start up normally.
Step 2
Now, you can check whether virtualization is enabled on your system or not.
1. At first, right-click on the Windows icon and tap on the “Task Manager“.

2. After that, visit the second tab which is the “Performance” tab.
3. Here, click on the “CPU“. You will find information on the current status of your system CPU.
4. Now, what matters to you is the state of the “Virtualization” setting. Check whether it is showing “Enabled“.
If it is showing ‘Enabled’, go ahead and retry running the virtual machine once more. It will work just fine.
Fix 2 – Enable the PAE/NX
Enabling the Physical Address Extension (PAE) feature on supported systems should work.
[FOR VMWARE USERS]
1. At first, launch the VirtualBox Manager or VMWARE on your system.
2. Then, right-click on the virtual machine and tap “Settings” to access it.
3. Now, just go to the “System” tab.
4. After that, ‘Extended Features:’ settings, check the “Enable PAE/NX” box.
5. Then, click “OK“.
After that, run the virtual machine and test.
Fix 3 – Disable Hyper-V
Hyper-V is Windows’ proprietary virtual machine software, that may reserve the virtualization for its own.
1. You can find the Hyper-V settings on the Windows Features page.
2. So, press the Windows key and the R keys together.
3. Then, type “optionalfeatures” and click on “OK” to open the Windows Features window.

4. When the Windows Features opens up, scroll down to “Hyper-V“.
5. Just uncheck the box beside “Hyper-V“. Then, tap on “OK” to disable the Hyper-V features.
Now, as soon as you have clicked on the ‘OK’ button, Windows will start to uninstall the Hypervisor feature from your system.
6. Within a few minutes the process will be complete. After this, tap on “Close” to close the window.

You should restart your device after doing this to completely uninstall Hypervisor.
Once the device properly boots up, launch the virtual machine. It should start up and perform normally.
Fix 4 – Clean up the HDD space
Virtual machines do need a hard disk drive and need free space to work properly.
1. At first, press the Win key+R keys at once.
2. Just put this line and hit Enter to open the Disk Cleanup.
cleanmgr
3. When the Disk Cleanup appears, select the “C:” drive and tap “OK“.
4. Next, just tick all the boxes and tap “OK” to start the cleaning operation.
Once it is done, try launching the virtual machine. Check if this works for you.
Fix 5 – Check whether the VM has enough RAM
Virtual machines do require a substantial amount of RAM, not only to run but also to work smoothly. Usually, the host machine should have at least 8 GB of RAM. The more system memory your system has, it will be useful to work properly. Hope this helps you resolve the issue.


