Are you a frequent Word user who uses some specific functionalities, available under some specific tabs, every single time? Are you finding it difficult to keep switching tabs in between your tasks to find the functionality you need? Have you been wishing for a long time that you could put all your favorite functionalities under one custom tab so that you can just keep this tab open and get all your tasks done, super quick and easy? Have you been nodding your head to all my questions? If so, this article is just for you!
In this article, we tell you how you can easily create a customized tab in your Word ribbon. You can give any name of your choice to this new tab. Also, you can create as many groups as you want in your custom tab and organize all your favorite functionalities under them perfectly. So what are you waiting for? Let’s dive straight into the article and discover this super amazing Word hack!
Section 1: How to Create a Custom Tab in the Top Ribbon
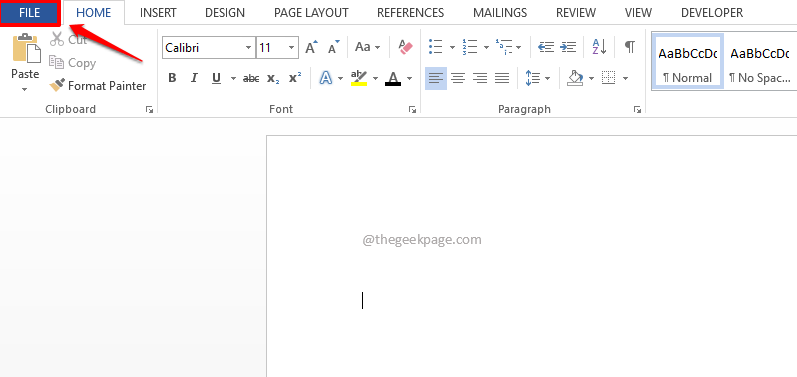
Step 1: Firstly, open any Word document, even a blank document works, and then click on the FILE tab at the top ribbon.
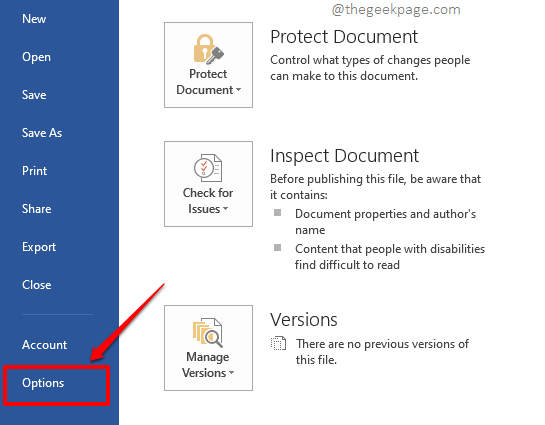
Step 2: Under FILE options, on the left window pane, click on the Options tab.
Step 3: When the Word Options window launches, click on the tab Customize Ribbon on the left pane of the window.
On the right pane, you will be able to view all the native tabs currently available in your Word. This is marked in green in the screenshot below.
Step 4: To create a new tab, you need to click on the button New Tab under the Customize the Ribbon section.
Step 5: Now, click on the newly created tab New Tab (Custom), and then click on the Rename button to give it a name.
Step 6: On the Rename window, give a name of your choice. I have named my new tab as Geek Page Tab. You can give any name.
Step 7: As next, we are going to create groups under the newly created tab. Before we go ahead, let’s see what groups are.
In the screenshot below, FILE, HOME, INSERT, DESIGN, PAGE LAYOUT, REFERENCES, MAILINGS, REVIEW, VIEW, and DEVELOPER are tabs. It is to this set of tabs that we are going to add our custom tab.
Now, if you click on any of the tabs, you will be able to see that the functionalities available under them are neatly sectioned. These sections are called Groups.
Now that we have a clear picture of what tabs and groups are, let’s go ahead and organize a group under our custom tab. For that, click on the already created group, New Group (Custom), under the custom tab.
As next, click on the Rename button as shown below.
Step 8: You can give any name to your group. I have given the name Geek Page Group 1. Once you are done, hit the Enter key or press the OK button.
Step 9: You can now see that the new group is named perfectly.
Let’s go ahead and create one more group. For that, click on the Custom tab and click on the button New Group.
Step 10: Just like before, let’s give it a name first. For that, click on the newly created group and click on the Rename button.
Step 11: Give any name to your new group, we have named it Geek Page Group 2. Hit the OK button to proceed.
Your custom groups are now all set.
Step 12: You can also decide where you want your custom tab to be positioned by using the UP and DOWN arrows as shown in the screenshot below.
For example, if you want your custom tab to be positioned at the end of all the native tabs, then you need to click on your custom tab first and then keep clicking on the DOWN arrow till it reaches where you want it to reach.
Step 13: Now let’s add the commands that you want to add to your Custom tab.
To add a command/functionality, firstly click on the custom group under your custom tab to which you want the functionality to be added. In the example below, I’m adding my functionality to the custom group Geek Page Group 1 (Custom). So I have selected it by clicking on it.
As next, using the dropdown, you can filter the commands. I have chosen the option Popular Commands, this is the default filter as well.
Now, from the options available under it, click on the one that you want to be added to your custom group. I have clicked on the option Cut.
Finally, click on the Add button.
Step 14: If you look at your custom tab, you can see that the functionality you selected is now successfully added under your custom group.
Step 15: Likewise, you can add as many functionalities under your custom groups. The following screenshot shows the functionalities I have added under both my groups.
Once you are all set, hit the OK button at the bottom to close the window.
Step 16: Viola! Now you can see that your custom tab Geek Page Tab is added and that it has 2 groups under it, all organized and easy to access!
Note: You can add as many tabs and groups as you want following the same steps.
Section 2: How to Delete the Custom Tab You Created
If you would like to delete your custom tab or groups, you can very well do so by following the steps below.
Step 1: Click on the FILE tab at the top ribbon.
Step 2: Now, under FILE options, click on the tab named Options.
Step 3: On the left window pane, just like in the section above, click on the tab named Customize Ribbon.
On the right window pane, if you want to delete just the group, then right click on the group you want to delete and hit the Remove button.
Step 4: Your group is now gone. If you want to delete the whole tab, then similarly, right click on the custom tab you want to delete and then hit the Remove button.
Step 5: That’s it. It’s all back to normal, your tab is gone.
Hit the OK button to close the window and go back to your Word document. You will see that the custom tab is no longer present in your Word ribbon.
Section 3: How to Temporarily Enable/Disable the Custom Tab You Created
Let’s say you want to create the tab and keep it, but you don’t want other users who use your Microsoft Word to find out about this, or let’s say you want to enable different custom tabs when you work on different documents. So, is there a way how you can temporarily disable the custom tab along with its custom groups and enable it later when you need it? Follow the steps below if you are dying to find this out!
Just like in the previous section, click on the FILE tab and then click on the Options tab. As next, get to the Customize the Ribbon window.
Now, check the checkbox corresponding to your custom tab to enable it and uncheck the checkbox to disable it. simply hit the OK button for your changes to take over.
So, now you can easily toggle off and toggle on your custom tabs, as and when you prefer. Enjoy!
Were you able to successfully create a custom tab and group all your favorite functionalities under it? Tell us about it, we are all ears!
Please stay tuned for more wonderful technical tips, tricks, hacks, and how-to articles.


