Error messages in Microsoft Outlook is nothing new. In one of such instance, there are reports of witnessing the “Out of memory or system resources” message while using Outlook for office work. This can disrupt the normal operation in MS Outlook, negatively impacting the user’s productivity. So, we have presented this curated list of solutions that should help overcome this limitation in MS Outlook.
Fix 1 – Lower the memory cache size
You should reduce the memory cache size of the Outlook data files on your system.
[NOTE – This method includes steps to be performed in the Registry Editor. As the system registry is a delicate component, you should create a registry backup before proceeding. ]
Step 1 – Hit the Win+S buttons together.
Step 2 – When this brings up the search box, type “regedit“.
Step 3 – Next, tap to open the “Registry Editor“.
Step 4 – Go to this address in your Registry Editor –
HKEY_CURRENT_USER\Software\Microsoft\Office.0\Outlook\PST
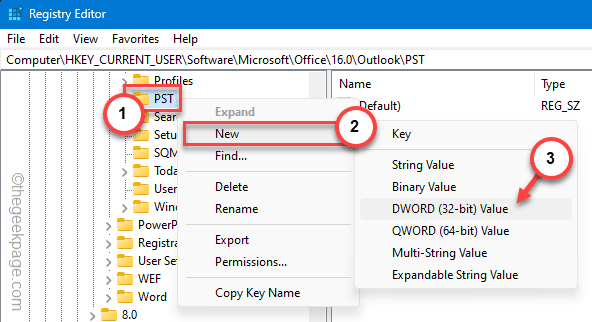
Step 5 – Select the “PST” folder on the left pane. Next, right-click that and tap “New>” and select the “DWORD (32-bit) Value” to open that up.
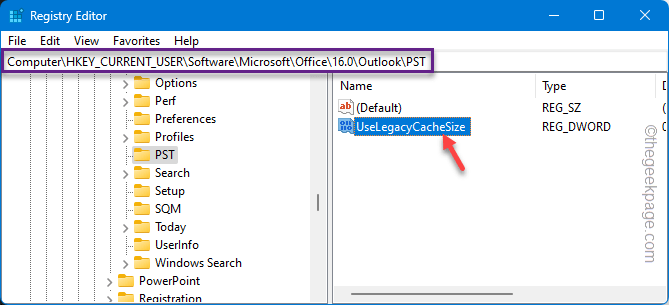
Step 6 – A new DWORD 32-bit value will be created. Rename this to “UseLegacyCacheSize“.
Step 7 – Now, you have to double-tap this value to modify this.
Step 8 – Input “1” in the blank ‘Value data:‘ box, there. Afterward, tap “OK” to save this.
After completing these steps, you must exit the Registry Editor page and restart your computer.
After the device restarts, re-open Outlook and check it out.
Fix 2 – Terminate resource-heavy applications
This message only shows up when Outlook doesn’t have enough resources (CPU, RAM power) to function properly.
Step 1 – To terminate background applications, quickly hold down the Win+X buttons from your keyboard.
Step 2 – Next, choose to open the “Task Manager“.
Step 3 – When the Task Manager utility box shows up, try to find the applications that have higher CPU, RAM, or Disk consumption rates.
Step 4 – Right-click any such application (except Outlook) and tap “End task” to kill that.
This way, close all the background applications that are taking hold of a maximum of the power resources.
Now, get back to the Outlook page. Close and relaunch the application, if needed.
Fix 3 – Enlarge the memory heap size
If lowering the cache size doesn’t help, follow these steps to increase the heap size of the memory and see if this helps.
Step 1 – Just tap the Windows icon once. Next, type “regedit“.
Step 2 – Next, click to open the “Registry Editor“.
Step 3 – Paste this registry address in the address bar and hit Enter.
HKEY_LOCAL_MACHINE\SOFTWARE\Microsoft\Windows Messaging Subsystem
Step 4 – Just, right-tap the “Windows Messaging Subsystem” from the left pane and choose “New>“. Later, click on the “DWORD (32-bit) Value” to create the value.
Step 5 – Next, you have to name this value to “SharedMemMaxSize“.
Step 6 – You have to modify this value. So, double-tap this.
Step 7 – Set the value to “300000“.
Step 8 – Click “OK“.
Step 9 – Now, right-click that “Windows Messaging Subsystem” key one more time and click “New>” and “Key” to create a new key.
Step 10 – This time, name this “Applications“.
Step 11 – Make sure to select this. Now, right-tap the “Applications” key and choose “New>” and “Key“, to create a new sub-key.
Step 12 – Name this new key “Outlook“.
Step 13 – After this, right-tap the “Outlook” key, click “New” and then, click the “DWORD (32-bit) Value“.
Step 14 – After creating this value, name it “SharedMemMaxSize“.
Step 15 – Later, just right-tap that value and click “Modify” to alter that.
Step 14 – Finally, put this in the blank box and hit the Enter key.
300000
This registry edit requires a system restart for this change to work.
After increasing the memory heap size, Outlook won’t be restricted to the lack of system resources.
Fix 4 – Repair the Outlook inbox
There is a dedicated Outlook inbox repair tool and you should use to test and repair any inbox-related issues.
Step 1 – Use the Win+E buttons together and bring up the File Explorer.
Step 2 – Later, reach this spot –
C:\Program Files\Microsoft Office\root\Office16
Or,
C:\Program Files (x86)\Microsoft Office\root\Office16
Step 3 – Either use the search box on the top-right corner or just scroll down to the “SCANPST.EXE” file.
Step 4 – Next, double-tap the utility to run it.
Step 5 – In the Microsoft Outlook Inbox Repair Toolbox window, tap “Start” to initiate the utility.
Step 6 – When the scanning process is complete, check the “Make backup of scanned file before repairing” box.
Step 7 – Hit the “Repair” button to start the repair operation.
When this repair process is finished, start the MS Outlook application and check it out yourself.
Fix 4 – Delete the unwanted .pst file
Every email account in your Microsoft Outlook has a separate data file associated with it. These huge, unwanted Outlook Data Files can hang Outlook.
Step 1 – To do this, start searching for “control“.
Step 2 – Open the “Control Panel” from there.
Step 3 – Adjust the ‘View by:’ to “Small icons” from the drop-down menu.
Step 4 – Now, click to open “Mail (Microsoft Outlook)” to open it up.
Step 5 – After this, tap “Data files…” to open that.
Step 6 – Now, you will get a comprehensive view of all the data files listed there.
Step 7 – You can distinguish the data files from their name. Select the data file there and tap “Remove” to remove the data file.
Step 8 – Ignore the next warning message and click “Yes” to confirm the removal of the data file.
Close the Mail Setup page. Start the Outlook and use the primary mail ID/profile to log into it.
This way, you won’t get any error messages in Outlook again.
Fix 5 – Take the help of an Office repair tool
The Office repair tools are designed to troubleshoot these problems. So, run it on your system.
Step 1 – Type “appwiz.cpl” after opening the search box and hit Enter.
Step 2 – Wait for the Programs and Features to open up.
Step 3 – Next, select the Microsoft Office application (or, select the Office standalone package). Next, right-tap and click “Change“.
Step 4 – Run the “Quick repair” operation from here.
Don’t do anything till you see this message –
Done Repairing!
After this, close all the other instances and then, open the MS Outlook app and send a demo e-mail.
Additional Tip –
Are you managing multiple major accounts from Outlook on an older, low-spec PC/laptop? An upgrade of the system memory (RAM) on your computer should help you manage the MS Outlook utility without any such errors.


