Vmmem or the Virtual Memory can cause High CPU or memory usage due to various factors. One of the key reasons behind this issue is some resource-intensive processes running in the virtual host. But, if that isn’t the case and VM is still eating up a lot of your system resources in idle mode, it can be a case of a faulty driver. This will slow down the virtual machine and your work can get stalled. So, follow these steps to fix the problem quickly.
Fix 1 – End all the resource-intensive processes
If you are running some heavy applications or a software build, expect vmmem using high resources. There is no abnormality in that. Even you can directly kill these processes to free up more resources for your device.
NOTE – You can end these processes in many ways. These steps may vary from one host OS to another. We have shown the steps in Windows OS.
1. Open the Virtual Machine.
2. There, right-click on the Windows icon and tap “Task Manager” to open it.
3. When the Task Manager shows up, go to the Processes tab.
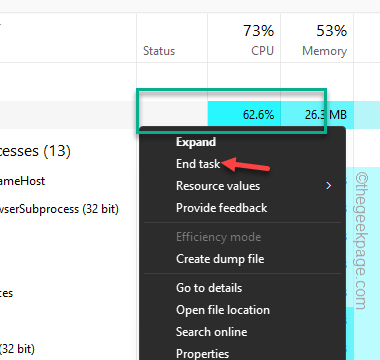
4. There, look for any processes that are eating up more than 70% of CPU usage. If you can identify any such process, right-tap it and tap “End task“.
This way, kill any unnecessary process that is consuming power and resources in the background. This will free up more resources and vmmem will not have high CPU or RAM usage.
Fix 2 – Restart the WSL
Try restarting the Windows Subsystem Linux (WSL) on your computer.
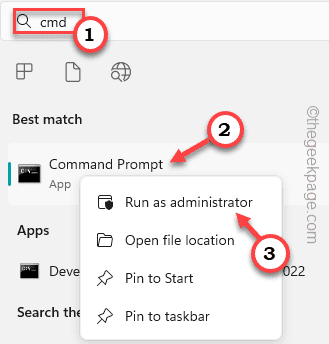
1. Open a search bar and type “cmd“.
2. Then, right-tap “Command Prompt” and click “Run as administrator“.
3. Once you have opened up the CMD terminal, you can easily copy-paste this code and hit Enter to
wsl --shutdown
This should shut down the Windows Subsystem Linux on your computer. Automatically, the virtual machine will shut down.
If this doesn’t work, you can do these steps –
1. Open File Explorer.
2. Then, you have to head on to the WSL configuration file. You can find it at this address –
C:\Users\your-username\.wslconfig
3. This configuration file will open up in Notepad.
4. So, when it does, copy-paste this line into the configuration file.
[wsl2]
guiApplications=false
5. Next, just click “File” and “Save” to save the configuration file immediately.
After this, just close the .wslconfig file.
Then, you have to reboot the system. Rebooting the system kills the vmmem process completely.
NOTE –
You have stopped the vmmem process and shut down the Windows Subsystem for Linux (WSL). So, you can’t run any Linux-based GUI apps. To do that you have to restart the WSL service, you can do the following these easy steps –
1. Click on the “Search” box and type “powershell“.
2. Then, right-click on the “Windows PowerShell” and tap “Run as administrator” to open the PowerShell as an administrator.
3. Now, just write this line and hit Enter to restart the WSL service.
Restart-Service LxssManager
After this, close the PowerShell terminal. Now, you can use the Linux GUI apps again.
Fix 3 – Disable the running VM
If ending the processes or shutting down the VM doesn’t work, you can try to kill the virtual machine which is already running on your system.
1. You can do this via PowerShell with admin rights. So, write “powershell“.
2. Then, right-click “Windows PowerShell” and tap “Run as administrator“.
3. When the PowerShell terminal opens up, write this exact line there and hit Enter.
This command will show you the list of virtual machines with their current status.
wsl -l -v
4. Finally, you can put a stop to the running virtual machine, using this particular code –
wsl -t nameofvm
[Now, replace the “nameofvm” with the name of the virtual machine that is running on your system. Suppose, you have Kali Linux, the command is like this –
wsl -t kali-linux
]
After terminating the Linux machine, vmmem won’t eat that much CPU or RAM processing power.
Fix 4 – Increase the allotted resources
The host resources you have allocated to the virtual machine may be falling short of supply based on what you are doing on it. So, if you are running something or testing a build that is resource-hungry, vmmem will consume a high amount of CPU and RAM.
Hyper-V users
1. Open the Hyper-V Manager.
2. There, right-click your virtual machine in the list and tap “Settings“.
3. On the Settings page, you can find serval options related to “Memory“, “Processor“.
4. Now, you can increase the memory and processor count for the virtual machine.
If the virtual machine is already running on your system, you have to restart it to let this change take effect.
VMWare Workstation users
1. Open VMware Workstation.
2. Then, on the left-hand pane, you can find the all the virtual machines stacked as a column.
3. Next, right-click the virtual machine and click “Settings“.
4. Now, head on to the “Hardware” section.
5. There, you can see the allocated “Memory” and “Processors“.
Tweak these settings according to your need and resource limitations.
You have to switch off the virtual machine once and restart it.
This way, vmmem will consume less resources.
Additional Points –
There are certain points that you should be careful about.
1. Check whether any process that is bleeding resources. That way, all the resources are getting wasted So, so test it from the process manager.
2. Malwares and potentially harmful infections can cause over usage of resources. So, run a full malware scan to identify and get read the malware file.
3. Hardware issues can also be the cause of the problem. So, if you are using some very old components, get rid of these.


